
-

SUBSCRIBE TO SHIPS IN SCALE TODAY!
The beloved Ships in Scale Magazine is back and charting a new course for 2026!
Discover new skills, new techniques, and new inspirations in every issue.
NOTE THAT OUR NEXT ISSUE WILL BE July/August 2026 -

Win a Free Custom Engraved Brass Coin!!!
As a way to introduce our brass coins to the community, we will raffle off a free coin during the month of August. Follow link ABOVE for instructions for entering.
You are using an out of date browser. It may not display this or other websites correctly.
You should upgrade or use an alternative browser.
You should upgrade or use an alternative browser.
Bluenose by Scientific
- Thread starter Fright
- Start date
- Watchers 13
-
- Tags
- bluenose scientific


Fright. I am working on a Bluenose 2. I have all the rigging plans, do you want details?
 man - that is a very kind offer but at the moment, I have two printers and both are down! I'm like a Cro-magnon when it comes to computers. Would this be sent in a pdf form or would it come to my email address? I'd be interested if it is an easy process for you. After I finish with this main sail, my next project will be my topsails. This being my 1st build and my lack of knowledge in skills and plans, I've been going along as best that I can. I know that I am off with complete accuracy on this kit but I am really enjoying this learning process so far.
The kit came with these terrible metal blocks to be used on the rigging, so I've been using 2-3mm single blocks only for this build. I've also made some 'primitive' hooks when needed out of annealed wire. Working on the hull and it's structure and fittings felt comfortable for me but, when it comes to the rigging, this part of the build is very challenging for a newbie like myself! LOL I'd love to take a look at your plan but, again, only if it is an easy process for you to share this.
I want to say thanks to so many people, like yourself, who have taken the time to watch what I have been doing and who have also provided me encouragement, tips and ideas along the way which have helped me get to where I am today. A big "SHOUT OUT" to all of you.
")
Last edited:
It will be a PDF file 13 meg. Do you have an e-mail address?
It will be a PDF file 13 meg. Do you have an e-mail address?
man - many, many thanks for taking the time to help me along my way!!!! Use frightnukem@aol.com ")
Update on what I've accomplished over the last few days with the main mast. Main boom, sail and gaff fixed into place. I worked on getting the main peak halliard lines attached to gaff and main mast. I also now have the flying backstays attached to deck and belayed to rail. Boom crutch tackle is attached as well. A big "SHOUT OUT" to man, who was very kind, to send me detailed plans of the Bluenose to help me along!!! So my next project will be to work on the main boom topping lift and quarter lift lines.


man, who was very kind, to send me detailed plans of the Bluenose to help me along!!! So my next project will be to work on the main boom topping lift and quarter lift lines. So after looking at a few more pictures, I had to do a little trimming on the mainsail to accommodate the line and tackle for the main boom topping line. I did not have two drilled holes through the end of the boom and I did not want to tempt fate in trying at this stage in the game. I was afraid I would either break the boom from it's placement or slacken up the lines. I used one of the metal blocks (came with ship) and attached to ring on boom end. I added another small ring into the boom and then connected the line(s) that would run to main mast. With that done, I will now start try to finish up the bow of the schooner. I'm pretty happy with the way this schooner is shaping up!


Last edited:
I spent some time last night and today working on the bow of schooner. I attached my balloon jib sail and jib sail to the bow of ship and connected up the halliards from foremast to sails. I went to apply one of the water-based decals but it broke up into 5 pieces, due to it's old age. Someone suggested I use clear lacquer spray as I have no hobby shops in my area to see about purchasing Microscale Decal Film liquid. I still need to install the old Canadian flag and make up quite a few rope coils for deck and belaying pins. I noticed I've loosened up one of the standard lines between the fore mast and main mast - must tighten. (note to self)


The appearance of the model with the sails is realy good - great work
Well, new post. The clear lacquer that I sprayed over the old decals did not help in keeping the decals to hold together. I tried one of my bow decals and it broke apart into pieces when it hit the water. I'm purchasing a new printer that will allow me to make my own decals and iron on patterns when needed.
My wife made me my port and starboard lights out of Sculpey and styrene. I drilled holes through the ends of the styrene and ran black line through them. I then lashed each light into place on the foremast's rigging. I'm now making rope coils for the deck and coils for the belaying pins. Having some issues getting decent looking belaying pin coils.

My wife made me my port and starboard lights out of Sculpey and styrene. I drilled holes through the ends of the styrene and ran black line through them. I then lashed each light into place on the foremast's rigging. I'm now making rope coils for the deck and coils for the belaying pins. Having some issues getting decent looking belaying pin coils.
Attachments
Here is a close up photo of the foremast area of deck. I have no trouble with rope coils for the deck but I've had some difficulty when it comes to the coils for belaying pins. They are improving with practice and this little jig that I made from a balsa wood block, finishing nails and straight pins have improved their looks.


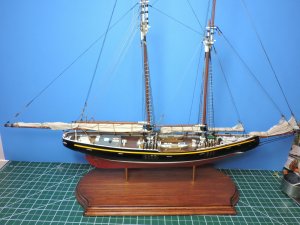
I believe I have come to the end with this build. I'm waiting for my new printer so I can create an iron-on transfer for my Canadian flag that will attach to the lines on the main mast. This inexpensive kit by Scientific has taught me some valuable skills and knowledge along the way and I'm very happy with the way she has turned out. Yes, there are some inaccuracies with my rigging that I have become aware of, but I'm still very grateful I chose this schooner as my first wooden kit. I want to thank everyone who have followed along on my progress, and have provided me with help, tips, suggestions to get me to this point. Cheers and thank you all!!!


Congratulation,very nice nice job Robert,if you feel like you can upload the finished model images in the Media gallery.
Congratulations for this built.....it was a pleasure to follow your log......

Awesome Build I love that you got your Grandson involved. I have all of the Scientific kits I have been collecting them for years. My Grandson saw them stacked on a table in the Basement and said Pop can we build those. since I'm not in the habit of telling him No much, we will start building those kits. They will be a perfect starting point for him
Awesome Build I love that you got your Grandson involved. I have all of the Scientific kits I have been collecting them for years. My Grandson saw them stacked on a table in the Basement and said Pop can we build those. since I'm not in the habit of telling him No much, we will start building those kits. They will be a perfect starting point for him
Epicdoom - Many thanks for your comment! I so enjoyed working on this 'old' kit by Scientific that I purchased the HMS Bounty by Scientific for a future build. These kits by Scientific are little 'gems' and I hope you and your grandson will have some great adventures (and memories) with one of your kits. I'm currently working on Trumpeters Nantucket lightship before I tackle my next wooden kit, Model Shipways HMS Bounty Launch. Thanks again and cheers!!!
I am currently working on the Constructo Mayflower and AL Santa Maria. I like to work on multiple ships as it keeps things fresh for me. My Grandson and I will be starting the Schooner Yacht Atlantic its a small vessel perfect to get him started on. I have 2 of those so I plan on letting him do most of the work with guidance towards doing a good job.Epicdoom - Many thanks for your comment! I so enjoyed working on this 'old' kit by Scientific that I purchased the HMS Bounty by Scientific for a future build. These kits by Scientific are little 'gems' and I hope you and your grandson will have some great adventures (and memories) with one of your kits. I'm currently working on Trumpeters Nantucket lightship before I tackle my next wooden kit, Model Shipways HMS Bounty Launch. Thanks again and cheers!!!
 man - For my 1st ship, I was pretty intimidated in trying to fabricate full sails but I did not want to exclude the appearance of showing her with sails. In doing a lot of researching furled sails, I came across this link that really helped me along with my furled sails. This gentleman really hits the mark with his work! Good read!!!
 https://modelshipworld.com/index.php?/topic/3944-landlubber-mikes-technique-for-furled-sails/
A great looking ship Robert and I've enjoyed watching you build her,
Cheers Andy
Cheers Andy