
- Joined
- Sep 23, 2021
- Messages
- 137
- Points
- 113

This is my third build of a kit ship and my first build log. Apologies in advance if it is not what people like to see or read. I will try to briefly summarise progress and high-light issues that I have come up against and hopefully, that may prompt some helpful hints from the more experienced crew members.
I decided this was an appropriate build as it is the 100th Anniversary Year of the original Bluenose. I was hoping to buy the Model Shipways version (which most people review highly), but there was no stock in the UK at the time. Instead, I bought the 1:75 Artesania-Latina Bluenose II kit, 22453. I made a start back in February but, as I progressed the build, I was really disappointed with the model. The quality of the fittings is bad, there are many issues with the laser cut parts, no 1:1 drawings or rigging plans and the instructions leave much to be desired. But I started, so I’ll finish! After battling with the first planking, I decided that the best thing to do was to use the kit as a learning exercise and rework it into something a bit better. Fortunately, there is plenty of information on the internet that has helped me to progress the build. Hopefully, at the end, I will have something that I will be happy to put on display.
As a quick run down of the build so far:-
Feb. 2021 -
1. Getting started:-

2. Setting the bulk heads and laying out the decking.
I glued the deck pieces to some wax free tracing paper using the false decks as a template and then marked up the planking with pencil lines (I missed that the planks should be nibbed in - next time).

3. First planking - a lot of issues! Supplied strips were 50mm too short for the longest part of the hull ( I used some spares from my previous build). The keel pieces did not follow the false keel line and had big gaps. I had to make new bow parts rather than try to correct the kit parts. It was a real struggle to stop the upper hull ply pieces from warping (if the bulk heads had had stanchions it would have been much easier to continue the strip planking to form the gunwales).

March 2021.
4. I found this picture of the hull in the Lunenburg shipyard during its restoration, 2010-2012. It has such a wonderful profile that I immediately decided to ditch the A-L instructions and try to get the model looking like it should.

5. Tidied up the hull as best I could. I am painting the hull to match the actual ship, so I did not bother with the 2nd planking. Skimmed with filler and touched up with stopper paste to flatten minor imperfections. Added the prop tubes and cut the scuppers.

6. Primed ready for painting (all my sins covered up).

7. Hull in paint. I used generic acrylic car paint-spray cans. Upper hull is semi-gloss/satin black. Lower hull is red-oxide. I did mask in the yellow pin stripe that is on the upper hull, but I accidentally damaged the soft paint work and I had to go over with the black again and could not save it. I will add it back at the next stage.

April 2021
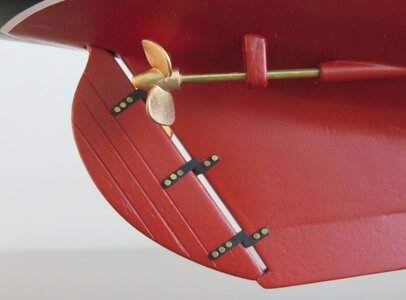
8. Fitted the bowsprit, false stanchions, decks, rails, rudder, props, deadeye-loops and straps, decorative etched parts and repainted in the yellow stripe.
The brass dead eye loops supplied were too small for the fittings so I made a complete set from 0.7mm Ni/Cr wire. Very tricky to mount them on the hull without damaging the paint work. The deadeyes were dyed ebony as used on the ship. The kit rail stanchions did not look right, so I replaced them with 10mm ones from Caldercraft - much better. The props look out of scale, but I went with what I have.
Painted in the yellow pinstripe again. This was a task I do not want to repeat again any time soon! The pinstripe is 0.5mm wide, so the only way I could do it was to use 0.5mm fine-line masking tape to define where the lines run, butt up two strips of 3mm tape either side of that to give me enough width to then put a strip of 10mm tape on top of that to which I could then attach some masking paper to mask off the rest of the hull. I could then remove the 0.5mm tape to leave a precise gap for painting. 3 passes of white to cover the black and then 3 of yellow - a lot of effort for two stripes - I will be more careful in the future. The ship has undergone several refits over the years and I have used some images from YouTube as a reference for how parts on the deck are painted (
).


May 2021
9. Deck housings and some deck fittings done. I had several goes at the Dorys. They are still not quite right, but I decided to go with the best ones that I could build.

Early June 2021
10. Fitted out the deck - needs a bit more work, but mostly complete.


June to mid- September - House and garden projects!
Mid-September to-date.
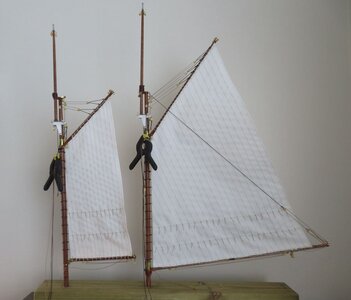
11. Masts, booms and gaffs mostly done.
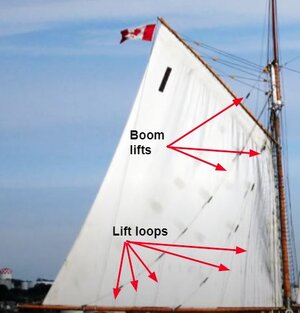
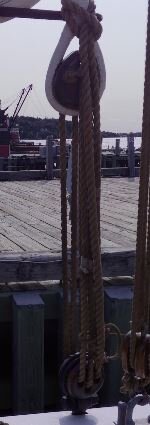
Tapered in the masts, booms and gaffs and added bands, eyelets and pulley blocks. Rigged the main aft boom lift, the haul-outs on the booms and the bridles on the gaffs. The kit came with 10 cheap brass rings for the sail hoops so I ordered some Billing Boats plastic hoop fittings as replacements but they looked totally wrong. I attempted to make some myself, but that was completely hopeless! If anyone knows how to make nice hoops, please let me know. Fortunately, I found some laser cut pear-wood mast hoops from Vanguard Models in the UK. Very high quality and varnished up they look just like the hoops fitted to the Bluenose. Very happy with the result, but - ouch - rather on the pricey side!

12. Next up is to start the rigging.
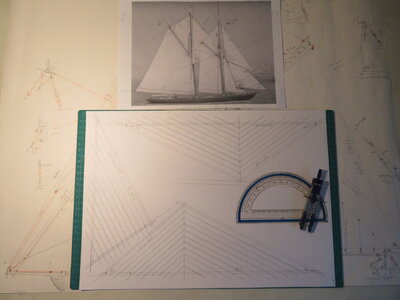
The rigging instructions provided by A-L were rudimentary at best, so they just went into the bin! I have found a number of reference sources, but a really useful site is (https://suburbanshipmodeler.com) which I am using as my main guide in order to rig the model as it should be done (many thanks to the suburban modeller!). With no proper plan, I have used DOMCAD to draw up a 1:1 plan so that I can keep track of what I am doing and approximate the run lengths and where all the lines are tied off. I will refine as I rig each run and reference back to the pictures that I have found. Hopefully, I will rig the model better than my drawing!

13. Sails.
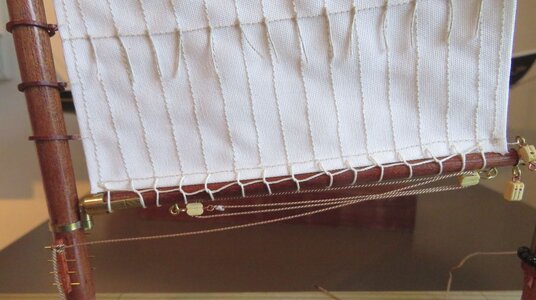
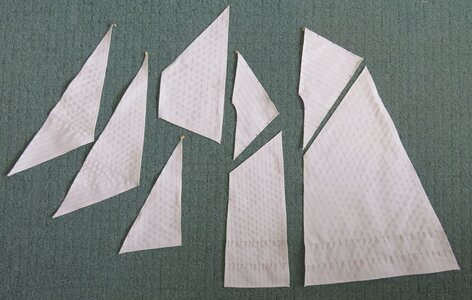
I will also have to tackle the sails. There were some pre-sewn sails in the kit, but they are really dreadful quality (picture) - the material is rubbish, the seams are 10mm wide and just lapped over making the corners 4mm thick, the panel stitching is randomly spaced and, to top it off, the sails are the wrong size and are longer than the booms! Definitely worth a frowny face !! I nipped into a local haberdashers and found some light-weight, plain-weave cloth, which I think will make nice sails - bonus - I paid £2 for 4m2 end-of-roll, so plenty of material to practice with. I do not have any sail plans so I will need to make some card templates once I have done some rigging and figured out the set of the sails in order to get the size and angles correct - I have never done this before, so I will be looking through the Forum for tips on how to do sails. It will be a good challenge for me.

Will up-date with progress on the rigging and sail making in a few weeks time. Now, it’s getting to the fun part!
I decided this was an appropriate build as it is the 100th Anniversary Year of the original Bluenose. I was hoping to buy the Model Shipways version (which most people review highly), but there was no stock in the UK at the time. Instead, I bought the 1:75 Artesania-Latina Bluenose II kit, 22453. I made a start back in February but, as I progressed the build, I was really disappointed with the model. The quality of the fittings is bad, there are many issues with the laser cut parts, no 1:1 drawings or rigging plans and the instructions leave much to be desired. But I started, so I’ll finish! After battling with the first planking, I decided that the best thing to do was to use the kit as a learning exercise and rework it into something a bit better. Fortunately, there is plenty of information on the internet that has helped me to progress the build. Hopefully, at the end, I will have something that I will be happy to put on display.
As a quick run down of the build so far:-
Feb. 2021 -
1. Getting started:-
2. Setting the bulk heads and laying out the decking.
I glued the deck pieces to some wax free tracing paper using the false decks as a template and then marked up the planking with pencil lines (I missed that the planks should be nibbed in - next time).
3. First planking - a lot of issues! Supplied strips were 50mm too short for the longest part of the hull ( I used some spares from my previous build). The keel pieces did not follow the false keel line and had big gaps. I had to make new bow parts rather than try to correct the kit parts. It was a real struggle to stop the upper hull ply pieces from warping (if the bulk heads had had stanchions it would have been much easier to continue the strip planking to form the gunwales).
March 2021.
4. I found this picture of the hull in the Lunenburg shipyard during its restoration, 2010-2012. It has such a wonderful profile that I immediately decided to ditch the A-L instructions and try to get the model looking like it should.
5. Tidied up the hull as best I could. I am painting the hull to match the actual ship, so I did not bother with the 2nd planking. Skimmed with filler and touched up with stopper paste to flatten minor imperfections. Added the prop tubes and cut the scuppers.
6. Primed ready for painting (all my sins covered up).
7. Hull in paint. I used generic acrylic car paint-spray cans. Upper hull is semi-gloss/satin black. Lower hull is red-oxide. I did mask in the yellow pin stripe that is on the upper hull, but I accidentally damaged the soft paint work and I had to go over with the black again and could not save it. I will add it back at the next stage.
April 2021
8. Fitted the bowsprit, false stanchions, decks, rails, rudder, props, deadeye-loops and straps, decorative etched parts and repainted in the yellow stripe.
The brass dead eye loops supplied were too small for the fittings so I made a complete set from 0.7mm Ni/Cr wire. Very tricky to mount them on the hull without damaging the paint work. The deadeyes were dyed ebony as used on the ship. The kit rail stanchions did not look right, so I replaced them with 10mm ones from Caldercraft - much better. The props look out of scale, but I went with what I have.
Painted in the yellow pinstripe again. This was a task I do not want to repeat again any time soon! The pinstripe is 0.5mm wide, so the only way I could do it was to use 0.5mm fine-line masking tape to define where the lines run, butt up two strips of 3mm tape either side of that to give me enough width to then put a strip of 10mm tape on top of that to which I could then attach some masking paper to mask off the rest of the hull. I could then remove the 0.5mm tape to leave a precise gap for painting. 3 passes of white to cover the black and then 3 of yellow - a lot of effort for two stripes - I will be more careful in the future. The ship has undergone several refits over the years and I have used some images from YouTube as a reference for how parts on the deck are painted (
May 2021
9. Deck housings and some deck fittings done. I had several goes at the Dorys. They are still not quite right, but I decided to go with the best ones that I could build.
Early June 2021
10. Fitted out the deck - needs a bit more work, but mostly complete.
June to mid- September - House and garden projects!
Mid-September to-date.
11. Masts, booms and gaffs mostly done.
Tapered in the masts, booms and gaffs and added bands, eyelets and pulley blocks. Rigged the main aft boom lift, the haul-outs on the booms and the bridles on the gaffs. The kit came with 10 cheap brass rings for the sail hoops so I ordered some Billing Boats plastic hoop fittings as replacements but they looked totally wrong. I attempted to make some myself, but that was completely hopeless! If anyone knows how to make nice hoops, please let me know. Fortunately, I found some laser cut pear-wood mast hoops from Vanguard Models in the UK. Very high quality and varnished up they look just like the hoops fitted to the Bluenose. Very happy with the result, but - ouch - rather on the pricey side!
12. Next up is to start the rigging.
The rigging instructions provided by A-L were rudimentary at best, so they just went into the bin! I have found a number of reference sources, but a really useful site is (https://suburbanshipmodeler.com) which I am using as my main guide in order to rig the model as it should be done (many thanks to the suburban modeller!). With no proper plan, I have used DOMCAD to draw up a 1:1 plan so that I can keep track of what I am doing and approximate the run lengths and where all the lines are tied off. I will refine as I rig each run and reference back to the pictures that I have found. Hopefully, I will rig the model better than my drawing!
13. Sails.
I will also have to tackle the sails. There were some pre-sewn sails in the kit, but they are really dreadful quality (picture) - the material is rubbish, the seams are 10mm wide and just lapped over making the corners 4mm thick, the panel stitching is randomly spaced and, to top it off, the sails are the wrong size and are longer than the booms! Definitely worth a frowny face
!! I nipped into a local haberdashers and found some light-weight, plain-weave cloth, which I think will make nice sails - bonus - I paid £2 for 4m2 end-of-roll, so plenty of material to practice with. I do not have any sail plans so I will need to make some card templates once I have done some rigging and figured out the set of the sails in order to get the size and angles correct - I have never done this before, so I will be looking through the Forum for tips on how to do sails. It will be a good challenge for me. Will up-date with progress on the rigging and sail making in a few weeks time. Now, it’s getting to the fun part!
Attachments

Last edited:


