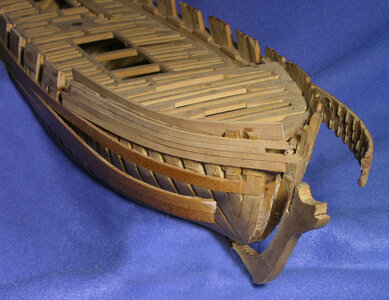
CAUSTIC gun boat

Dave Stevens (Lumberyard)

Sponsor: dlumberyard
Staff member
Sponsor
Joined
Dec 1, 2016
Messages
5,095
Points
728

i built the Caustic about 6 years ago and because model builders thought the one big problem with kits were poor instructions. So i thought why not do a step by step video series.

Here is that series totally amateur in nature but hey it gets the job done.

Video one is an introduction to building the frames. When building frames the typical method is to use a drawing of the frame as a guide. I am using this system that will automatically give you the shape of the frames by building them on a jig using 3 points. one at the keel notch and one at the top of each side. Because the laser cut parts are exact copies of the edges of the frame what you will be doing is lining up the edges of the frame parts.

 
i only used the super glue at the joints of the frame pieces, for the rest of the frame i use Titebond wood glue. On another build i used 5 minute Epoxy to build the frames and that worked out just fine. with epoxy you do not need all the clamps, just hold the pieces together for a minute and it will grab. Using the Epoxy one little draw back is when toy are lining up the edges your fingers get glue on them and you end up with epoxy on the face of the frames. Another tip is to let the wood glue sit in a container and it will thicken up. Once the glue gets thick it also becomes tacky and you do not need to clamp the parts together.


lets do a recap of gluing up frames.

sometimes when i do prototyping building i am building for nothing more than a proof of concept so needless to say the build is fast and yes sometimes sloppy. i am not doing a refined build so not using clamps really speeds up the building, there is little to no waiting for glue to setup so it is more of a production type of build. i do recommend clamping the frames even when using Expoy it just insures a tight fit.

 
Epoxy does not work on all types of wood. As an example at first the Epoxy held but a couple years later the epoxy failed. There are woods out there that are oily or have their own resin in the wood which are not compatible with epoxy. This is why for any job like gluing the frames together i will use Wood glue as my first choice.

wrong glue.jpg
 
part 5

all about sanding

There are builders out there that expect sheet stock to be sanded to a fine finish, the finer the finish the finer the sanding paper needed. The finer the grit the less you can remove in on pass, so it takes several passes through the sander. More passes more time and more cost added to the sheet.
Wooden ship model building is a hands on process of working with wood and finishes are part of the process. Wood will move with changes in temperature and humidly so the building is a process of fitting and sanding parts to fit are part of it. Personally i like scraping the surface as you can see in this next video.
I only clean the char on the inside because once the hull is assembled it is harder to sand the char. i did leave the outside char on the frames for a reason we will see later.


cleaning up the laser char part 6

when laser cutting was first introduced to model ship building there were various concerns. One concern was the difficulty of cleaning off the char and another concern was when sanding off the char you are removing wood and the parts would no longer fit. None of these were true the char is only on the surface and not "burned" into the wood unless the actual cutting was done wrong because you can burn the wood but a good laser cutting will not have such a problem. Now as far as sanding off to much wood to the point the parts will no longer fit is another myth. When sanding or scraping off the char you are maybe removing just a few thousandths of an inch, besides that when i set up the laser cutting file the cut was offset a few thousandths so you would have to literally grind off quite a bit of wood to get a bad fit between joints.

take a look

 
PART 9

Back in the day when Harold Hahn introduced the idea of building a framed hull in a jig many builders jumped on the idea thinking it would solve all the problems of setting frames. What they did not take into account were all the little misfits and alinements. These little measurements start to accumulate as the build continues and in the end result in a misshaped hull. Model ship building is very much an attention to little details.

Hahn built his hull upside down and one draw back to the method was having to set all the frames up and then fit the keel. On this build i used the same basic idea but i set the keel in place and slid the frames into the jig from the top down.


part 10

Building the bow has always been a problem with builders. Back in the time BC before computers research information was hard to come by. When you did come across a nugget of information from a book or article or from another model builder your thoughts were "oh so that is how it was done" and that information was applied to all ships of all ages. today we now know that is not the case. Harold Hahn did his thing right before the dawn of the information age and his bow framing methods were considered made up or stylized because they did not match the British methods. In hind sight it is now known he was actually correct. Even ships built in North America for the British Navy did not follow British construction methods because there were very few British shipwrights in North America.

The method used in the video came from Portia Takakjian drafting was not her best skill, she was one heck of a good builder though. Portia idea was why need perfect drawn parts? All yuo need are patterns that are close and "shape the parts one they are in the hull. This is the idea used for the Caustic hull.


Last edited:
PART 16

moving to the stern frames

some builders think a mill is needed to cut joinery and angles. when i build i use simple tools like a Dremel tool, a 4 inch disk sander and hand tools. You really do not need a shop full of tools most all this work can be done by hand.
In this video i show how an angle is saned with just a Dremel tool.

 
PART 17

once all the frames are in place i sanded the hull to shape.
In this video i tested different "hobby" tools i bought on ebay

from the time i tested these tools the angle sander burned out the other two sanders were pretty much useless, maybe they could sand Balsa wood but for hard woods not a chance. These hobby tools are for very light crafty work. In time even the Dremel will burn out but they do last much longer.

 
PART 18

getting into the actual sanding and shaping of the hull. The angle grinder you see in the video is a great tool IF it were just a bit more robust. In the end it burned itself out and got tossed in the trash.

When i set up the laser cutting i did offset the shape of the frame pieces so the hull is just a bit over size. The reason for the offset is two fold One is because of the "hand of man" that means if all the laser parts were cut to the exact size you would have to build the model from start to finish with a zero tolerance, and who builds that exact? with a tolerance designed in there is a little leeway when building. Number two for the offset is simply giving a builder a little extra to clean up the model.


PART 19

With model ship building there is a little more to it than gluing part A to part B you have to think it through and come up with ways to solve problems. In the video the problem was how to clamp the keelson in place? Then having to measure where the deck clamp goes. There are many different ways to go about building ship models and that is what makes this form so interesting, it is a gold mine of facts, hints and tips.

 
PART 20

the deck clamps

There is not much to say about a deck clamp, it is just a stick of wood. If i were to select a wood for deck clamps i would select something that is bendable like Beech, Cherry, Maple or Pear.

how to bend wood sometimes it take 2 or 3 or 9 tries. So just soaking it in water may not work the first time.

This is a subject that has been asked many times on the forum and that is about bending wood. you do get a lot of replies but did you ever watch bending a deck clamp in real time?

well here you go

 
Dave

Thank you for providing your youtube series on Caustic build on this forum. Your comments here are an added plus to the video.

Rick
 
PART 21

installing the deck beams

in this video i am installing the 3 heavy beams that are under the guns. You never want to build a deck starting at the ends and work in one direction because there is that creeping error that adds up. By the time you reach the other end you may find yourself long or short. On any ship you want to set the deck beams which are at the location of the masts or hatches then fill in between them.
You may notice in the video series i have all the hobby tools which i collected over the years. I came to the conclusion these small tools are really not suitable for model ship building, they are to "light duty". you end up pushing the tool to its max which in time either wears the tool out or breaks it. These tools are expensive and limited in their use.
If you plan on staying in the hobby it might be better to invest in better tools. If you purchase a small table saw which is good for ripping down thin sheet stock then later decide you want to build a plank on frame model., what happens? you realize you can not cut a curves frame on a table saw. A small band saw might of been a better choice.
in the video i tried to cut the heavy deck beams with a hobby size scroll saw, yes it will cut but just barely, What i did was run down in the shop and zip! in seconds cut them on my 10 inch band saw.

Measuring the length of the beams was an on the spot of the moment of hum how to measure the length? There are many way to solve problems you may come up with something better.


Part 22

Still working on the deck

Sometimes you have to be inventive and make a tool in order to do a job, in this case i repurposed a jig saw blade and made a chisel.

You may find build logs that show a part to install and the next post there it is installed. Well! that's fine but what happened from the first post to the second post?

The video series is about building the Caustic but it is also about all the how's and why's and all the little tips i use to do something.


Thanks for posting this, Dave. Your videos and the timbering set, available from the Lumberyard, should permit even a beginner to build this model. I, for one, would like to see full plans for Caustic available, so the more experienced builder can do a full POF scratch build.
 
Back
Top