• "Thank you for your Donations and Support"
    As we close this Annual Donations Drive, I want to thank you all for your Generosity in Donating to Ships of Scale. It is Greatly Apreciated !!!
    Ships of Scale continues to explore exciting things to offer to the Ship Building Community.

Copper plating hull- paint or copper plate?

Joined
Oct 9, 2020
Messages
1,964
Points
488

I was wondering if anyone has painted their hull with copper paint instead of gluing on copper plates, and if they found that it looked good?
 
My first model, about 1973, was a solid hull clipper ship. I painted (by brush) the hull below the water line with copper paint from Humbrol. Still looks great in its glass enclosure and is still one of my favorite models. I have done several ships using copper plates and would probably use them again in lieu of paint, but the painted ship worked out quite well. I was not aware of plating at that time. Painting is much, much less labor intensive!
 
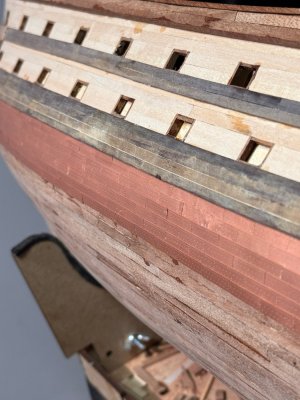
This is how it will look like. Painted over green painted wood strips and slightly sanded. It is acceptable but not comparable with tea copper.

IMG_0020.jpeg
 
My first model, about 1973, was a solid hull clipper ship. I painted (by brush) the hull below the water line with copper paint from Humbrol. Still looks great in its glass enclosure and is still one of my favorite models. I have done several ships using copper plates and would probably use them again in lieu of paint, but the painted ship worked out quite well. I was not aware of plating at that time. Painting is much, much less labor intensive!
Agreed
 
Part of the response depends on the size and scale of the model. :) For instance, I would not want to try to plate the bottom of the hull of the Constitution with individual plates in 1/196 scale. :)

However, if it is a larger scale, say 1/64, it will be hard to beat the realism of individual plates. But, painting can be done to wonderful effect !

Also, different paint types and brands will provide different finishes.

Test a lot !
 
the paint I am thinking of using is actually a metallic paint. I am just fed up with the copper plates not sticking properly and ruining the look. I am probably doing something wrong, but at least with paint, I can make things look more neat...
 
Just wondering about your plates not sticking Jack. I had no idea what I was doing and mine stuck well. Did you put some kind of finish on the planks before you tried to copper the bottom? I used a couple of coats of shellac on the Discovery before I coppered it.
 
Just wondering about your plates not sticking Jack. I had no idea what I was doing and mine stuck well. Did you put some kind of finish on the planks before you tried to copper the bottom? I used a couple of coats of shellac on the Discovery before I coppered it.
I used that copper tape that is used for stainglass hobby. I didn't have anything on the wood. So you are thinking that I need to put some varnish or something on the wood before putting the copper tape?
 
Yeah. I think the tape I used was for keeping slugs away from plants but it all probably comes off the same machine. I do think that it would stick better to a smooth surface. Stick a piece to a window and then stick a piece to a Popsicle stick and see which sticks better.
 
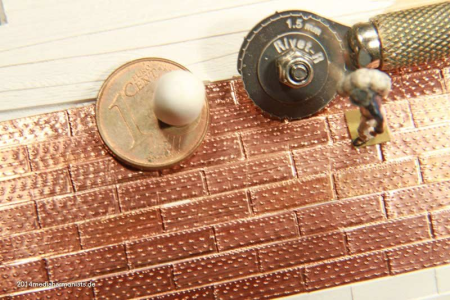
My plating has been done using the copper ribbon that is supplied with many kits. It is pre-coated with a glue that is protected with a peel off paper strip. I usually cut up to 100 individuals strips (each capable of representing 3-6 individual plates) and then I use a ponce wheel to simulate the rivets. Very important, I think, is that after applying to the ship, each strip must be further set against the ship by hard rubbing (burnishing) with a smooth surfaced sculpting tool. I have never plated on bare wood, but prime the surface with a flat paint. The surface must be smooth and clean. My first plated ship is the Charles Morgan and it is now 10 years old. A nice patina is forming but zero plate peeling. One problem that I have not been able to resolve is that the ponce wheel application I use is on the cooper side of the ribbon. This places the "head" of the rivet on the inside of the plate. I tried to ponce on the adhesive side, but that really destroys the protective adhesive strip making for its difficult and complete removal. Regardless, the backward rivets still look realistic, I think, because of what we expect to see -- our eyes fool us.
 
Yeah. I think the tape I used was for keeping slugs away from plants but it all probably comes off the same machine. I do think that it would stick better to a smooth surface. Stick a piece to a window and then stick a piece to a Popsicle stick and see which sticks better.
Ok. Thanks
I think I will still paint the boat to see what it looks like and if I don't like the look then I'll put the copper tape on it. I have nothing to loose but time which doesn't bother this retired guy.
 
Full disclosure, I have built only one model that could have required a coppered hull, a 1:144 solid hull Model Shipways Harriett Lane. I painted the bottom with a satin non metallic “copperish” colored enamel. Sitting in its glass case atop a tall bookcase I like its look.

I have struggled to find a solution for simulating riveted shell plating on my present project, a steel hulled Great Lakes freighter. My first attempt, .005” sheet brass plates secured with 3M transfer tape was a disaster. Within a day or so corners of the plates began to lift. This ended my confidence in the longevity of any sort of pressure sensitive adhesive. A related concern is the off gassing the adhesive within the confines of a glass case. I can think of nothing worse than copper foil plates lifting from the bottom of a completed fully rigged model.

My ultimate solution was shellac saturated acid free bond paper plates glued to the hull with ordinary PVA glue (Titebond II). Two or three years later they show no sign of disbonding. I chose not to show rivets; at 1:96 scale, scale sized rivets would be invisible at any viewing distance. The same would be true of nails used to secure copper sheathing of sailing ship models.

With the widespread use of air brush technology I have thought about simulating copper sheathing with glued lightweight paper then airbrushed with paint. Experienced air brushed users could spray variable color patterns to achieve a realistic look.

BTW copper sheathing was very thin. It was nailed on with flat headed nails (like a larger version of a tack), not riveted through the planking. At most modeling scales these nails would be invisible but if you feel compelled to show them, the most realistic simulation would be slight dimples rolled into the plates from the outside.


Roger
 
Last edited:
I have used Rustoleum Copper color spray paint with great result on primed plastic models. I believe it would look good on a well sanded and primed (maybe with sanding sealer) wood. I would do a test strip and see if you like it.
 
Part of the response depends on the size and scale of the model. :) For instance, I would not want to try to plate the bottom of the hull of the Constitution with individual plates in 1/196 scale. :)

However, if it is a larger scale, say 1/64, it will be hard to beat the realism of individual plates. But, painting can be done to wonderful effect !

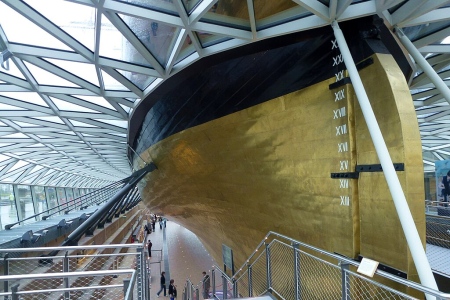
Corsair's comment regarding the importance of scale is on target. Once again, we are addressing matters of accuracy, appearance, and the physics of scale. The process of attaching individual copper bits to a model may be "accurate" as it roughly represents the process of attaching copper to a vessel. However, is the thickness of the copper to scale (probably not, since copper sheathing was pretty thin)? Does the completed sheathing look like what one would see on an actual vessel? The first picture below is of the Cutty Sark on display in Greenwich. You can discern a pattern of plates on Cutty Sark's shiny new copper, but they are not nearly as pronounced as those shown in post #3.

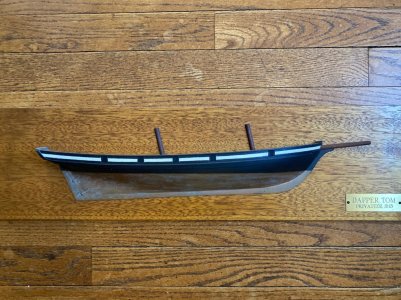
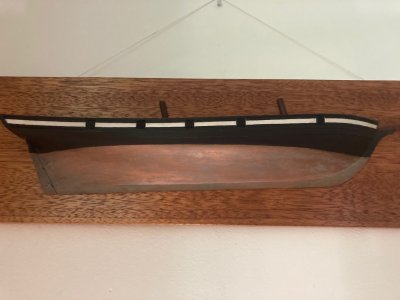
Second and third pictures are of a simple half-hull model of the Dapper Tom in 5/32" scale. The rough-carved, solid hull was rescued from the reject box at the old Model Shipways shop in Bogota NJ. I painted her below the waterline with copper paint with some green worked in to represent verdigris. If memory serves, I used Testors enamels in the little square jars. I think this is fine for such a small, simple model.

So, each modeler gets to make their own choice. Fair winds!

cutty sark copper.jpegdapper tom 1.jpgdapper tom 3.jpg
 
Corsair's comment regarding the importance of scale is on target. Once again, we are addressing matters of accuracy, appearance, and the physics of scale. The process of attaching individual copper bits to a model may be "accurate" as it roughly represents the process of attaching copper to a vessel. However, is the thickness of the copper to scale (probably not, since copper sheathing was pretty thin)? Does the completed sheathing look like what one would see on an actual vessel? The first picture below is of the Cutty Sark on display in Greenwich. You can discern a pattern of plates on Cutty Sark's shiny new copper, but they are not nearly as pronounced as those shown in post #3.

Second and third pictures are of a simple half-hull model of the Dapper Tom in 5/32" scale. The rough-carved, solid hull was rescued from the reject box at the old Model Shipways shop in Bogota NJ. I painted her below the waterline with copper paint with some green worked in to represent verdigris. If memory serves, I used Testors enamels in the little square jars. I think this is fine for such a small, simple model.

So, each modeler gets to make their own choice. Fair winds!

View attachment 467595View attachment 467596View attachment 467597
I like the painted look.
 
I was wondering if anyone has painted their hull with copper paint instead of gluing on copper plates, and if they found that it looked good?
I am building my second Revell 1/96 Constitution; with the detail on the hull, I used Testors copper paint on both hulls and they look great, brushed on.
Years ago (30), I did the whaler Morgan, using peel/n/stick copper plating, and it's still looking good, but I sealed the hull with lacquer first, sanded it then added more lacquer.
 
I offer for your consideration my own personal opinions regarding depicting a metal-sheathed bottom on a model. Any artistic depiction is always a matter of the artist's creativity and skill, and I expect reasonable minds certainly will differ.

Just for a passing note, Cutty Sark's hull is sheathed with Muntz metal, not copper. Muntz, a brass alloy (60% copper, 40% zinc and a trace of iron.) Muntz metal became available around 1840 and was a sheathing material that provided protection similar to copper, but for a much lower cost. It has more of a brass color than pure copper. Muntz metal doesn't appear to oxidize in the same fashion as pure copper or many of the other brasses if Cutty Sark is any indication, although I do not know if they coated it for appearances' sake or the new "hothouse" which covers it, keeping it dry, has retarded tarnishing.

While I concede that tastes differ, I presume that any modeler wishes to produce a miniature 3D representation of a particular vessel which appears to be a perfect miniature while at the same time using archival materials that will last as long as possible. To determine what a real vessel with a coppered bottom looks like, one has to consider the "scale viewing distance." In other words, looking at a 1:48 scale model from two feet away should look exactly like what you would see looking at the prototype vessel from 96 feet away (2 ft x 48). The detail also must be properly scaled, so the plate thickness and tacks (not "rivets!") must be correctly scaled, meaning even at 1:48 they are going to be very, very small and, in all likelihood, invisible. If you don't have a full-size copper sheathed hull readily available, google all the photos you can and estimate the viewing distances involved. If you want to portray the model's sheathing as "brand spanking new," it may be shiny and owing to the variables of the plate manufacture, the storage of the plates before application, and so on, even a new bottom will have "checkerboard" variations in color. Remember that copper oxidizes rather rapidly in an exposed environment and even copper that isn't exposed to salt air in the marine environment which will yield a verdigris-colored patina (like the Statue of Liberty,) will still quickly end up being the color of a circulated copper penny. ("penny brown.") A "weathered" copper bottom's appearance, such as seen when a vessel is hauled out, will vary depending upon the amount of marine growth on it. If scrubbed, it will appear "penny brown," but with verdigris coloration at the waterline from exposure to air, as well as when it has been out of the water for any significant amount of time. To obtain a realistic scale appearance will require "weathering" with an airbrush and/or other standard weathering painting techniques. Depending upon the scale, it is likely that the plate seams will not even be discernable at the "scale viewing distance," for that matter. In larger scales, you can determine the plates' scale thickness with a micrometer. As a practical matter, if your scale permits depicting the actual sheathing plates, they will be probably much easier to "fake" with very thin paper sheets set in shellac and painted than by fiddling with actual copper foil. Adhering them with shellac and then coating the bottom with thinned shellac will provide a far more reliably archival result than relying on the often-questionable archival qualities of the adhesive backing often seen or, God forbid, using something like contact cement which, being rubber based, has a relatively short lifespan.

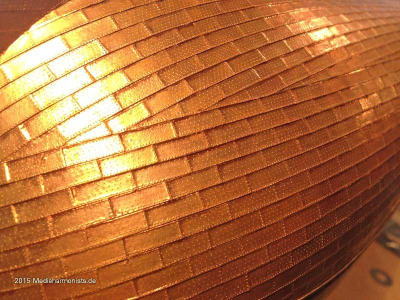
Real copper sheathing is applied using a special hammer with a large, round convex-shaped head. This hammer face produces a dimple in which the tack head lies and yields a relatively smooth hull surface which enhances the vessel's performance. Models which have wildly out of scale "rivets" or "pimples" all over their "real copper plates" (as some kit manufacturers tout,) don't create a compelling impression of reality. To my eye, and I readily admit this is a matter of taste, a shiny coppered bottom on a model is distracting and draws the eye to a detail that is of little interest or value, compared to the rich detail to be found on deck and aloft. Your mileage may vary, of course. ;)

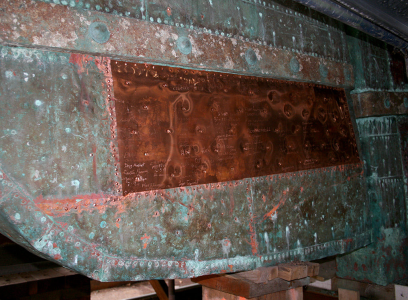
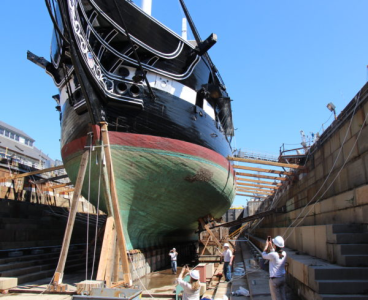
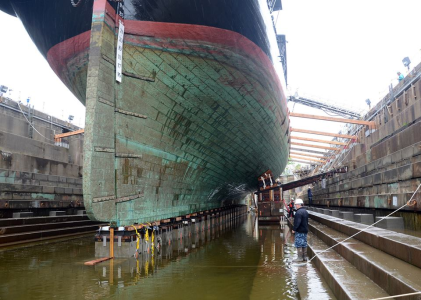
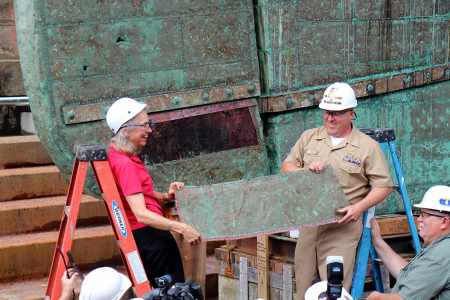
USS Constitution's bottom from perhaps 25 feet away after being scrubbed and exposed to the air for a while during haul out for restoration:
1724892999976.png

Cutty Sark's Muntz metal bottom properly fastened from 35 or 40+ feet away:
1724893194916.png

USS Constitution's bottom from about ten feet away:
1724893436314.png

USS Constitution's from about 100 feet away:
1724893709656.png

USS Constitution from about 50+ feet at the rudder to midships:
1724894523131.png

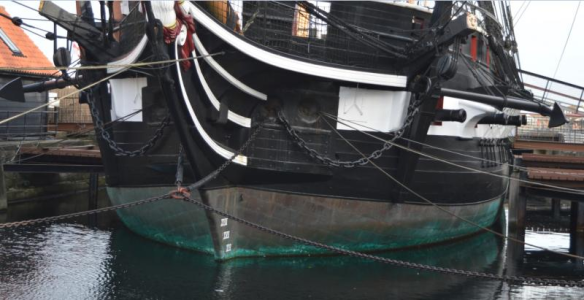
HMS Trincomalee showing naturally weathered copper sheathing above the waterline with verdigris patina at the waterline from about 50+ feet:
1724894286118.png

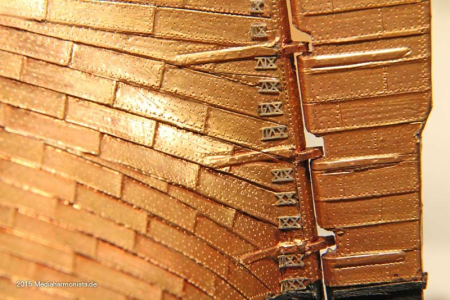
Model, scale unknown, with interesting nailing detail, but out of scale plate thickness:
1724893893379.png
1724894085937.png

Out of scale "pimples" and "brick and mortar" looking plates on a model hull:
1724895150943.png
 
Jack, paint the hull. If you're happy with the results, move on. If at some point you are ready to try copper plating start with a small project. Learn the basics, what works for you. There are countless helpful opinions and recommendations on copper plating to consider, there's no right or wrong.
 
First, I tend to be on the "artistic" side of the argument and I go with what I think looks best on things. I am not a purist trying to recreate an "exact" replica of a ship that is probably based on drawings or renderings that may or may not be accurate themselves. That being said, I can understand those that do. I am currently copper plating my first ship (Montanes) and enjoying the process. This model is huge, 1:70 and I am using the plates from Amati. It is a lot of work, but I think I am liking it. I might even continue the copper plate a bit above the waterline on the bow just simply because it follows the line of the ship and I think it will look good. The purists will scream bloody murder...but lol, it's my ship......Not positive, but I will decide in a few days when I get to that point.

My point, I don't think you can go wrong....try what you want...if it comes out great then congrats...if not, you learn something and you do something different on the next one. Honestly, I switched over to the copper plating the Montanes because I was not happy with my planking which I felt was average at best and now I think I will come out with a "WOW" result with the copper plates....LOL...but it cost me, copper plates are not cheap...especially on a boat this size. Who knows, maybe next time I will try tape and create my own dimples.IMG_7600.jpg
 
Last edited:
Back
Top