Do you use a paint mixer/stirrer/shaker?

I have the bottle shaker on the 'to do' list as my wife has also requested this machine.
I don't plan to use perspex sheet, but sheets of Plywood for the case.
The shaker's bottle holder can be carved out of a single block of softwood or built lighter using 3mm ply.
I really need to get that 3d printer.:confused:
 
MicroMark sells this shaker:

Which is very similar to a cheaper mixer sold on Amazon that is used to mix nail colours:
 
I used to use a modified pop-cycle stick. That I could scrape on the lip to remove the excess paint but the bottles now a days are too small. I'm used to the old Floqual paint bottles with a much larger mouth. They have drip spouts now and is the reason I'm asking about shaking these things instead of stirring 'em.
 
Last edited:
I got this cheap power mixer you guys may actually be talking about. You only pull it out of the paint while it's still running ONCE....lol It's kind of like touching the hot stove, you learn your lesson, well, hopefully you do.:p

This is the one I bought from MicroMark. for $11 I didn't expect much, nor did I get much. The connection on the trigger broke only after I used it a few times.

So, I just took the shaft with the mixer on the end and cut off the end that prevented me from inserting into my Dremel cordless tool. I now have a great mixer that if I wanted to could mix tar @ 50,000 RPM....ROTF

Bottom line, it works.
 
This one I use for never opened containers of enamels such as Model Master and Tamiya, or tins such as White Ensign. When doing the newer acrylics with the dropper top, I add a stainless steel ball bearing first to aid in mixing. Can be mixing for a while, while I'm getting other stuff ready for a spray session.

rvMzYxF.jpg


This one I use mostly for previously opened bottles. I don't know why, just force of habit I guess. Quick and easy.

89s1Kxb.jpg


And last but not least, for stirring up paints that have been used very recently to just be sure they haven't settled.

ZS9X1qk.jpg


EJ
 
Hello all,

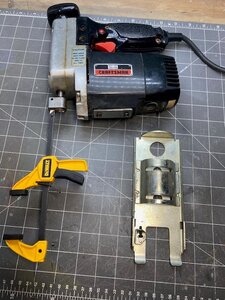
I got this idea from a video I watched on You Tube...I used an old Sears Craftsman Jig Saw and attached a clamp in place of a blade after reaming out the hole in the clamps arm to fit the screw on the saw that holds the blade in place (clamp now). I had to remove the guide pictured to the bottom right in the photo to allow for taller bottles of paint. This didn't cost me anything more than what I had already spent on the tools I had on hand. As I don't have a way to hold the paint in place as it is being mixed other than the pressure of the clamp, I cup may hand around the bottle as I am mixing it. The variable speed of the saw makes this work great...

Jig Saw Paint Shaker.jpg

Frank
 
Hello all,
... As I don't have a way to hold the paint in place as it is being mixed other than the pressure of the clamp, I cup may hand around the bottle as I am mixing it. The variable speed of the saw makes this work great...


Frank
Thanks, Frank,
Why not use a strip of Velcro or a wire tie that could be cut off??? At least that's what I'm doing. :)
 
I use my jig saw too with a 99 cent clamp from Harbor Freight. I had to file down the clamp as it was too wide for the blade mount and I use my jig saw so did not want to mess with the blade mounting. I used my Dremel to take a little metal off the end of the clamp and it goes in just like a blade does.
As suggested above, I use Velcro to hold the bottles of paint. I drilled the holes in the clamp using a blade as a guide.
That jig saw shakes the hell out of the paint. I have many bottles of old Testors and Model Master that were settled with all the carrier agent on top of the hardened paint. It takes only a minute and brings paint that would have been useless right back to life. Just make sure the lid is tight!
It is also good to store your paint upside down, the jars seem to seal better that way...again be sure the lids are tight!
 
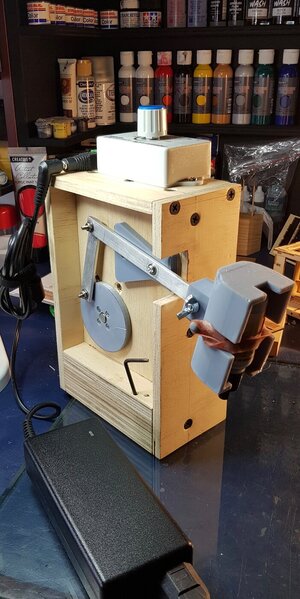
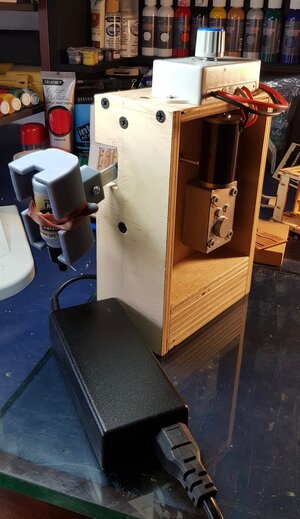
A while back I finished building the paint shaker as per the video I posted above.
I didn't have a camera then so I didn't capture the process but I'll post pictures now of the finished paint shaker.
Instead of having an on/off switch + a speed controller like in the video I combined them in a single unit.
I turned the 3D printed bottle holder upside down as that's the way I have always shaken paint bottles by hand- I found that the air pocket and bubbles rising to the top of the bottle releases the paint that settled on the bottom.
It took about one weekend in total to build (over several weekends while I waited for parts)- I added an extra heavy base so it wouldn't jump around like in the video.
It has worked flawlessly - the only problem is remembering to put the bottle in about 30 seconds to 1 minute before I need to use it.
20210107_133632.jpg20210107_133741.jpg
 
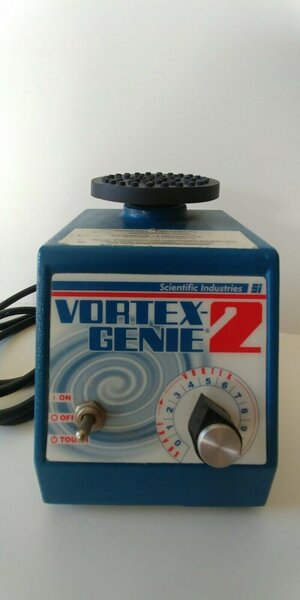
I've been airbrushing for 45 years...tried all of the paint mixing/stirring options...best I've found is one of the vibratory mixers from the laboratory industry...this "Vortex Genie 2" is the one I use now (There are several similar models)...they are easily found on the online auction site...not the cheapest as they are industrial level tools, but mixes ALL paints and liquids very quickly...I'll never use anything else now.
 

Attachments

  • vortex genie 2.jpg
    vortex genie 2.jpg
    83.8 KB · Views: 4
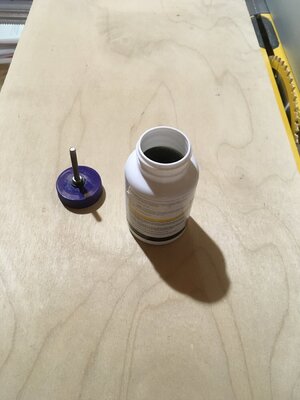
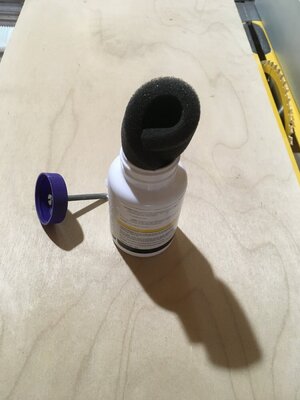
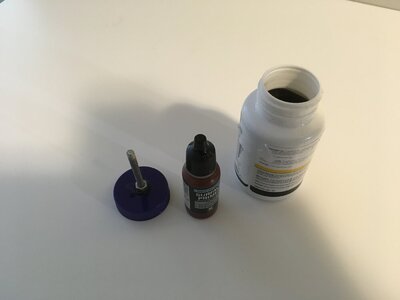
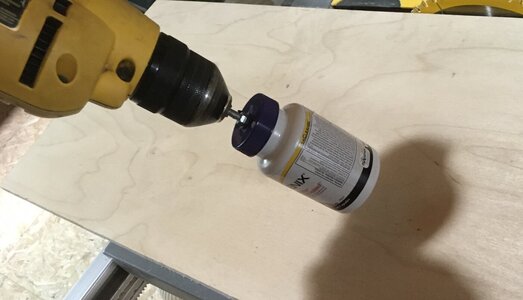
I predominantly use Vallejo paints for airbrushing. Instead of madly shaking the paint bottle I used to roll it between my hands, as suggested by Vallejo. This avoids air bubbles In the bottle. Some hand blisters later I made my own mixer.

It’s a small plastic bottle with a threaded bolt and nut passed through the lid. Inside I put a length of thick foam, about enough to hold the paint bottle centred and firmly in place. I put the paint bottle in the homemade mixer, put the lid on and then put the bolted end in my power drill. I keep the drill and mixer angled slightly downwards and slowly adjust the speed of my drill. I can vary the speed, which simulates the hand rolling I used to do. Recycling and no more blisters!

5CA1FE5F-14B9-4755-937D-79315A8E05C9.jpeg23C97F2E-2921-465A-855C-A4C3983BCC73.jpeg381D4ADD-7503-4D19-9E57-4E6B8B667C56.jpeg5E6372BE-4C1F-4E5A-B246-E6376696FE4C.jpeg
 
Back
Top