Enterprise Maryland 1799 - Constructo Kit (1st Attempt)

Joined
Sep 17, 2020
Messages
19
Points
58

I have never maintained a build log of the Models I have built, but since this is, what I will consider, my first attempt to build a plank on bulkhead model I would give it a go, though the intervals between posts may span longer than expected periods of time.

I will post pictures of the different stages of assembly and will probably ask a lot of questions as things get more gnarly from my own perspective.


As far as tools, I bought an X-Acto knife set that came with a plane, jigsaw and sanding block. I now have wood glue and super glue at the ready. What I don’t have is contact cement that I saw should be considered for some steps, if anyone can suggest one, I would be greatly appreciative.

To date, I have read through the instruction book at least 4 times and Step 1 at least twice. Following other modelers who built the Enterprise I have followed their lead and constructed a jig to hold the false keel and bulkheads. The image is of the completed stand with the false keel fastened to it and the bulkheads in place, not yet glued in place since I need to make another jig to ensure the bulkheads are perfectly perpendicular to the false keel. I will then add the mast wedges and beam.


EnterpriseBulkHeadFit.jpg
 
I do not use contact cement. When I used it for planking, it was always a mess on my hands. I only use wood glue and Super Glue in gel medium density (at model shops you find it like water and gel that come in 2 density or I belive is call thickness )

Best
Daniel
 
I used only Titebond II on my Enterprise 1799 build. It cleans up easily with H2O. If you have to take something apart, subsequent soaking with hot water will allow you to remove items. Take your time, fit, measure, fit when you're satisfied then glue. I would suggest getting some wooden clothes pins , metal clips and fat rubber bands.

Jan
 
I do not use contact cement. When I used it for planking, it was always a mess on my hands. I only use wood glue and Super Glue in gel medium density (at model shops you find it like water and gel that come in 2 density or I belive is call thickness )

Best
Daniel
Thanks for the info on the contact cement, I have never used it and will stick, sorry for the pun, to what I'm comfortable with.
 
I used only Titebond II on my Enterprise 1799 build. It cleans up easily with H2O. If you have to take something apart, subsequent soaking with hot water will allow you to remove items. Take your time, fit, measure, fit when you're satisfied then glue. I would suggest getting some wooden clothes pins , metal clips and fat rubber bands.

Jan
The clamping tools is next on my list, I was thinking of various size binder clips but I wasn't sure if they could damage anything. I didn't think of wooden clothes pins, that's a great idea, thanks for info.
 
The clamping tools is next on my list, I was thinking of various size binder clips but I wasn't sure if they could damage anything. I didn't think of wooden clothes pins, that's a great idea, thanks for info.
I used the small and medium binder clips for most of the clamping tasks on my Enterprise, and as another builder posted, you can remove the "bails" from one clip and insert it in the jaws of a binder clip for holding down planks. They work great on the bulwarks as well! Good luck with your build, it can be an odd beastie, but very nice when done. And try not to go too far down the historical research rabbit hole or your head will 'splode...
 
Very good, that you started a building log, so we are able to give advise and help if necessary and requested.
Crossing the fingers
 
To date my build is slowly coming along, a lot of measuring and dry fitting but I added the deck, bow and stern wedges. The shaping of the bow and stern wedges to conform to the bulkheads wasn't as hard as I thought though a lot of material needed to be removed. I didn't use a file, I used a Dremel and course sanding cones. The sanding cones are very old my dad, back in the 70's refinished an antique table and got these from somewhere but I kept what was left, there were quite a few that I use, sometimes. The thing with using something like this means a steady hand is needed, and mine isn't as steady as it used to be and also that the sanding goes fast.
Once I got the wedges all shaped to the bulkheads, the bow was the most challenging because of the several angles, but when I start planking I am figuring I can make some adjustments if need be. Now it's time to plank the deck!EnterpriseSternBlocking.jpg

20201101_150740.jpg
 
Last edited by a moderator:
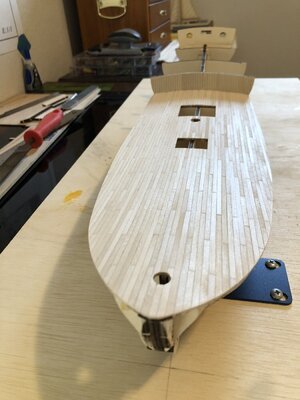
I am now halfway through planking the deck. I was looking at the images in the instructions, always a step or so ahead of where I am working so I can make sure I account for what I am building. So I did get a bit confused over how the deck was supposed to be done. I do a lot of D.I.Y. projects at home and one thing I did was to install a laminate floor so when I saw the images of the planking and nails heads I figured that maybe the deck planks would be cut every 12mm that coincides with what I was seeing in the drawing, until looked a bit closer to see that in the step to lay down the planks they are all indeed one length from the front of the poop deck to the bow. So aside from the center plank all the rest are a single piece. Lots of clamps! The other thing running around my head is if I should pencil in the planks after sanding, then varnish the deck to seal the markings? I do know I probably will not use ink since the wood is very thin and porous which will make it "bleed". But I am a few steps back from that.
While I am planking I did stop in an attempt to make a planking jig, since planking the hull is coming, though it didn't turn out as nice as some of the others I've seen here, but before giving up on it, I will give it a go and if necessary make another.
 

Attachments

  • EnperpriseMainDeck50pctPlanked.jpg
    EnperpriseMainDeck50pctPlanked.jpg
    232.9 KB · Views: 14
I would say when it comes to power tools like a dremel, be very careful as they can remove too much material very fast. So if you choose not to shape and sand by hand, then use a finer grade sand paper or drum to slow down the speed of removal so you have more control.
For the deck boards, it’s like a real floor...just miniature. So stagger your joints, a 3 butt pattern usually works well. Also the penciling of the edges is done before the boards are installed, at least that’s how I do it so I can pencil the entire edges, and I don’t have to worry about sanding the deck removing the pencil edge.
Here is a pic of mine after sanding. You can’t see the pencil edge very well. But after you stain it will stand out.8F0D0BA7-1F72-474B-8577-075D9C458A0C.jpeg
 
Last edited:
Here is a pic after nail holes added and deck stained...As you see the edges stand out nicely. It’s tedious work. Cutting boards, penciling edges and then gluing down. But the end result is nice.
Someone else may know of a technique where you can do the edges after the boards are on?
I suppose you could put a lighter stain, then clear coat. Then come back with a darker stain that is highly thinned, to use as a wash to get in the cracks. Worse case you have to sand the top of the deck again to get it lighter. But if you wipe off the excess dark stain as you go, chances are you won’t have to sand again and will have a nice weathered look.
29933563-1524-44B2-88B2-43041F147779.jpeg
 
Last edited:
Here is a pic after nail holes added and deck stained...As you see the edges stand out nicely. It’s tedious work. Cutting boards, penciling edges and then gluing down. But the end result is nice.
Someone else may know of a technique where you can do the edges after the boards are on?
I suppose you could put a lighter stain, then clear coat. Then come back with a darker stain that is highly thinned, to use as a wash to get in the cracks. Worse case you have to sand the top of the deck again to get it lighter. But if you wipe off the excess dark stain as you go, chances are you won’t have to sand again and will have a nice weathered look.
View attachment 189252
That looks great! I am going to put the lines in after a first sanding using a straight edge. Doing the edges first is a great idea, I wish I thought of that.
Learning as I go.

-Carl
 
I just wanted to post an update on progress, when the weather got nice this week the build slowed down. I am still laying down the deck, almost done. I have about half the poop deck and poop deck bulkhead left. Then I will have my next question, what is recommended to varnish the deck, and the rest of the ship? I haven't heard the work varnish or shellac in a long time. Also,
Here is a pic after nail holes added and deck stained...As you see the edges stand out nicely. It’s tedious work. Cutting boards, penciling edges and then gluing down. But the end result is nice.
Someone else may know of a technique where you can do the edges after the boards are on?
I suppose you could put a lighter stain, then clear coat. Then come back with a darker stain that is highly thinned, to use as a wash to get in the cracks. Worse case you have to sand the top of the deck again to get it lighter. But if you wipe off the excess dark stain as you go, chances are you won’t have to sand again and will have a nice weathered look.
View attachment 189252
Hello Dean, may I ask what color stain you used or can recommend I am so impressed with how your deck is looks, I'd like to replicate it on my build.
 
I just wanted to post an update on progress, when the weather got nice this week the build slowed down. I am still laying down the deck, almost done. I have about half the poop deck and poop deck bulkhead left. Then I will have my next question, what is recommended to varnish the deck, and the rest of the ship? I haven't heard the work varnish or shellac in a long time. Also,

Hello Dean, may I ask what color stain you used or can recommend I am so impressed with how your deck is looks, I'd like to replicate it on my build.
See attached pic...I used this stain, then came back and used 0000 steel wool and 2000 grit sandpaper to weather the finish. You probably don't have to use both steel wool and sandpaper, either one will due.
 

Attachments

  • stain.jpg
    stain.jpg
    201.1 KB · Views: 13
See attached pic...I used this stain, then came back and used 0000 steel wool and 2000 grit sandpaper to weather the finish. You probably don't have to use both steel wool and sandpaper, either one will due.
Thank's Dean, it's greatly appreciated.
 
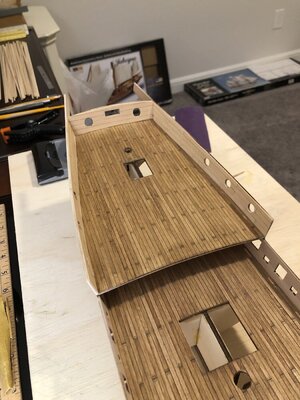
The deck is done, since I was laying the deck down and didn't consider how the planking would look completed, like the earlier pics Dean sent. I did some improvisation, something that I do on plastic kits to show panel lines, thought for doing the same in wood, rather than inked paint I used a fine awl to make marks for the nail heads then used a black gel pen to fill them in. Then using a ruler, I "inked" in the sides of the boards, the picture is very close up so you can see the inconsistencies in doing it this way, but when viewing the model at a "normal" distance they appear cleaner. after the inking was done, so the color would be softened, I stained the deck, lightly with Minwax Golden Oak. I am pretty happy with the result. On to the first planking and getting them all bent. So I am figuring a lot more reading, YouTube video and anything else I can get my hands on. The instructions with the kit is very sparse with any kind of hints, so I am learning as I go.

MainDeck2.jpg
 
I have been reading and watching YouTube videos on plank bending, everything from soaking in hot water then forming, to soaking overnight the forming another day to using irons to bend the wood then something that looked like a crimping tool to make bends. Needless to say, it's a bit confusing, but I think I am going to try the heat method stealing my wife's curling iron since it's heat can be adjusted. Now just a few more videos before I really commit to that. But anyone that has done one or more of these methods that can provide their experience and opinion is most welcome.
 
Back
Top