Fokker Spin III, scale 1:48, scratch build [COMPLETED BUILD]

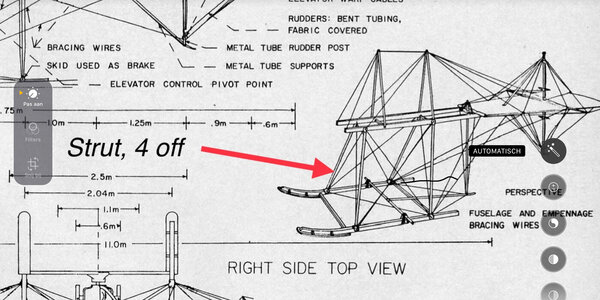
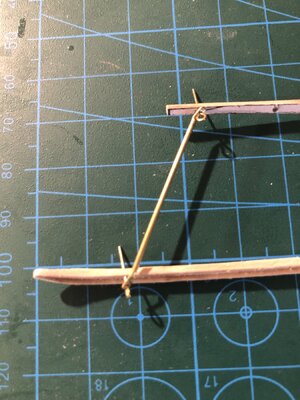
The first of the four fuselage frame-undercarriage struts tried out. I used brass tube, flattened it at the ends and drilled 0,6mm holes.
The struts have angles in two directions, so in order to determine the length of the struts I had to refresh my high-school math...

IMG_0455.jpeg

Fit check to check my analysis. So far so good. Three more to go.
IMG_1621.jpeg
 
Dear Johan. I have no idea why I am so late to your new project, In Afrikaans we have a saying "agteros kom ook in die kraal" (the slowest ox also makes it to the camp), so here I am. This is bound to be a fascinating project - not exactly my cup of tea (when it comes to early planes, I am in love with the Nieuport) but fascinating, nonetheless. And knowing that it is your build, I won't miss it for anything in the world.
 
Dear Johan. I have no idea why I am so late to your new project, In Afrikaans we have a saying "agteros kom ook in die kraal" (the slowest ox also makes it to the camp), so here I am. This is bound to be a fascinating project - not exactly my cup of tea (when it comes to early planes, I am in love with the Nieuport) but fascinating, nonetheless. And knowing that it is your build, I won't miss it for anything in the world.
You're more than welcome to this exiting little project. Fokker belongs to the pioneers of aviation and as such earned himself ánd the Fokker Spin a place in history.
One thing is certain though, it's a tricky little airplane...
 
Last edited:
Tentatively, I started work on the Fokker Spider.
First parts selected are the fuselage frame longerons and the undercarriage skids.
Initially I thought the fuselage frame and undercarriage were wooden constructions and could be build separately, but that's not to be; you have to build frame and undercarriage as a single assembly, due to the struts, connecting the two together.
Next step is to determine the struts and the attachment of the struts to the undercarriage and the fuselage.

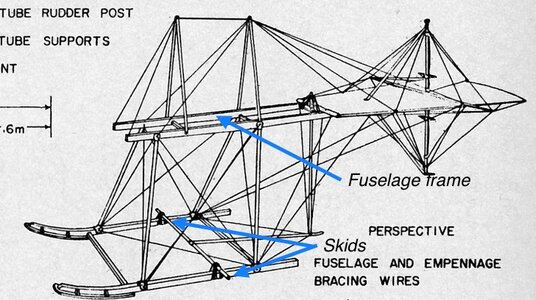
A poo perspective view of the fuselage and the undercarriage:
View attachment 436837

The skids and longerons, cut and drilled:
View attachment 436836

The intended shapes glued to some leftovers from my Bluenose build:
View attachment 436840

View attachment 436838
Aha, the show has started. A Spin partly made of pear wood. It looks promising, Johan.
Regards, Peter
 
Johan how are you doing,,,,,
Hey Grant, doing well, thanks for asking.
Have been away for a couple of weeks, away from the wet and the cold, and now getting readjusted to "normal" life again.
Regards,
Johan
 
Last edited:
Progress on this little project is very slow; naive as I am, I thought it was an easy build, but once committed I found out it's far from.
The drawings I have are very hard to interpret, especially the rigging (yeah, you read right: the rigging) and leave much to one's imagination.
The number of Spin- configurations are bountiful; longer fuselages, different skids, various wheel options, adding and moving struts, different engines; liquid- or air cooled, varying radiator locations, etc, etc.

Furthermore, every connection of the model has to be evaluated and then it has to be determined how to fabricate the parts and the joints and simultaneously looking ahead to the following steps.
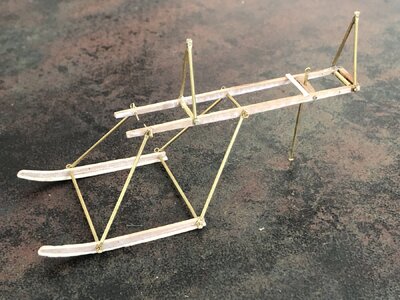
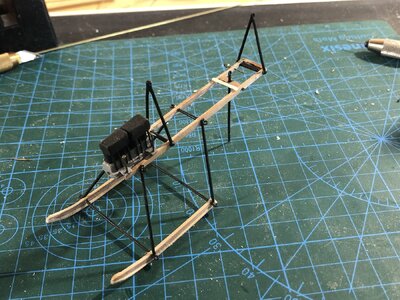
The current status is that the fuselage frame and the skids is work in progress and yesterday evening I was able to perform a test fit of the frame with the skids.
The picture below shows this test fit, the next steps are completing the fuselage frame and the build of the engine.
The isometric picture is from another configuration, I use it for reference only

IMG_1789.jpeg

IMG_0452.jpeg
 
Progress on this little project is very slow; naive as I am, I thought it was an easy build, but once committed I found out it's far from.
The drawings I have are very hard to interpret, especially the rigging (yeah, you read right: the rigging) and leave much to one's imagination.
The number of Spin- configurations are bountiful; longer fuselages, different skids, various wheel options, adding and moving struts, different engines; liquid- or air cooled, varying radiator locations, etc, etc.

Furthermore, every connection of the model has to be evaluated and then it has to be determined how to fabricate the parts and the joints and simultaneously looking ahead to the following steps.
The current status is that the fuselage frame and the skids is work in progress and yesterday evening I was able to perform a test fit of the frame with the skids.
The picture below shows this test fit, the next steps are completing the fuselage frame and the build of the engine.
The isometric picture is from another configuration, I use it for reference only

View attachment 445133

View attachment 445134
Good morning Johan. AH it is always a good idea to run from inclement and cold weather. From what I see these are looking spot on regarding your skids and frame. Its always a contradiction in this hobby. What looks easy never is.....Cheers Grant
 
The past few days saw the emergence of a scratch build engine.
Since this is a first for me, it took me some time, before anything came off it…
For starters I took the Argus engine as the basis. Fokker did use a variety of engines on his Spiders, the first was a 50hp Argus, later on he used a 75hp Argus, a 95 hp Mercedes, all liquid cooled and there’s also evidence of an air cooled Renault engine being installed at one point.
There is not too much information about dimensions and such, other than a few pictures and a very schematic drawing of a 100hp Argus engine, so I decided to use the drawings I have as a reference.
As far a materials go, I still have some pieces of usable scrap from my Bluenose build, so I started chipping wood. It took me at least two tries before something sensible came out.
Now I have my first engine, which now enters its evaluation time, the main question being whether or not it’s deemed good enough for application.

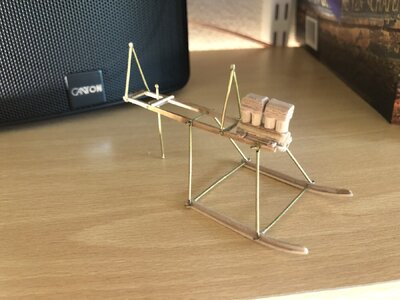
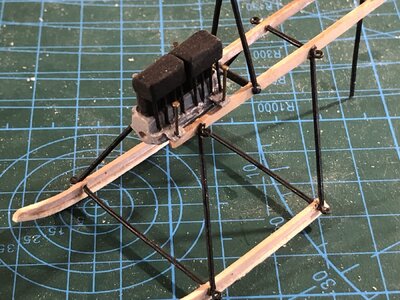
The first dry fit, engine unfinished.
IMG_1794.jpeg

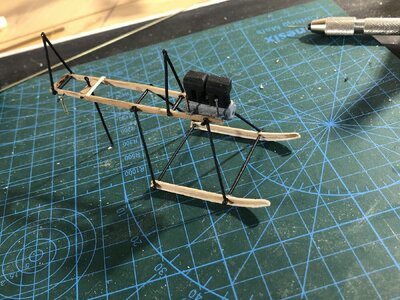
View from the RH side, engine model painted.
IMG_1797.jpeg

Engine, seen from the left
IMG_1798.jpeg

And a close up of the engine, with push rods clearly visible.IMG_1799.jpeg

It’s still a dry fit, for now I’ll let it simmer for a while to see if I’m sufficiently satisfied with the results.
 
The past few days saw the emergence of a scratch build engine.
Since this is a first for me, it took me some time, before anything came off it…
For starters I took the Argus engine as the basis. Fokker did use a variety of engines on his Spiders, the first was a 50hp Argus, later on he used a 75hp Argus, a 95 hp Mercedes, all liquid cooled and there’s also evidence of an air cooled Renault engine being installed at one point.
There is not too much information about dimensions and such, other than a few pictures and a very schematic drawing of a 100hp Argus engine, so I decided to use the drawings I have as a reference.
As far a materials go, I still have some pieces of usable scrap from my Bluenose build, so I started chipping wood. It took me at least two tries before something sensible came out.
Now I have my first engine, which now enters its evaluation time, the main question being whether or not it’s deemed good enough for application.

The first dry fit, engine unfinished.
View attachment 446055

View from the RH side, engine model painted.
View attachment 446052

Engine, seen from the left
View attachment 446053

And a close up of the engine, with push rods clearly visible.View attachment 446054

It’s still a dry fit, for now I’ll let it simmer for a while to see if I’m sufficiently satisfied with the results.
That is looking very nice, Johan. What some paint can do!
Building scratch has its charm. A lot of interpreting drawings, looking for materials, fitting and measuring, and then deciding whether what you have built can withstand your criticism. With what you have already accomplished: Chapeaux.
Regards, Peter
 
The past few days saw the emergence of a scratch build engine.
Since this is a first for me, it took me some time, before anything came off it…
For starters I took the Argus engine as the basis. Fokker did use a variety of engines on his Spiders, the first was a 50hp Argus, later on he used a 75hp Argus, a 95 hp Mercedes, all liquid cooled and there’s also evidence of an air cooled Renault engine being installed at one point.
There is not too much information about dimensions and such, other than a few pictures and a very schematic drawing of a 100hp Argus engine, so I decided to use the drawings I have as a reference.
As far a materials go, I still have some pieces of usable scrap from my Bluenose build, so I started chipping wood. It took me at least two tries before something sensible came out.
Now I have my first engine, which now enters its evaluation time, the main question being whether or not it’s deemed good enough for application.

The first dry fit, engine unfinished.
View attachment 446055

View from the RH side, engine model painted.
View attachment 446052

Engine, seen from the left
View attachment 446053

And a close up of the engine, with push rods clearly visible.View attachment 446054

It’s still a dry fit, for now I’ll let it simmer for a while to see if I’m sufficiently satisfied with the results.
Good afternoon Johan. Looking good. Does she start or is that Argus still in need of some tweaking.. ;)
 
That is looking very nice, Johan. What some paint can do!
Building scratch has its charm. A lot of interpreting drawings, looking for materials, fitting and measuring, and then deciding whether what you have built can withstand your criticism. With what you have already accomplished: Chapeaux.
Regards, Peter

Thanks Peter,
All of what you describe needs to be done, with the most critical factor one's own criticism.

This really looks like a fun build Johan, complete with its own unique challenges. I love it!

It definitely requires some functioning grey matter, still loads of fun building it.

Wow, that is definitely a different type of modeling. Impressive what you have done so far.

Jan

Indeed quite different from my BN build, still very satisfying. One major common issue: lacking reliable and consistent design information, so AL-FI will definitely be used.

Suddenly a tiny engine emerges!

And tiny the engine is! Length of the engine: 18mm. And here I thought 1:48 building would help me out...

Good afternoon Johan. Looking good. Does she start or is that Argus still in need of some tweaking.. ;)

Tried to start her up, but she blew off an entire cylinder head... (Tried to drill holes for the inlet- and exhaust stubs, but three 2mm holes and a 8,5mm block doesn't work. Redo time!)
 
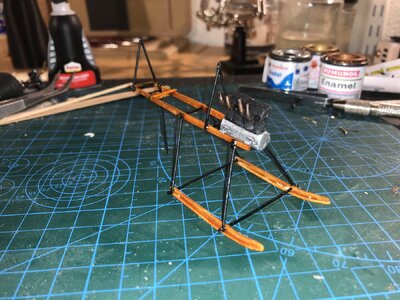
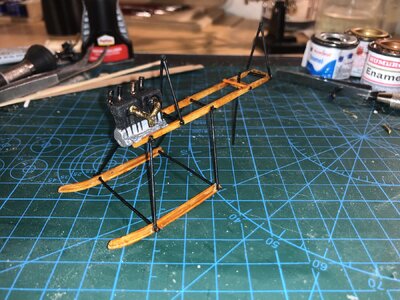
The blown-off cylinder head repaired and the inlet- and exhaust stubs added. For the stubs I used Evergreen dia 2 and heat, generated by a soldering iron. Still a few accessories to be added, but the engine starts to look like something.

IMG_1827.jpeg

IMG_1826.jpeg
 
The blown-off cylinder head repaired and the inlet- and exhaust stubs added. For the stubs I used Evergreen dia 2 and heat, generated by a soldering iron. Still a few accessories to be added, but the engine starts to look like something.

View attachment 446364

View attachment 446365
Good morning Johan….now we are talking!!!….Cheers Grant
 
The blown-off cylinder head repaired and the inlet- and exhaust stubs added. For the stubs I used Evergreen dia 2 and heat, generated by a soldering iron. Still a few accessories to be added, but the engine starts to look like something.

View attachment 446364

View attachment 446365
You gave the engine a very nice up-date, Johan. I can imaging the sound out of those open pipes ………
Regards, Peter
 
Back
Top