Gads! You work is amazing!
-

Win a Free Custom Engraved Brass Coin!!!
As a way to introduce our brass coins to the community, we will raffle off a free coin during the month of August. Follow link ABOVE for instructions for entering.
-

PRE-ORDER SHIPS IN SCALE TODAY!
The beloved Ships in Scale Magazine is back and charting a new course for 2026!
Discover new skills, new techniques, and new inspirations in every issue.
NOTE THAT OUR FIRST ISSUE WILL BE JAN/FEB 2026
You are using an out of date browser. It may not display this or other websites correctly.
You should upgrade or use an alternative browser.
You should upgrade or use an alternative browser.
French cutter Le Cerf from Ancre drawings, scale 1/48
- Thread starter Moxis
- Start date
- Watchers 13
-
- Tags
- french cutter le cerf
Your carving looks great you have inspired me to try to carve myself. Really nice workmanship.
Regards JANET
Regards JANET
Thanks Jim, stoney71 and Janet for your encouraging words, and all "likes" as well.
Janet, I was afraid to start carving too, but then I realized that it is not so difficult at all. So please go for it! You'll love it. You only need very small burrs and high rpm.
Janet, I was afraid to start carving too, but then I realized that it is not so difficult at all. So please go for it! You'll love it. You only need very small burrs and high rpm.
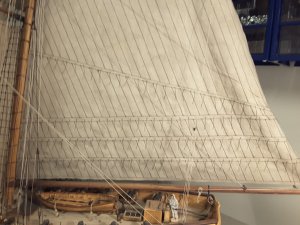
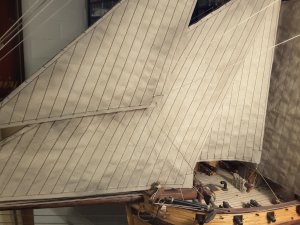
The last update of this log I was thinking to issue about sails. There are many materials and ways to make sails for model ships. After thinking which material would suit me best, I decided to use old, worn cotton bed sheet ready to be thrown away. This is soft, you can almost see through it, and no more used for it's original purpose. And there is lot of it (if the Admiral has not yet thrown it away).
Sails of old ships were seldom white, so I prepared a liquid by adding acrylic colours of brown, green, yellow and black to water, to get a mud colored liquid. I added there also a bit of white PVA glue to get certain stiffness to the fabric.
When fully colored the fabric was spread on old newspapers to dry, and after dried completely the sails were cut with scissors according to sail plan. After that I drew the seam lines with a pencil, and then they were sewn with a sewing machine using the shortest stich.
The last procedure was to spray a haze of matte black paint into the edges of the sails, and finally they were ready to be rigged.
For some of the sails reef lines were glued according to sail plan, and rigging could be started.


So that was it for this log guys. I hope you liked it, and got at least one or two hints for your modelling. At least for me the building of the model and also writing this log was a great pleasure, and I really like this forum because here people are friendly and active and give feedback to your writings, which is not the case at some other forums.
It might be that I will be encouraged enough to continue and issue build log for my present project, we will see....
Sails of old ships were seldom white, so I prepared a liquid by adding acrylic colours of brown, green, yellow and black to water, to get a mud colored liquid. I added there also a bit of white PVA glue to get certain stiffness to the fabric.
When fully colored the fabric was spread on old newspapers to dry, and after dried completely the sails were cut with scissors according to sail plan. After that I drew the seam lines with a pencil, and then they were sewn with a sewing machine using the shortest stich.
The last procedure was to spray a haze of matte black paint into the edges of the sails, and finally they were ready to be rigged.
For some of the sails reef lines were glued according to sail plan, and rigging could be started.


So that was it for this log guys. I hope you liked it, and got at least one or two hints for your modelling. At least for me the building of the model and also writing this log was a great pleasure, and I really like this forum because here people are friendly and active and give feedback to your writings, which is not the case at some other forums.
It might be that I will be encouraged enough to continue and issue build log for my present project, we will see....
- Joined
- Jul 22, 2017
- Messages
- 331
- Points
- 268

Hello Moxis,
The explanation on how you've made the sails is quite detailed. In regards to the actual sewing of the sails, did you do it yourself or did you have help from your Admiral? If she did help, she should become your official, "Sail Seamstress". I also love the way you have added the reef lines and the extra strengthening lining at the corners of your sails. Well done Brother.
Raymond
Canoe21
Lawrence
Hello Moxis
Just found your great log build on the Le Cerf. You sure have done a great job of building her, I just love all of that detail that you have added and also Give your Admiral a Well Done on that great job she has done on your set of sails, ENJOY.
Regards Lawrence
Just found your great log build on the Le Cerf. You sure have done a great job of building her, I just love all of that detail that you have added and also Give your Admiral a Well Done on that great job she has done on your set of sails, ENJOY.
Regards Lawrence
Another fantastic build Moxis,
Do you have any intention to build a display case to keep her safe?
Cheers,
Stephen.
Do you have any intention to build a display case to keep her safe?
Cheers,
Stephen.
Thank you Stephen! It has been standing on our cupboard a few years now without any display case. Gathered a bit of dust but not too much, so I have decided to keep things that way. When she begins to look too dirty I can just toss her into carbage bin quite easily.Another fantastic build Moxis,
Do you have any intention to build a display case to keep her safe?
Cheers,
Stephen.
I have my first shipmodel which was finished 1972, still standing on my workshop table without any display case. It has a nice dust patina on her, but not too much, so that it can still be recognized as a ship. So no problem!
Hi Moxis,
Garbage bin sounds a bit harsh, you could always do what Harold Underhill says he did in his book and "hose off his models with a garden hose".
Cheers,
Stephen.
Garbage bin sounds a bit harsh, you could always do what Harold Underhill says he did in his book and "hose off his models with a garden hose".
Cheers,
Stephen.
Last edited:
What kind of CNC router did you use? Beautiful build.Thanks Raymond, exactly that I have done, I don`t care what other people say, I just make models for my own delight and joy.
Unfortunately there are no pictures about planking the deck. But it was made in the same way as hull, using same material. The only thing that was different, I "painted" the edges of planks with very soft pencil to emulate caulking.
The dinghy on deck was made of thin strips of birch veneer glued together on a plug made of balsa. And all other structures on deck were also made of this material and stained with dark wood stain. Hinges & other metal parts are of thin brass plate which were first painted with matt black and then weathered with dark brown pigments.
View attachment 69771
Stern decorations are of boxwood. A thin plate, about 1 mm thick was first sawn with bandsaw, it was then sanded smooth and decorations drawn and sawn out with jeweler`s saw. The deer was found in Internet, it was scaled down and printed on paper & glued on the boxwood plate. Then it was sawn out, and edges rounded with a small rotary burr.
Letters LE CERF were first drawn and scaled suitably with Corel Draw program. Then they were saved as dxf file, which my CAM progran at cnc router can understand and milled from 1 mm boxwood with very tiny 0,3 mm router bit.
Thin brass chain and eyebolts made of thin iron wire were attached into the rudder.
View attachment 69772
Thank you Gennaro! I have a German made CNC router EAS(Y) 440: https://www.easgmbh-shop.de/CNC-Fra...raesmaschine-Baureihe-EASY/baureihe-eas-y-78/
I bought it a few years ago together with control electronics and CAD/CAM software. Start-up was a bit complicated but with help from the supplier everything went well and now I am using the machine a lot.
The only thing which I would like to change is that the software is only 2D and 2.5D and I would like to make also 3D parts with the machine. But that would need learning of some modern 3D design software & buy new CAM and electronics, which is not so easy any more with my ageing brain.


