
-

SUBSCRIBE TO SHIPS IN SCALE TODAY!
The beloved Ships in Scale Magazine is back and charting a new course for 2026!
Discover new skills, new techniques, and new inspirations in every issue.
NOTE THAT OUR NEXT ISSUE WILL BE July/August 2026 -

Win a Free Custom Engraved Brass Coin!!!
As a way to introduce our brass coins to the community, we will raffle off a free coin during the month of August. Follow link ABOVE for instructions for entering.
You are using an out of date browser. It may not display this or other websites correctly.
You should upgrade or use an alternative browser.
You should upgrade or use an alternative browser.
Gunboat Caustic from dlumberyard
- Thread starter MavRick
- Start date
- Watchers 4
-
- Tags
- caustic the lumberyard

- Joined
- Dec 1, 2016
- Messages
- 6,699
- Points
- 728

clamps clamps and more clamps never enough the Tecumseth need a lot i had to raid Ev's craft and hobby room for more
clamps clamps and more clamps never enough the Tecumseth need a lot i had to raid Ev's craft and hobby room for more

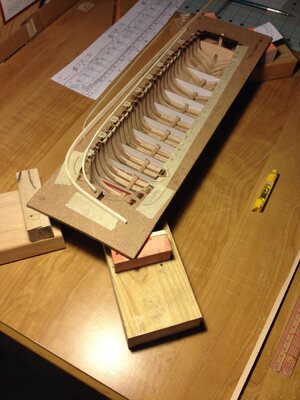
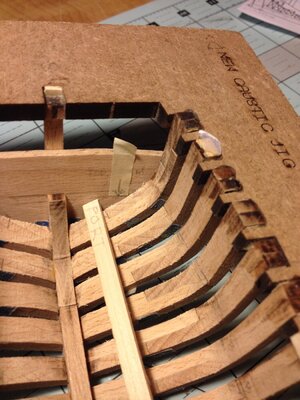
While preparing for clamp installation I noticed that it wasn't meeting transom at proper height. I'm doing some sanding of frames to accomplish this.
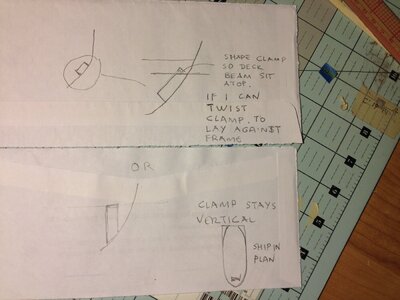
Stern photo show piece of tape where top of clamp is to be. Ive added a couple of sketches for possible solutions once the sanding is done.
If I can twist the clamp to lay against the frame I can shape the top to meet the deck beams. If the clamp cant be twisted , it will stay vertical .
May need to shape the bottom of the clamp to meet the frames along with a taper towards the transom .
Attachments
- Joined
- Dec 1, 2016
- Messages
- 6,699
- Points
- 728
i am seeing the same thing building the Tecumseth the clamps take a drastic twist at the stern frames.
i think the clamp should be twisted to sit against the frames then a notch cut in the upper edge for the beam. From different research sources shallow notches were cut along the clamp for the ends of the deck beams.

the clamp would either have notches for the deck beams or angle the top of the clamp. As the clamp reaches the stern it is twisting but the top surcace is level with the deck beam

i think the clamp should be twisted to sit against the frames then a notch cut in the upper edge for the beam. From different research sources shallow notches were cut along the clamp for the ends of the deck beams.
the clamp would either have notches for the deck beams or angle the top of the clamp. As the clamp reaches the stern it is twisting but the top surcace is level with the deck beam
Last edited:
Davei am seeing the same thing building the Tecumseth the clamps take a drastic twist at the stern frames.
i think the clamp should be twisted to sit against the frames then a notch cut in the upper edge for the beam. From different research sources shallow notches were cut along the clamp for the ends of the deck beams.
View attachment 252032
Thank you for your comment and CAD drawing. It helps me a lot!
Finishing up installing clamps. I took piece of wood and made a breast hook. The white color isn't the wood but the paper template attached to guide in shaping.
The laser cut wood at mid ship are the three heavy beams, one will be installed under each of the cannons.

The laser cut wood at mid ship are the three heavy beams, one will be installed under each of the cannons.
Last edited by a moderator:


Thank you for your comments, the Oneida is a challenging build and together with Caustic keeps me busy. Look forward to your Oneida build when time allows.Looking great Mav, I like your Oneida as well, I’ve got one (Oneida) at about the same stage as yours, but I need to un glue the bow cants and re do them…. More space and wrong angle on the port side…. One day…")

- Joined
- Dec 1, 2016
- Messages
- 6,699
- Points
- 728
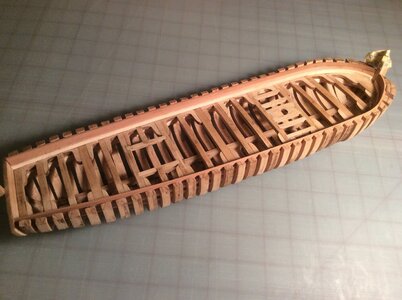
With a few knees left to install I removed the Caustic from the jig. With all the various wood members joining together she's becoming a rigid unit.
i noticed the same thing with the Tecumseth, once the wales and clamps are added the hull becomes quite rigid and then with the deck structure it really became a strong structure.
i have been following your build and the Caustic is looking very nice.
i noticed the same thing with the Tecumseth, once the wales and clamps are added the hull becomes quite rigid and then with the deck structure it really became a strong structure.
i have been following your build and the Caustic is looking very nice.
Thank you Dave. She’s a great kit to work on.With a few knees left to install I removed the Caustic from the jig. With all the various wood members joining together she's becoming a rigid unit.
i noticed the same thing with the Tecumseth, once the wales and clamps are added the hull becomes quite rigid and then with the deck structure it really became a strong structure.
i have been following your build and the Caustic is looking very nice.
A very good lookinh hull - good work !!!
Thank you for your words of encouragement .A very good lookinh hull - good work !!!
Back after bit of work on another hobby. Caustic has had frames cut down near final height. I’ve added planking to inside bulwark. I’ve also completed installing knees and added waterways. Will add spacers between frames and proceed with sanding outside hull.
Attachments
Kurt Konrath
Kurt Konrath
Getting frames out and cut to proper height is like taking a youngster out for their first haircut!
And the youngster didn’t fidget too much.Getting frames out and cut to proper height is like taking a youngster out for their first haircut!
