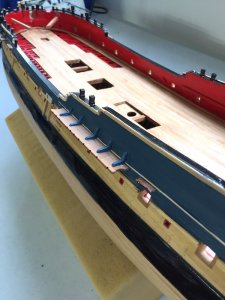
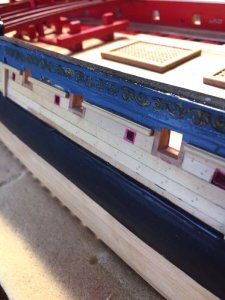
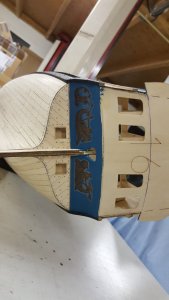
H.M.S Enterprise plank on frame CAF Models 1/48.

Great work Brian,the shade of blue is spot on.I have seen many discussions about mixing colours to obtain this shade of blue.As a precaution,I would be tempted to mask and seal the blue before and after applying the decals using something like Testors dullcoat in aerosol form.

Kind Regards

Nigel
 
Hi Brian,
Are those decals are part of the painted or carving decor? I cannot imagine how decal can substitute for carving.

Hi Jim,
the decals are the same as for plastic models. Soak in water and apply. The model has a painted frieze, not carvings.

Nigel, thank you. Yes I will apply a coat of Testers dull coat lacquer before applying the decals. And the blue I am using is correct period colour. Some models are painted bright blue which is incorrect.
 
Last edited by a moderator:
Hi Brian

Yes I totally agree,your blue is spot on.I have seen many modellers struggle to get the correct shade and yes bright blue is incorrect.I tried 3 different artists acrylics before I was happy with the colour on Royal Caroline.The final colour is mixed by myself.

Kind Regards

Nigel
 
Hi Brian,
Are those decals are part of the painted or carving decor? I cannot imagine how decal can substitute for carving.

Hi Jim,
the decals are the same as for plastic models. Soak in water and apply. The model has a painted frieze, not carvings.

Nigel, thank you. Yes I will apply a coat of Testers dull coat lacquer before applying the decals. And the blue I am using is correct period colour. Some models are painted bright blue which is incorrect.
[/QUOTE]
Hi Brian,
I've done a lot of plastic modelling, can I suggest that you use GLOSS varnish before you apply the decals, matt dries with a very fine pitted surface finish (which is why it looks matt) which causes micro bubbles of air to get trapped under the decal, around the transparent carrier, this is what causes 'silvering' by applying gloss varnish as a decal base, you eliminate this. simply airbrush a light coat of flat (matt) varnish over the decal and the glossed area to seal and drop it back to matt and you're done.

Apologies if you all know this already and I'm teaching my granny to suck eggs - I'm still new around here ! :)
 
I've done a lot of plastic modelling, can I suggest that you use GLOSS varnish before you apply the decals, matt dries with a very fine pitted surface finish (which is why it looks matt) which causes micro bubbles of air to get trapped under the decal, around the transparent carrier, this is what causes 'silvering' by applying gloss varnish as a decal base, you eliminate this. simply airbrush a light coat of flat (matt) varnish over the decal and the glossed area to seal and drop it back to matt and you're done.

Thanks Nick, I have bought this kit and look forward to building it after I finish my current build. I will be sure to test your suggestion on a scrap piece of wood - it makes sense as decals are best suited for a smooth, flat surface.- again, thanks for the tip.
 
This is interesting, and I have not encountered this before with any timber ship kit. The model came with decal/ transfers of the decorative fretwork for the exterior trims of the model. First photo is the transfers, and the second photo is the instruction booklet showing where they are to be applied.
View attachment 84696View attachment 84697
Could you take a picture of the stickers without distortion, I want to try to make them for my model. My mail piter1956@ukr.net Thank.
 
This is looking amazing, i can not get enough of this Brian. Are you planning any long boats or other support boats?

Hi Brito, yes I think I will add a longboat and full rigging to the model.

I added the decals to the model and it was an extremely disappointing result. You can barely make them out over the dark blue background colour. I think I'm going to paint over them as its a very poor rendition of ships decoration.

.jpeg-imag.jpg
 
Hi Brito, yes I think I will add a longboat and full rigging to the model.

I added the decals to the model and it was an extremely disappointing result. You can barely make them out over the dark blue background colour. I think I'm going to paint over them as its a very poor rendition of ships decoration.

Maybe the decoration painting are barely visible, but I guess that this is relatively realistic - I guess, that if a real ship painting has contact with salt water and sunshine etc. that these paintings often lost colour
 
I agree with both opinions, it may indeed be how the paintings would look like with the natural aging on the ships and be close to accurate but as one, building a model like this one or any other, you would surely want this details to stand out much more, unless, (i think), you would weather the hole model to match the fainted colour effect of these decals.
 
Last edited:
Hi Maarten,
the black paper caulking is a bit of a complicated process. First of all do not buy black paper. The commercial black paper is too refined and not suitable, as it does not allow the glue to penetrate through the pours of the paper properly..
You need brown paper similar to what you get from a grocery shop for your fruit in a brown paper bag if you follow what I mean, then cut it into slivers and soak in diluted black acrylic paint and then hang out to dry.

heres a link I did on this technique-

The requested page could not be found.
 
Hi Maarten,
the black paper caulking is a bit of a complicated process. First of all do not buy black paper. The commercial black paper is too refined and not suitable, as it does not allow the glue to penetrate through the pours of the paper properly..
You need brown paper similar to what you get from a grocery shop for your fruit in a brown paper bag if you follow what I mean, then cut it into slivers and soak in diluted black acrylic paint and then hang out to dry.

heres a link I did on this technique-

Hello @Brian077 ,can you repost the link please,it is the old link from the old Sos before the upgrade,they do not work anymore,thank!
 
Back
Top