Thats a great explanation, thank you.
-

Win a Free Custom Engraved Brass Coin!!!
As a way to introduce our brass coins to the community, we will raffle off a free coin during the month of August. Follow link ABOVE for instructions for entering.
-

PRE-ORDER SHIPS IN SCALE TODAY!
The beloved Ships in Scale Magazine is back and charting a new course for 2026!
Discover new skills, new techniques, and new inspirations in every issue.
NOTE THAT OUR FIRST ISSUE WILL BE JAN/FEB 2026
You are using an out of date browser. It may not display this or other websites correctly.
You should upgrade or use an alternative browser.
You should upgrade or use an alternative browser.
H.M.S Minerva plank on frame 1/48 scale - Prototype Pilot Model
- Joined
- Apr 15, 2020
- Messages
- 448
- Points
- 278

By the way, a highlight of museum model Minerva is also a major reason for me to develop this project. It is the frieze at the stern of the ship. I will provide transfer materials. You don't need to draw them by hand. Unlike stickers, transfer printing is similar to the effect of real painting, similar to the frieze painted on wood, but it requires some skills.
Last edited:
Many thanks for timber differences education @DaHaimodel. So...to reiterate my question: will we have a choice of timber to choose from when will order the kit, correct?
- Joined
- Apr 15, 2020
- Messages
- 448
- Points
- 278

I think we can offer pear wood, jujube wood and booxwood. I'm even considering cherry wood. As for the order, need to wait from October to November.that's need to wait for at least the completion of the assembly of all the frames, hawse pieces and stern structures of the hull. If these are all OK, can start accepting orders.Many thanks for timber differences education @DaHaimodel. So...to reiterate my question: will we have a choice of timber to choose from when will order the kit, correct?
Very good news!!! I think it is worth waiting...I think we can offer pear wood, jujube wood and booxwood. I'm even considering cherry wood. As for the order, need to wait from October to November.that's need to wait for at least the completion of the assembly of all the frames, hawse pieces and stern structures of the hull. If these are all OK, can start accepting orders.
Good morning...ahh guys buy the South African boxwood- our Poor little country needs all the forex we can getI echo everyone's comments and enthusiasm. The kit quality, at a glance is like nothing I've ever seen. I will piggyback on Kurt's question Brian. In your opinion, does this Yellow Tang wood look like a workable substitute for English Boxwood?
I ask, because only 4 days ago I bought a "live edge" piece of not "English", but "South African" boxwood of 4in. x 5in. x 43in., for $300!It was a "clear" piece, i.e., no checks, cracks, worm holes or bark inclusions, but just so expensive. I don't even have a use for it at the moment, but with supplies drying up, I decided just to add to my inventory. Finding a workable substitute would be a welcome development.
Ken
- Joined
- Oct 15, 2017
- Messages
- 1,191
- Points
- 443

Thank you for the thorough explanation. I will now search for "Jujube" and "Golden Tang" woods.There are many varieties of wood in China,once I compared two kinds of yellow Tang wood from different provinces, but the difference is quite obvious. Also, in China, boxwood from different provinces is different, among which boxwood from Hubei is recognized as the best, and the wood I purchase is from Hubei. Brian's wood comes from the north of China, but to be exact, this kind of wood may belong to jujube wood. In the past four years, I looked for many wood suppliers, but they were unable to provide this kind of wood. Only one supplier told me that he selected it from the thousands of tons of wood he purchased. I only reserve about 4 tons of this kind of wood, and I'm not sure whether I can purchase the same more. If I have the opportunity, I'll reserve some more.This kind of wood is called 'Golden Tang' wood by Internet, which can also be collectively referred to as jujube wood. But as I mentioned earlier, the supplier doesn't tell me what kind of tree this kind of wood is and where it comes from. Maybe this is their trade secret. He once told me vaguely that even if they came from the same area, the varieties of trees were different.
But at least one thing, there has been a saying 'hundred years of pear wood and jujube wood' in China. Both pear wood and jujube wood were the preferred wood for carving in ancient China. However, because there was no power tools in ancient times, jujube wood was too dense and hard to be carved manually (compared with pear wood), so pear wood was used more widely. But the color of pear wood is quite different from boxwood. The jujube wood model is closer to the style of the museum and can be painted(frieze) directly.
I was getting tired of getting https://en.wikipedia.org/wiki/Yellow_tang, no matter how I changed my search criteria!

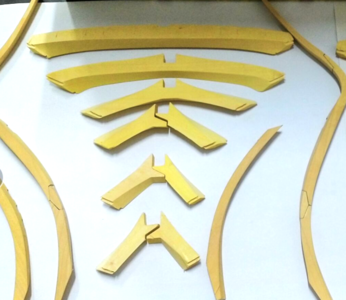
I am moving my attention now to the transom pieces. They are already bevelled and have tenon and mortice joinery.
As I assemble each item, I am in communication with Dahai model with feedback to them regarding fitment of pieces and assembly issues. I believe there will be 2 versions of this kit available. One with tenon and mortice joinery for the most experienced builder, and a simplified version for the middle of the road model builder.
.
.

Last edited:
Hi Bryian - Stunning presentation so far and the jigs are the best I've seen. I'm trying not to get too excited as the $$$$ part of the brain is telling me I'm going to need 3 Bank Managers in the family to purchase the kit. No doubt in my mind I have to have one (to fully rig) just comes down to the dollars. Just thought it makes a very interesting comparison in different developer approach to kits say to the recent Belle Poule.I believe there will be 2 versions of this kit available. One with tenon and mortice joinery
Last edited:
Hi Brian,
Have you already seen anything about the fittings for this kit? Like possible gun barrels, capstan, etc etc.
And do you have a detailed picture of Minerva herself. See she is between the frame members on picture 1. Is she in golden tang or in box?
Have you already seen anything about the fittings for this kit? Like possible gun barrels, capstan, etc etc.
And do you have a detailed picture of Minerva herself. See she is between the frame members on picture 1. Is she in golden tang or in box?
- Joined
- Apr 15, 2020
- Messages
- 448
- Points
- 278

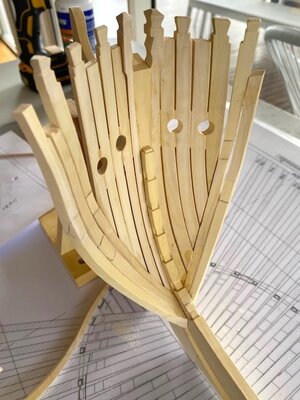
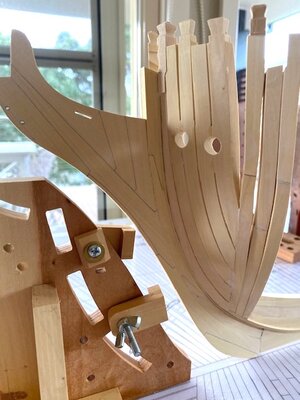
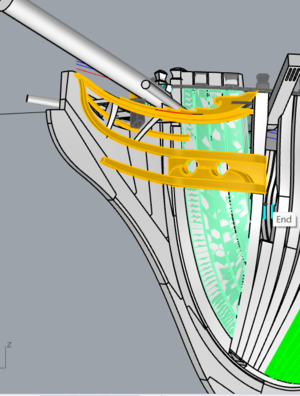
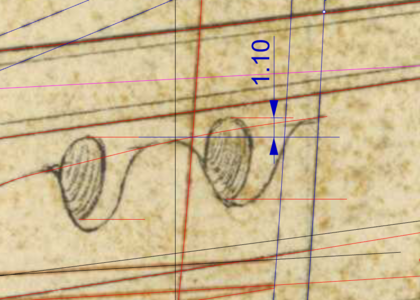
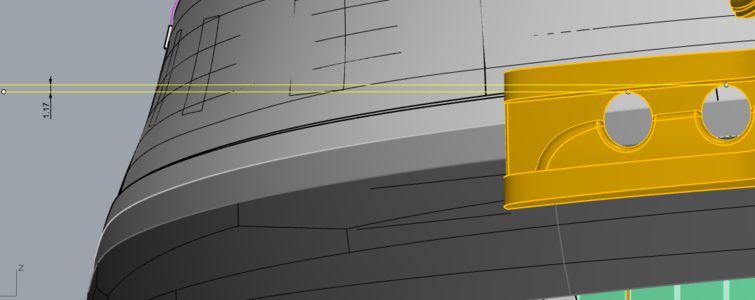
Hi trussben,Do the Hawse holes on Minerva really have that big of an offset in height between them? Typically the outer one is only an inch or two lower - that picture looks like it’s a lot more like half the total diameter (6”)???
It may be the reason for the angle of shooting
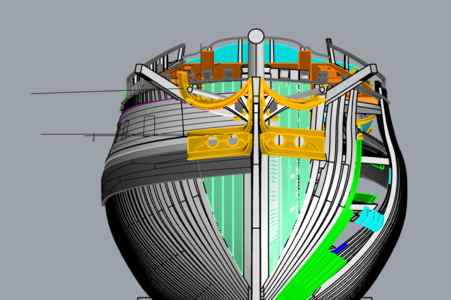
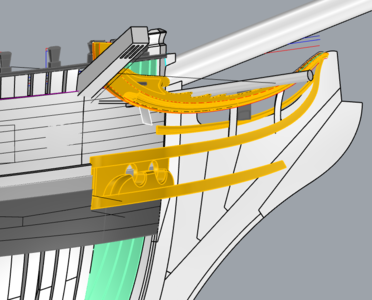
The value measured from the 3d design is about 2 1/4“,
Last edited:
- Joined
- Apr 15, 2020
- Messages
- 448
- Points
- 278

Kurt Konrath
Kurt Konrath
The jig board looks great for use in scratch building to hold frames and such in place while glue dries.I have started to glue together the keel and stem structure. All pieces fit perfectly together like a jigsaw puzzle.
This is a real pleasure to assemble, with barely any sanding or filing required.
.View attachment 316428View attachment 316429View attachment 316430
Do the Hawse holes on Minerva really have that big of an offset in height between them? Typically the outer one is only an inch or two lower - that picture looks like it’s a lot more like half the total diameter (6”)???
Thank you sir for being so observant and you are correct. One side is slightly out of alignment and needs to be rectified. I have only tacked it in place with a small amount of glue.
By the way, glad to see you here. I have followed you for years.
Like your reply! Love the boatHi Ted,
Your POF (or fully framed model) Kingfisher left a deep impression on me, which is the ancestor kit I know.
Although I can't understand the meaning of all the sentences you said accurately, you mentioned time. There may not be enough time.
Indeed, time is a big factor in my consideration.Maybe every developer has his own ideas, which will accompany his products. A very important consideration is to save time. I hope most modelers can reduce the 'pain' of milling, but some people think that milling is a kind of happiness, whether it is pain or pleasure, milling is indeed time-consuming and there is a lot of dust. My idea is to reduce the milling time as much as possible, so that modelers can enjoy the pleasure of completing a model and the assembly process, in which they have a deeper understanding of the structure of the ship model.
Therefore, the simpler, more efficient and practical design concept is always with me. Through Brian's post, I also learned a lot of different needs and feedback. The balance between price and quality is the consideration of many modelers.
Making these anchor chocks by hand is very tedious, tedious and time-consuming, but everyone knows this structure, and it is very simple. Isn't good to leave this low-level work to CNC? This kind of processing may only take 1 hour to process all the anchor chocks required by stern sections, and it is quite accurate. This can save modelers a lot of time.
View attachment 316745
View attachment 316767
In the past, because the kit of POF was too complex, it was difficult to popularize, and it could not solve the complex splicing, especially the 'real' framesView attachment 316768
Since the sided of frame is different from the bottom up, almost no one can solve this problem before, so it (frames) can only be simplified greatly. But this is very simple for me, so the 5th rate is the smallest ship I will develop. Assembly plates and gaskets of different thickness can solve this problem, and the cost is only $10-20.
View attachment 316769
View attachment 316770
Due to the price factor, I redesigned the frame jig, and I almost gave up the original complex jigs, in which the assembly board can be used for the base of jig one more time, saving costs and improving utilization. It is simple and efficient, and will not interfere with the planking on main wale.But it still needs to be tested and optimized.
Said too much,...Ha,
Thank you!
Dahai
- but please stop waving temptation in front of me!!!
Ted
A superb kit and superb building.I am moving my attention now to the transom pieces. They are already bevelled and have tenon and mortice joinery.
As I assemble each item, I am in communication with Dahai model with feedback to them regarding fitment of pieces and assembly issues. I believe there will be 2 versions of this kit available. One with tenon and mortice joinery for the most experienced builder, and a simplified version for the middle of the road model builder.
.
.View attachment 318022
Ted
- Joined
- Oct 15, 2017
- Messages
- 1,191
- Points
- 443

Bryian, I envy you and your opportunity to build such a prototype. With that said, I understand your "pioneering" role in doing so. You are testing the waters, providing feedback to DaHaimodel, enabling them to make adjustments, improving the model. I know this is not easy, although from your reporting the issues seem to be small and infrequent.
Thanks for forging ahead! Maybe the final kit can have a small print note somewhere: "Officially Tested by Bryian."

Cheers,
Ken
Thanks for forging ahead! Maybe the final kit can have a small print note somewhere: "Officially Tested by Bryian."

Cheers,
Ken


