Help with rigging

Joined
Jul 3, 2018
Messages
30
Points
58

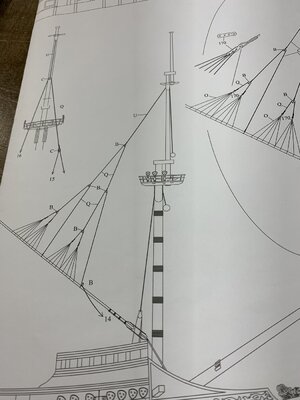
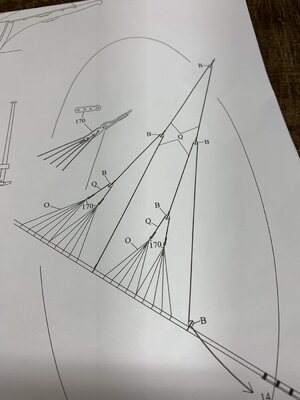
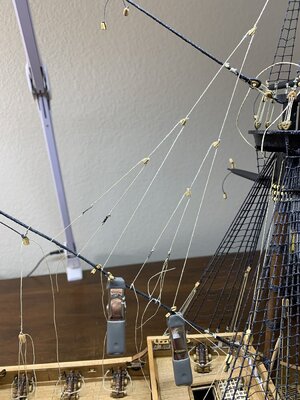
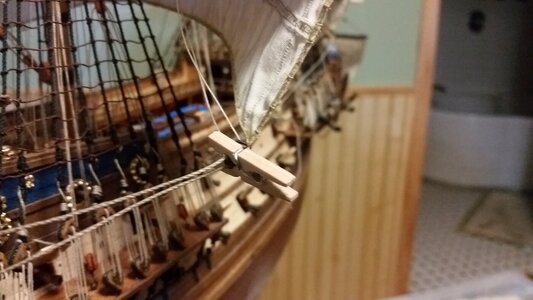
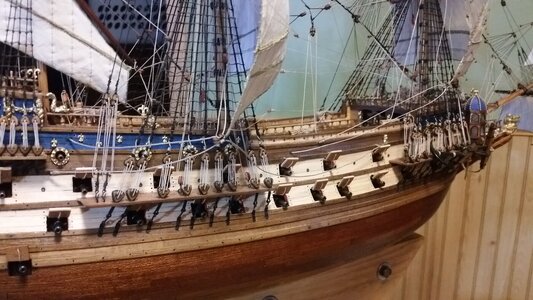
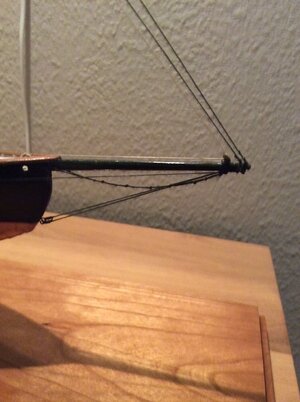
Attached are photos of the point I’m at in rigging the Amati Revenge. I’ve been working on this for 2 weeks with no luck. Whenever I move one line some or all other lines move or sag. Is there a trick or secret to accomplishing this? I would so appreciate any help you good folks could give me.
Thank you
Mike33987586-8A4F-4DCD-9546-9AA613EB0445.jpeg433E2787-31FD-4B36-BB93-7F0773EABFA5.jpegB18802A5-69C2-4FED-BFA4-0385D5DC92FF.jpeg
 
Last edited by a moderator:
Attached are photos of the point I’m at in rigging the Amati Revenge. I’ve been working on this for 2 weeks with no luck. Whenever I move one line some or all other lines move or sag. Is there a trick or secret to accomplishing this? I would so appreciate any help you good folks could give me.
Thank you
Mike
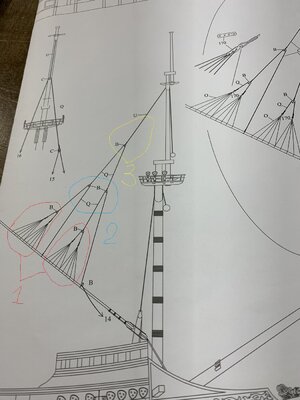
Colleague, good afternoon. That's how I see this job. By stages signed. See the photo.33987586-8A4F-4DCD-9546-9AA613EB0445.jpeg
 
Last edited by a moderator:
Attached are photos of the point I’m at in rigging the Amati Revenge. I’ve been working on this for 2 weeks with no luck. Whenever I move one line some or all other lines move or sag. Is there a trick or secret to accomplishing this? I would so appreciate any help you good folks could give me.
Thank you
Mike
The 'stiffness' in real rope and scaled down model rope does not scale down proportionately. Thus model ropes are much stiffer (on the model) are much stiffer than real ropes on the real ship. Everyone and every model has this problem. There is no good 'cure' for it. Some people put smaller ropes on the model; but you can't really reduce the size enough to make a big difference. Some people paint the ropes with 'whatever'; whatever translates to just about everything that can be applied to a string. The result usually looks like 'crap'. Some people (like most of the European builders) turn their model ropes from crochet thread (which by its' very nature has very little internal stiffness, www.knitting-warehouse.com). Sorry I don't have a perfect fix, but there isn't one.
 
Do we have any answers on this forum as to obtaining a natural sag on lines, rope etc, ? How do we give them weight ?
 
Является ли установка показанного выше типа такелажем общим правилом так, чтобы такелаж был направлен вверх по направлению к мачте?
Луиджи Софт, в зависимости от того, о каком снасти идет речь. Думаю, нужно смотреть на каждую подкатку индивидуально. Здесь я попытался ответить на конкретный вопрос.

Luigi Soft, depending on what kind of tackle we are talking about. I think you need to look at each ride individually. Here I tried to answer a specific question.
 
Last edited by a moderator:
If your referring to the mast standing rigging. I had success in putting slight tension on the rigging as I pu it on but I don’t glue it down until all the lines are on, then I start from the bottom and work up. You may end up doing several t
 
If your referring to the mast standing rigging. I had success in putting slight tension on the rigging as I pu it on but I don’t glue it down until all the lines are on, then I start from the bottom and work up. You may end up doing several times
 
Do we have any answers on this forum as to obtaining a natural sag on lines, rope etc, ? How do we give them weight ?
Adding weight to a catenary in a line is not an option. Because scaled down line is many times more stiff than line at full scale and resists sharp bends, the most common solution is to use watered down PVA glue to stiffen the line in the position you want it to be in to simulate the natural shape of a hanging line. The PVA does very little to change the appearance of the line if used sparingly. The line needs to be held in the proper shape as it dries. You can hang clothespins or clamps on the line as weights, or other methods to hold it in the shape you want.

So, where a line passed through a block, in order to prevent the line from going through the block with a gentle or wide curve, you fold the line over the sheave in the block, clamp the line and pinch it such that the line forms a sharp bend. Then, use a paint brush to apply watered down PVA glue to the line on both sides of the block, and let it dry. You'll learn how much PVA is enough to hold the line's shape with some practice. Release the clamp after it dries, and adjust the curve of line with your fingers to make it appear to hang properly in a catenary curve.

Take look at the main course brace line below. This technique does not have to be used on every block, but it should be used on thicker lines that are more stiff. If you pay lots of attention to the appearance of how lines hang and attempt to make them appear realistic with this and other techniques, your model will appear much more like a real ship, and not a model.

Clamped brace line drying.
1299 Glue Main Sheet and Clamp for Natural Hanging Curve.jpg

The main course brace lines below appears to hang naturally when stiffened in areas where it needs to make a sharp bend, such as when it passes through a block.
1302 Main Tack and Sheet Lines Done on Stbd Side.jpg
 
My post might bring on more confusion, but I shall try as what I want to say not using any pictures is hard to do. So, I shall try to explain in stages and I am sure it is open for debate.

1. All of the Shroud pairs and ratlines done and completed.
2. At the Bowsprit, there are two major sets of lines. One set should start from the bowsprit to the LOWER hull at the Bow. This BEGINS the first set of stationary tension.
3. Then at the Bowsprit again, the other set should start at the bowsprit and go up to (several locations) on the Foremast. This sets up a major stationary tension.
4. Then you want to install a "stay" and a "preventer stay" if the plans call for it traveling from the BASE of the foremast to several locations on the Main Mast.
5. Then repeat for the Base of the Main mast to travel to several locations to the Mizzen Mast,

As you can see there is a pattern going from front to back as it is constantly adding tension to the stays as you work back. Then if you have any other rigging - there is enough tension on the lines to complete the work.

Yes, the Stays do finally loop around the entire group of shrouds. Most like me when I first started, I rigged the stays first - this is entirely wrong.

I hope this helps as this is basic info.
 
Attached are photos of the point I’m at in rigging the Amati Revenge. I’ve been working on this for 2 weeks with no luck. Whenever I move one line some or all other lines move or sag. Is there a trick or secret to accomplishing this? I would so appreciate any help you good folks could give me.
Thank you
Mike
Alexander74's approach to start rigging at the bowsprit and move upward to the upper end of the stay is the best approach. Here are some details on how to make the crow's feet while suspending the upper portion of the stay line in a temporary fashion so you can work on the line easily:

The crow's foot was rigged as follows. The euphroes were lashed to each end of a segment of line, which also passed through a 5mm block. A long length of 0.30mm line was attached to the block, and the other end of it was clamped temporarily to the top of the fore topmast. The length of this line was adjust to place the block and two euphroes at the proper distance from the bowsprit. To make sure that the lines are all equally taut in a Dutch style crow's foot stay, you start work at the bowsprit and work toward the large 7mm block at the end of the stay line. Several short segments of 0.30mm black line were cut for the lines that pass through the euphroes. You start with the line centermost relative to each euphroe, which is the line that passes through the last hole in the euphroe at its bottom end. For each line,you tie the forward end to the bowsprit with a slip knot so it stays tight on the bowsprit. Add a tad of glue to this knot. Then you pass it through the euphroe rearward and secure it to the bowsprit with an overhand bend followed by a half hitch. When the forward most euphroe line is secure by one line, run a similar line through the end of the second euphroe at the rear. Adjust the length of this line so that both euphroes are equidistant from the 5mm block above. The lanyard off the 5mm block must have enough tension to allow you to see the angles of the lines and the placement of the euphroes.When the forward most euphroe line is secure by one line, run a similar line through the end of the second euphroe at the rear. Adjust the length of this line so that both euphroes are equidistant from the 5mm block above. The lanyard off the 5mm block must have enough tension to allow you to see the angles of the lines and the placement of the euphroes.When the forward most euphroe line is secure by one line, run a similar line through the end of the second euphroe at the rear. Adjust the length of this line so that both euphroes are equidistant from the 5mm block above. The lanyard off the 5mm block must have enough tension to allow you to see the angles of the lines and the placement of the euphroes.

Now rig the lines for through the next hole up in each euphroe. Take care to tension each euphroe line so that the previous line does not go slack from over-tightening the next line. all three lines in each euphroe must have equal tension. This is critical if the end result is to look good. It takes several tiny adjustments making the second knot in each euphroe line and the position of the loops around the bowsprit to get everything even, so don't cinch the knots tight or apply glue until you are sure the tension is right.

When the euphroe lines are done, unclamp the 0.3mm line from the mast, and pass it through the center of a 7mm single block. You can now choose the position of the 7mm block, and lash the end of the 0.5mm stay line to the block. The take the end of the 0.30mm line and pass it through the 5mm block that was lashed to the bowsprit just behind the spritsail topmast top. run the line rearward along the bowsprit and tie it to the cleat on the side of the bowsprit over the bow deck.


Making euphroes, which are used more often than blocks on early vessels.
821 Fabricate Two Walnut Euphroes.jpg


Tying a stay line portion to the euphroe.
821 Lashing a Euphroe.jpg


The position of the euphro is established using a clamp until the first of the lowest line segments is tied off to the bowsprit.
822 Begin Rigging Fore Topmast Stay.jpg


While tying the lowest segments of the stay, the upper end is held temporarily with a clamp to the masthead.
823 Line Held Temporarily With Clip on Fore Topmast.jpg


Each loop for the lowest is made and adjusted by making and re-making the knots on the bowsprit to get the tension just right. Start with the segment at the center of the crow's foot, the line that passes through the lowest hole in each euphroe. Rig these centermost lines for each euphroe before rigging the lines higher and lower on the bowsprit.
824 Begin Rigging Fore Topmast Stay Crowsfeet.jpg


Note that the euphroes are both at the same height relative to the stay line. Once tension of all lines is acceptable, lock the lines and the knots in place with watered down PVA glue.
825 Apply Diluted PVA Glue.jpg


Now that the lower crow's feet are complete, rig the upper portions of the stay. Tie the upper end of the stay around the masthead, and tension the completed stay by tying off the lanyard for the stay to the belaying point. You can see this lanyard coming down above the crow's feet and passing through the block stropped to the bowsprit just behind the top for the sprit topsail. In this case, the line runs aft and is belayed to a cleat on the rear end of the bowsprit.
826 Stay Complete.jpg


Here is a picture of where the top end of the stay is tied, on the masthead of the fore topmast.
827 Fore Topmast Stay Mouse.jpg


You can see the entire fore topmast stay and the blocks and euphroe positions.
828 Fore Topmast Stay Complete.jpg


The example above was a forestay with crow's feet. The same method is used for backstays with crow's feet on early vessels like HMS Revenge. When any lines are attached to stays, or in the case below, the rear shrouds, make your best effort to not over tighten the line such that the stay or shroud are pulled out of position. As you attached more lines to the stays, they will get pulled father and farther out of position if you have too much tension on the lines. Try to keep the stays as straight as possible.
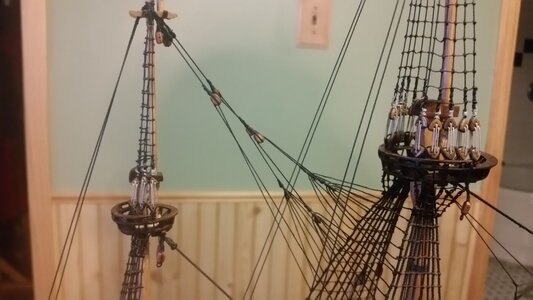
881 Stained Mizzen Staylines Black.jpg

Watered down glue applied to the crow's feet, and allowed to dry while the clamps add weight to the stay they are tied to, will stiffen the lines so they retain their shape with sharp bends at the points where they pass through the euphroes. The example below is my first time rigging crow's feet, and it's not the best, but it's good enough.
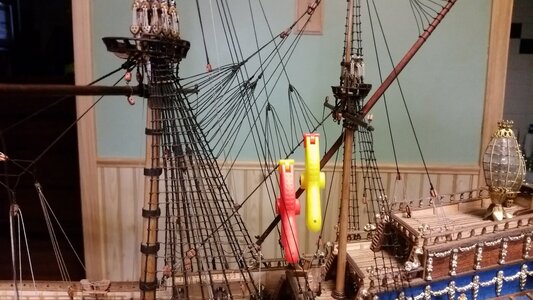
972 Lacquer Crow's Feet to Stiffen.jpg
 
Last edited:
Adding weight to a catenary in a line is not an option. Because scaled down line is many times more stiff than line at full scale and resists sharp bends, the most common solution is to use watered down PVA glue to stiffen the line in the position you want it to be in to simulate the natural shape of a hanging line. The PVA does very little to change the appearance of the line if used sparingly. The line needs to be held in the proper shape as it dries. You can hang clothespins or clamps on the line as weights, or other methods to hold it in the shape you want.

So, where a line passed through a block, in order to prevent the line from going through the block with a gentle or wide curve, you fold the line over the sheave in the block, clamp the line and pinch it such that the line forms a sharp bend. Then, use a paint brush to apply watered down PVA glue to the line on both sides of the block, and let it dry. You'll learn how much PVA is enough to hold the line's shape with some practice. Release the clamp after it dries, and adjust the curve of line with your fingers to make it appear to hang properly in a catenary curve.

Take look at the main course brace line below. This technique does not have to be used on every block, but it should be used on thicker lines that are more stiff. If you pay lots of attention to the appearance of how lines hang and attempt to make them appear realistic with this and other techniques, your model will appear much more like a real ship, and not a model.

Clamped brace line drying.
View attachment 233522

The main course brace lines below appears to hang naturally when stiffened in areas where it needs to make a sharp bend, such as when it passes through a block.
View attachment 233523
Regarding the passage of a line through a block with a naturally appearing curve and not a sharp angle entering or leaving, I always and recommend using a matching drill bit and either by hand or with an electric drill/grinder "rounding out both sides of the block holes to form the top of a sheave as well as better creating the "groove" for the fall to be settled within the block around the sheave and not sitting on the block face. This takes a good bit of time and patience, particularly with small double or multiple sheave blocks but that is part of the hobby time in producing a more "realistic" or visual presentation of the rigging lines. Just my own approach and suggestion that makes the sag in the lines easier to achieve as is desired. Rich (PT-2)
 
Regarding the passage of a line through a block with a naturally appearing curve and not a sharp angle entering or leaving, I always and recommend using a matching drill bit and either by hand or with an electric drill/grinder "rounding out both sides of the block holes to form the top of a sheave as well as better creating the "groove" for the fall to be settled within the block around the sheave and not sitting on the block face. This takes a good bit of time and patience, particularly with small double or multiple sheave blocks but that is part of the hobby time in producing a more "realistic" or visual presentation of the rigging lines. Just my own approach and suggestion that makes the sag in the lines easier to achieve as is desired. Rich (PT-2)
Great point, PT-2! Reworking the blocks to simulate the curvature of the sheave is definitely one method to help add realism to the lay of the lines passing through blocks. It's worth while to use the side surface of a drill bit in a rotary tool or other tool to add this to every block.
 
My post might bring on more confusion, but I shall try as what I want to say not using any pictures is hard to do. So, I shall try to explain in stages and I am sure it is open for debate.

1. All of the Shroud pairs and ratlines done and completed.
2. At the Bowsprit, there are two major sets of lines. One set should start from the bowsprit to the LOWER hull at the Bow. This BEGINS the first set of stationary tension.
3. Then at the Bowsprit again, the other set should start at the bowsprit and go up to (several locations) on the Foremast. This sets up a major stationary tension.
4. Then you want to install a "stay" and a "preventer stay" if the plans call for it traveling from the BASE of the foremast to several locations on the Main Mast.
5. Then repeat for the Base of the Main mast to travel to several locations to the Mizzen Mast,

As you can see there is a pattern going from front to back as it is constantly adding tension to the stays as you work back. Then if you have any other rigging - there is enough tension on the lines to complete the work.

Yes, the Stays do finally loop around the entire group of shrouds. Most like me when I first started, I rigged the stays first - this is entirely wrong.

I hope this helps as this is basic info.
Step 2 above applies to later vessels. HMS Revenge is a late 16th century vessel (1577), and bobstays did not exist for galleons of that period. Preventer stays are mentioned in step 3 above also a feature on ships about 300 years later. A lot changed in rigging from 1500 to 1800. Your steps above do bring to light an important point, that when rigging shrouds and stays, one has to be careful not to over tension, or unevenly tension shrouds on each side, so you don't pull the masts out of position. When rigging shrouds, you don't want to pull the masts rearward, so you tie temporary forestays to hold the masts from bending rearward as you add the pairs of shrouds. The permanently rigged stays are added later after the temporary lines are removed.
 
Do we have any answers on this forum as to obtaining a natural sag on lines, rope etc, ? How do we give them weight ?
Here’s what I did to make footropes. Tied the knots, taped the sections I’d knotted plus their tails to the side of a glass jar. Coated the knotted sections with a few coats of white glue diluted maybe 50/50. They dried with just the right ‘sag’. This would likely work under yardarms, too.5E27879B-66D8-4F3B-81A5-4872FDF94EA1.jpeg
 
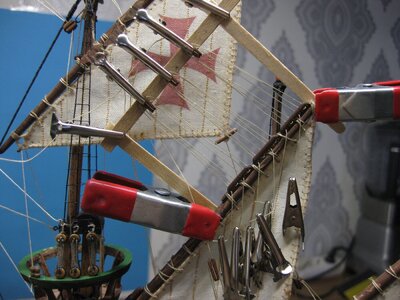
These crowfeet are a pain in the a@@ to make. But I found a way to make them on a easy way by building a stand around them. So I can easely rig the ropes through the euphroes. The clamps below hanging on the rope keeping it stif till I finish all of them. Then I knot them too the mast. And go further like post #12 of Davids Arch...
IMG_1017.JPG.jpg
This makes the job real easy
 
These crowfeet are a pain in the a@@ to make. But I found a way to make them on a easy way by building a stand around them. So I can easely rig the ropes through the euphroes. The clamps below hanging on the rope keeping it stif till I finish all of them. Then I knot them too the mast. And go further like post #12 of Davids Arch...
View attachment 236420
This makes the job real easy
Now I get to add a new term to my brain box, two actually, euphroses and crowsfeet in our modeling sense. SoS delivers every time . . . or at least most of the time. Rich (PT-2)
 
Attached are photos of the point I’m at in rigging the Amati Revenge. I’ve been working on this for 2 weeks with no luck. Whenever I move one line some or all other lines move or sag. Is there a trick or secret to accomplishing this? I would so appreciate any help you good folks could give me.
Thank you
Mike
Hallo Mike alias @Capt mike
we wish you all the BEST and a HAPPY BIRTHDAY
Birthday-Cake
 
Back
Top