HMS Alert 1/72 scale from Shipyard

Joined
Jul 20, 2020
Messages
233
Points
78

Location
New England
The Shipyard HMS Alert, in scale 1/72, just arrived from Ages of Sail, kit # ZL:001.
It looks like the only item that wasn't included was the glue. Everything else was, rigging lines, cannons, blocks, paint brushes and paints you name it...even directions!
I have on hand some Gorilla glue and Carpenter's Wood glue.
It looks like almost a similar build to a wooden one' except it's cardstock and paper.
Any suggestions for the glue?
 
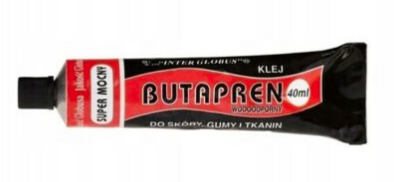
Hello Don, while cardboard is cellulose and can be glued using PVA, Shipyard recommends Butapren glue. It is made in Europe, and I am not sure of the American equivalent. You can try it on eBay. It is a contact cement glue.

1612916042941.png
 
I use Aleens Tacky Glue. You can also use cyano glue but just for metal parts Or rigging. Using Alleens now for the Shipyard HMS Wolfe. Used to use Elmers Glue, but this works better.
 
Got Aleene's Tacky Glue at Hobby Lobby. The Butapren is a cobbler's glue so I went to the local show repair shop to see if he had some. He said it was a great glue, but boy! Does it stink! He doesn't use that Butapren brand, it's European, but he uses a similar American glue. One whiff of that and it was off to Hobby Lobby.
I had a knife set from Harbor Freight years ago,, a Gordon brand set that Exacto blades fit. I use the Exacto blades as they are sharper and last longer than the blades from Harbor Freight. (The kit is good though)
The kits shown in here show a plastic case inside the box. this kit came with all the stuff but it was packed in little card board boxes packed around the box perimeter.
 
The hull is done and the deck is on the hull. I bent some of the card stock, being a little too heavy handed, but I straightened the pieces out and a little CA hardened them and is holding them in place. You have to be careful. It is amazing, though, as to how sturdy this hull is.
I am not used to painting with Acrylic paints. I made two washes, one Seagalb, which is a British yellow (used for the gun stripe and masts on my wrecked Constitution), and the other is Ghost Grey over the yellow. The directions call for a brown wash over yellow but on a working vessel, the decks would be grayish I was a little heavy on the washes, not really happy with the deck, but this is how we learn!. The deck is printed and with a thin wash the ink runs a little. I would suggest spraying some Testors or Tamiya dull coat on the deck before applying any washes.
 
The hull is done and the deck is on the hull. I bent some of the card stock, being a little too heavy handed, but I straightened the pieces out and a little CA hardened them and is holding them in place. You have to be careful. It is amazing, though, as to how sturdy this hull is.
Hello Don,

Would you mind showing some images of the process? The build log will make even more value if you show us the process in various photos. ;)
 
Hello Don,

Would you mind showing some images of the process? The build log will make even more value if you show us the process in various photos. ;)
I am lucky I know how to turn on the pc. I have pics on my phone and my son sends them to where ever. I did
not understand the instructions in this thread at all.
Can I e-mail them to SOS, at what address and how do you get them onto your log?
 
Hi Don,

If you are able to type in your build log, you shouldn't have any difficulties attaching images. First, let's determine where all of those photos stored on your PC. Then it is just a matter of 'drag & drops' photos from your PC to the reply area. Just try, it is super-easy. Also, check this tutorial, please.

 
The Shipyard HMS Alert, in scale 1/72, just arrived from Ages of Sail, kit # ZL:001.
It looks like the only item that wasn't included was the glue. Everything else was, rigging lines, cannons, blocks, paint brushes and paints you name it...even directions!
I have on hand some Gorilla glue and Carpenter's Wood glue.
It looks like almost a similar build to a wooden one' except it's cardstock and paper.
Any suggestions for the glue?
Hallo Don, alias @11320 Titanic
we wish you all the BEST and a HAPPY BIRTHDAY
Birthday-Cake
How is your work on your Alert going?
 
Hey Don:
Yes, please show us your building log.
Tell your son to show you but for sure we want to see your progress.
 
Hallo Don, alias @11320 Titanic
we wish you all the BEST and a HAPPY BIRTHDAY
Birthday-Cake
How is your work on your Alert going?
Started to finish up the third planking, thanks for the birthday greetings. Have learned a few things on this kit, and once done will try another. Back is sore, it's hard to sit for any length of time but the chair is padded. MDs can be a pain!
 
Hey Don:
Yes, please show us your building log.
Tell your son to show you but for sure we want to see your progress.
Not a computer pro, but I managed to download some pics into a file folder on my pc (Win 10). So the next step is to email them (?) to SOS, what address do I use and how do I get them into my album?
 
My daughter moved to Tennessee after selling her house in Massachusetts (it sole in two days) and we have been occupied moving her. Drove a little over 4,000 miles doing that, driving the moving van...two trips!
Finished the bathroom in the basement, so now back to the Alert.
I have a question.. Shipyard included masts, spars, etc. I can't tell it these are tapered or not, though it would make sense that they were.
 
One of the things I noticed was that compared to plastic models, cardstock in easier to bend or distort and tear. It is also mostly easier to repair. I learned this the hard way, having to repair parts G,F, and E after mashing them. The switch from the old Testors enamels to Acrylic paints takes some getting used to.
If I were to redo the Alert, I would double up on the frames, using two frames per section, so that there would be a better gluing surface for the frames to the backbone and more ability to fair the frames. With single frames, the ribs appear as on a stray dog, the gluing surface is limited and faring is negligible. The longitudinal planking covered up a lot of this. The hull is ok, but not great. What is surprising is how sturdy the hull it.
I am building the gun carriages now, grates in place.
 
Still trying to figure out how to send photos to SOS.
I am ready to install the masts and bow sprit on my 1/72 HMS Alert.Both seem way too long. Before cutting them, I would like to verify that the masts, spars, etc on the diagram that comes with the kit is correct. You can always shorten a piece that is too long but lengthening a piece that is cut too short is problematic. Has anyone built this kit yet?
I have been using Aleen's Tacky Glue with some success, applying with tooth pics.
Being on SS for income, I am not anxious to spend anything on lathes for tapering masts and spars However, I do have a bench top mounted vise, and a Ryobi 12 V variable speed lithium ion drill that can be clamped into the vise, Using sand paper, has anyone had success using this method?
 
I use Aleens Tacky Glue. You can also use cyano glue but just for metal parts Or rigging. Using Alleens now for the Shipyard HMS Wolfe. Used to use Elmers Glue, but this works better.
Could be a different format either. Most likely .jpg or .jpeg or .gif . All those ate supported formats on SOS. Just drag the image and drop it in the area in your log, That's it!!!
Have been using tacky Glue, it works very well, but it is sure named correctly, it's tacky all right! The instructions for the HMS Alert could be better. Tryine to figure things out from photos is a bit tacky too.
 
Hello Don, while cardboard is cellulose and can be glued using PVA, Shipyard recommends Butapren glue. It is made in Europe, and I am not sure of the American equivalent. You can try it on eBay. It is a contact cement glue.

View attachment 212156
Shipyard use to include 2 tubes of Butapren. Great stuff for building frame and covering. But be aware. It is a glue used in shoe repair, is unforgiving and holds fast. It is applied to both surfaces like contact, however! You assemble before glue drys as in contact cement, which it is. Just grabs ahold while still wet. So far, I have not found a suitable replacement.
PS: you apply with a sharpened bamboo kabob stick. Apply bead to rib and apply to part and stick together.
Rick
 
Back
Top