HMS Enterprise 1774 POF 1:48.

let alone the frame width being too large.
I would not worry if the frames siding (fore and aft) dimension is too thick as this looks to be more of an "Admiralty" style framing as in the painting. The one area that seems to be off at times is the moulded (in and out) dimension, especially at the top of the toptimbers. The ones in your kit may be perfect, but there are a lot of builds where they are far too thick and create a situation where the cap rail will have to be extraordinarily wide to cover the frames and planking. In the case of a 28 gun of the Enterprize group, it is "moulded in & out of the Top Timber Head 3 ins, & forward in wake of the timber heads 4 ins."

I saw a picture of a box of cover glass. I look forward to seeing how they have you cut this (assuming you have to cut it to size) I have been a total failure when it comes to cutting that stuff. My successful piece to broken piece ratio was about 1 in 7 which, unhappily, led to alternate materials for me.

Allan
 
You are welcome. Yep we have to make that jump to POF ships at least once. If we don’t like it at least we gave it a shot.

Good morning Gilbert. Thank you kindly. It is always a pleasure to have to on board

Good morning Alan. Thanks for this. I did read through the Aurora contract and check somethings against the kit. It was from this that my disappointment arose as the kit detail is far removed from the actual specs. E.g the frame construction is way out with no chocks and the futtock being the same width with a simple overlay construction etc, let alone the frame width being too large. That being said it is my first POF and I am excited to just build one according to the kit. Let see what goes.

Good morning Neil. Thank you. I have been following your build and kudos you are owning the project.

Good morning my friend. It is always good to have you on board….I appreciate your input.

Hi Graham. We all have to give a POF a go sometime……in my case may be a fool’s errand ;) …we shall see. Thanks for checking this build out.

Good morning my friend. Thanks Roger. Let’s hope it will be a good adventure.

Thank you Snowy.


Good morning. I agree there are some very helpful concepts CAF have added into this kit - let’s hope they help me along the way.

Yep Zoly is correct there are a few completed build logs here. @Bryian built a cool one.

Good morning Alex. I may well be asking some questions and learn from your process. I look forward to seeing your progress as I think I’m going to need all the help I can get.
I do have a little “buyers remorse” after seeing Dockyard has now released the1:48 kit. I think it adds so much added detail and accuracy. That being said I am excited to give this a try.

Welcome Paul always a pleasure. I think Arlene would be ecstatic if you redecorated my hobby space….. she just rolls her eyes when she enters my shipyard lately ROTF


Hi Jack. At the moment there are 3 POF enterprise models out there (all Chinese). Model Dockyard makes a 1:48 and a 1;96. These are more accurate kits with regard to internal structures and give more detail on the interior at all deck levels than the CAF version. The CAF 1:48 is an older kit from Cherry wood and has a different outcome to the others giving an outward POF museum finish with high quality upper deck finishes.

Thanks Russ. Welcome aboard. Hopefully we have smooth sailing ahead….

Cheers Grant
Thank you sir. I am fortunate in that I purchased the 1:96 version. I suspect that there will be a lot of fidgety bits with the kit, but I am up for it. It will be a challenge. I am going to assume that both the 1:96 and the 1:48 kits are more or less the same, with the exception of the size of the parts. I mean, there are only so many ways to make a POF model, I think.
 
I would not worry if the frames siding (fore and aft) dimension is too thick as this looks to be more of an "Admiralty" style framing as in the painting. The one area that seems to be off at times is the moulded (in and out) dimension, especially at the top of the toptimbers. The ones in your kit may be perfect, but there are a lot of builds where they are far too thick and create a situation where the cap rail will have to be extraordinarily wide to cover the frames and planking. In the case of a 28 gun of the Enterprize group, it is "moulded in & out of the Top Timber Head 3 ins, & forward in wake of the timber heads 4 ins."

I saw a picture of a box of cover glass. I look forward to seeing how they have you cut this (assuming you have to cut it to size) I have been a total failure when it comes to cutting that stuff. My successful piece to broken piece ratio was about 1 in 7 which, unhappily, led to alternate materials for me.

Allan
Good evening Allan. Time will tell and as I progress I’m sure there will be many challenges however I am pretty excited about this build. I saw that box of cover glass and was immediately impressed.;). If I can cut and apply it correctly is another matter which time will also tell. :cool:
Thank you sir. I am fortunate in that I purchased the 1:96 version. I suspect that there will be a lot of fidgety bits with the kit, but I am up for it. It will be a challenge. I am going to assume that both the 1:96 and the 1:48 kits are more or less the same, with the exception of the size of the parts. I mean, there are only so many ways to make a POF model, I think.
Hi Jack. From the builds I have seen of the 1:96 kit you have bought yourself a treat for sure. They look awesome.

Cheers Grant
 
You are welcome. Yep we have to make that jump to POF ships at least once. If we don’t like it at least we gave it a shot.

Good morning Gilbert. Thank you kindly. It is always a pleasure to have to on board

Good morning Alan. Thanks for this. I did read through the Aurora contract and check somethings against the kit. It was from this that my disappointment arose as the kit detail is far removed from the actual specs. E.g the frame construction is way out with no chocks and the futtock being the same width with a simple overlay construction etc, let alone the frame width being too large. That being said it is my first POF and I am excited to just build one according to the kit. Let see what goes.

Good morning Neil. Thank you. I have been following your build and kudos you are owning the project.

Good morning my friend. It is always good to have you on board….I appreciate your input.

Hi Graham. We all have to give a POF a go sometime……in my case may be a fool’s errand ;) …we shall see. Thanks for checking this build out.

Good morning my friend. Thanks Roger. Let’s hope it will be a good adventure.

Thank you Snowy.


Good morning. I agree there are some very helpful concepts CAF have added into this kit - let’s hope they help me along the way.

Yep Zoly is correct there are a few completed build logs here. @Bryian built a cool one.

Good morning Alex. I may well be asking some questions and learn from your process. I look forward to seeing your progress as I think I’m going to need all the help I can get.
I do have a little “buyers remorse” after seeing Dockyard has now released the1:48 kit. I think it adds so much added detail and accuracy. That being said I am excited to give this a try.

Welcome Paul always a pleasure. I think Arlene would be ecstatic if you redecorated my hobby space….. she just rolls her eyes when she enters my shipyard lately ROTF


Hi Jack. At the moment there are 3 POF enterprise models out there (all Chinese). Model Dockyard makes a 1:48 and a 1;96. These are more accurate kits with regard to internal structures and give more detail on the interior at all deck levels than the CAF version. The CAF 1:48 is an older kit from Cherry wood and has a different outcome to the others giving an outward POF museum finish with high quality upper deck finishes.

Thanks Russ. Welcome aboard. Hopefully we have smooth sailing ahead….

Cheers Grant
Good afternoon Grant. Have a look at my build of Enterprize-the initial part is real detailed and you might find it useful. Look also At Brian's build, which I used a lot. The common problems that most people have had with the kit are two: 1) The first and most important is locating the deck clamps on which the deck beams rest....The plans are very unclear: do the lines shown refer to the top of the deck clamp, or the level of the deck ?. This is very unclear, but Tom at CAF has some clarification. You can contact him here at SOS. Do the deck beams just rest on top of the clamps, or are they notched into it ? This will determine the deck level. This is really critical.
I made a huge mistake and my deck clamps were set too high. I ended rip having to rip them out and re-do them. Problem was that I had actually tree-nailed them into the frames in addition to glue !!
My suggestion is to quadruple check the level of the deck clamps and mark it with pencil ON EACH FRAME-ON THE INBOARD SURFACE, BEFORE AND AFTER EACH FRAME IS SEATED; Join the lines once the frames are installed on the keel, and take a million measurements so the level is correct...I would mark the clamp level on each frame individually before it goes on the keel, and then after it is fixed to the keel. It is very hard to pencil-in the deck clamp level with all the frames in the building jig- hard to establish your base level and transfer it to the inside of the ship!!! You need to undo this for the main deck and also for the foredeck and quarter deck. The notching of each frame into the keel is super important so each frame is sitting at the same level. If you want to bash the kit and build a full interior, then you could also mark deck clamp levels for each deck that you plan to build., 2) The second less important, problem was the construction and timing oof the stern and its fragility. Does one build it outside the jig or in the jig ? 3) a third problem is locating the mast partners on the ship...again, the plans were difficult to interpret. Lots of calculations and pencil marks. I miss-located my main mast by about 1 cm, but realized not too late....What I say now that it was a new design by me ! Anyway, have fun. It is a project, Look at what Brian created though.
Alex Rosas
Good morning Alex. Thanks for this. I am going to need all the help I can get and would probably run blindly into all the pitfalls which await me unless someone alerts me:) so much appreciated. I will certainly take this into account as I am finding the directions a little head scratching. Cheers Grant
 
Good afternoon
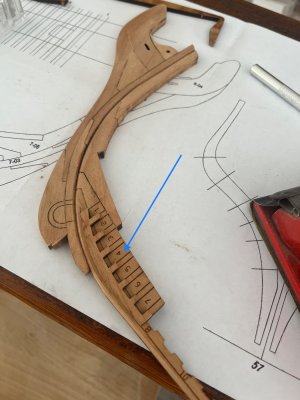
The fore centreline timbers. The individual parts went together really well when I dry fitted, however after removing the char it was more of a struggle. As with the stern deadwood etc I did not caulk these :
7625F52F-8FB7-428E-8F73-1FC1FBF0DD59.jpeg
The notches for the fore cant frames was added:
558247F1-0C13-4AB5-BA42-64429261D07B.jpeg
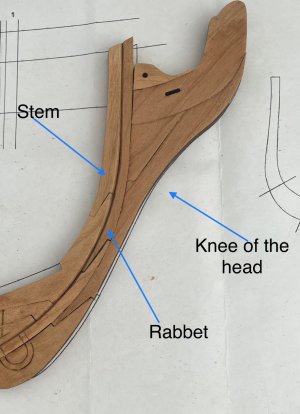
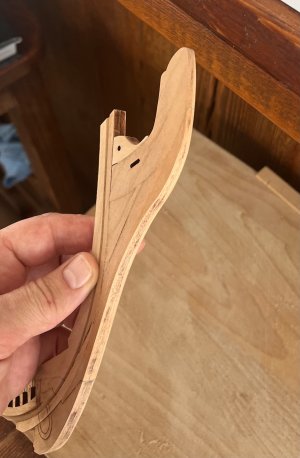
I started tapering the knee of the head. This is not finished and work in progress. As this is not part of the instructions I did check that the lion figurehead would take the tapering first…..whew ROTF
9BD9B928-37C3-4F7E-AD59-F1AF979F8ED1.jpeg
I have plenty of sanding to do on these timbers as my plan for this build is to have most of the sanding done as I build each part.
I’m enjoying working with Cherry wood although it gets “dirty” very quickly. I’m going to have to attempt to be neat with this buildRedface.
Cheers Grant

45137D1F-FE70-41B6-84CC-411399FCD3CE.jpeg
 
Grant,
You are doing very careful, accurate work. I should have, but didn't, taper the knee of the head as you have. What figurehead came with your kit ? The lion that came with mine does not have a slot cut in the center. I still have to taper the timbers and figure out how to insert/install the lion figure head although the ship is almost finished. I'll post some pictures next week. So far, your build is going great, a lot better than mine was at the same stage. What build are the pictures above from ?
Congrats
Alex R
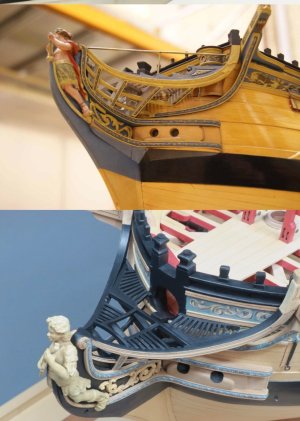
Hi Alex. Thank you kindly. My Lion has a thin slot which I will have to work a little when I get there one day. The more I look into this build the more I realise it is not an easy one…..The other ships were just some pics I was looking at when researching the tapering of the head - they weren’t supposed to be attached. Cheers Grant
 
I started tapering the knee of the head. This is not finished and work in progress. As this is not part of the instructions I did check that the lion figurehead would take the tapering first…..whew
FANTASTIC! This made my day as it is sometimes ignored by kit designers, yet you made the extra effort to shape it like on the actual ship. KUDOS

Allan
 
Last edited:
The plans are very unclear: do the lines shown refer to the top of the deck clamp, or the level of the deck
Your suggestion to check and recheck, and recheck over and over is spot on. This is also a great example for checking the original drawings. The level of the bottom of the beams at the side of the hull (the top of the deck clamps) can be clearly seen and height to the keel measured and transferred to the model.

Do the deck beams just rest on top of the clamps, or are they notched into it
From Peter Goodwin's, The Construction and Fitting of the English Ship of War, page 66, "the beams were sometimes scored to a depth of 1 inch" (0.52mm at 1:48) so you are right that it really is something to consider. There is no mention of scoring the beams on the lower deck or upper deck in the contract that I could find so would opt not to do it but builder's choice in the end. The scantlings for the beams are in the contract for comparison so if the kit beams are incorrect in depth, compensation might be needed in locating the top of the clamps and scoring may be the solution. Then again, 1/2mm may not be overly important in the end if the thickness of the deck planks is not correct.
Allan
 
Last edited:
Yes ! the best is to have the original plans, and a good reference book on hand. I didn't score the beams on my 1:48 CAF Enterprize build, just placed them directly on top of the clamp. It's a detail that is completely covered by the deck planking. The most important consideration in my opinion is to make sure that the distance between decks is accurate.
Alex R
 
Your suggestion to check and recheck, and recheck over and over is spot on. This is also a great example for checking the original drawings. The level of the bottom of the beams at the side of the hull (the top of the deck clamps) can be clearly seen and height to the keel measured and transferred to the model.


From Peter Goodwin's, The Construction and Fitting of the English Ship of War, page 66, "the beams were sometimes scored to a depth of 1 inch" (0.52mm at 1"48) so you are right that it really is something to consider. There is no mention of scoring the beams on the lower deck or upper deck in the contract that I could find so would opt not to do it but builder's choice in the end. The scantlings for the beams are in the contract for comparison so if the kit beams are incorrect in depth, compensation might be needed in locating the top of the clamps and scoring may be the solution. Then again, 1/2mm may not be overly important in the end if the thickness of the deck planks is not correct.
Allan
Good morning Allan. A quick question- the contract refers to “ bolts” for the scarf joints on the keel etc. Are these metal bolts or wood treenail type bolts for ships from this era?
Cheers Grant
FANTASTIC! This made my day as it is sometimes ignored by kit designers, yet you made the extra effort to shape it like on the actual ship. KUDOS

Allan
Thank you kindly.
Cheers Grant
 
Back
Top