-

Win a Free Custom Engraved Brass Coin!!!
As a way to introduce our brass coins to the community, we will raffle off a free coin during the month of August. Follow link ABOVE for instructions for entering.
-

PRE-ORDER SHIPS IN SCALE TODAY!
The beloved Ships in Scale Magazine is back and charting a new course for 2026!
Discover new skills, new techniques, and new inspirations in every issue.
NOTE THAT OUR FIRST ISSUE WILL BE JAN/FEB 2026
You are using an out of date browser. It may not display this or other websites correctly.
You should upgrade or use an alternative browser.
You should upgrade or use an alternative browser.
HMS Enterprise 1774 POF 1:48.
- Thread starter GrantTyler
- Start date
- Watchers 85
-
- Tags
- caf model enterprise
Good morning Peter. Extremely happy to have you on board….a vip front row seat is reserved for youwow, what a great kit and start! I wish you fun with building this model.
I don't mind having the back seat, looking over the shoulders of giants.
Good Luck with this build. No doubt you will succeed and demonstrate the usual 'Grant's ship building' accomplishments we are now accustomed to witnessing. All the best, stay cool and Cheers.This weekend I started playing a little with my new venture. Being Grant, I decided to start with Section 4 which in my opinion should be section 1.
I extracted all the laser cut parts which came out very easily, identified them and laid them on the 1:1 diagram (like a big wooden puzzle):
View attachment 501702
The aft deadwood and stem :
View attachment 501703
All parts come in pairs and need to be glued together:
View attachment 501704
I decided not to caulk this section and the char was removed and some of the deadwood parts glued together.
The notches for the aft cant frames were added:
View attachment 501705
The deadwood section was tapered top to bottom and fore to aft. This is not shown in the instructions however it is something which is obvious…? The manner in which the kit includes the aft cant frame notches does not seem correct however I am sticking with it.
View attachment 501707View attachment 501708
I included the V shaped rabbet for this section although I will only finish these after the frames are on. The stem and keel for this section are added:
View attachment 501709View attachment 501710
I am Learning as I go so I’m pretty sure I’m missing something although I seem in line with the instructions.
I am a little concerned with my kit selection as there are a fair number who started this project with only a handlful who actually finished. So far I am enjoying it tremendously.
Cheers Grant
How could I missed the unpacking of your already sneaky unpacked/packed Christmas gift and the start of the build? And now already on page 3! Is there still a chair, Grant? No problem with the 3th row.
The start is looking nice of this great kit.
Regards, Peter
The start is looking nice of this great kit.
Regards, Peter
- Joined
- Mar 1, 2022
- Messages
- 685
- Points
- 308

Even a back raw seat wouldn't be bad to me!
Hi Grant,A quick question- the contract refers to “ bolts” for the scarf joints on the keel etc.
Metal bolts for sure. Goodwin states that copper was used exclusively in the keel joints starting about 1783, but based on materials found in the deadwood on Victory, he believes copper came into use sometime earlier. It is my understanding that if the contract calls out bolts in any description they would be metal. Treenails would be called out by name and can be assumed to be wood. In the case of Aurora, treenails are described as being made from dry and seasoned wood clear of sap.
Allan
- Joined
- Oct 17, 2020
- Messages
- 1,691
- Points
- 488

Good morning Grant, is there any room for a stool?In my small way I am available,have a good adventure.FrankThat it is. The guys on this forum are really helpful and encouraging. It is very motivating.
Good afternoon Frank. I always appreciate your input and expertise when is comes to these period ships so I am excited to have you check out my humble attempt at this model. Cheers GrantGood morning Grant, is there any room for a stool?In my small way I am available,have a good adventure.Frank
Good afternoon. Thank you kindly and I will give this my best shot…..hopefully it will be okay.Good Luck with this build. No doubt you will succeed and demonstrate the usual 'Grant's ship building' accomplishments we are now accustomed to witnessing. All the best, stay cool and Cheers.
Good afternoon Peter. I did attempt to quietly sneak this one in as I’m still doing the bounty rigging…Your interest in my ships is a compliment and motivation- thank you.How could I missed the unpacking of your already sneaky unpacked/packed Christmas gift and the start of the build? And now already on page 3! Is there still a chair, Grant? No problem with the 3th row.
The start is looking nice of this great kit.
Regards, Peter
You guys make me blush…Even a back raw seat wouldn't be bad to me!
Thank you Allan. I’m glad you cleared up the terminology for treenails in the contract as I was wondering what “dry and seasoned wood clear of sap” was. Much appreciated. Cheers GrantHi Grant,
Metal bolts for sure. Goodwin states that copper was used exclusively in the keel joints starting about 1783, but based on materials found in the deadwood on Victory, he believes copper came into use sometime earlier. It is my understanding that if the contract calls out bolts in any description they would be metal. Treenails would be called out by name and can be assumed to be wood. In the case of Aurora, treenails are described as being made from dry and seasoned wood clear of sap.
Allan
Mutiny at its worst…Grant! What of HMAV Bounty? One of the guys asked me to ask you
Blessings.
Chuck
 . Ahh ..I lost motivation doing the rigging with left overs and struggling to get things looking ok. I decided that if I’m not having fun change it. I will finish it as I owe to Justin, however I will only work on it when I want to and not because I have to….it is a hobby after all. Thoroughly enjoying this Enterprise project. Cheers Grant
- Joined
- May 25, 2020
- Messages
- 1,131
- Points
- 443

Understood! I took 6 months off from my Lovely Renee nee Fair American build exactly because it ceased to be joyful. So, I honor your joyful nature, Grant! Loving the way HMS Enterprise is shaping up. I wish you increase - in joy of courseMutiny at its worst…. Ahh ..I lost motivation doing the rigging with left overs and struggling to get things looking ok. I decided that if I’m not having fun change it. I will finish it as I owe to Justin, however I will only work on it when I want to and not because I have to….it is a hobby after all. Thoroughly enjoying this Enterprise project. Cheers Grant
Blessings.
Chuck
Looking good, Grant.
A suggestion if I may: beware that the keel does not seem to be sitting firmly on the work surface. This will create all manner of chaos in the future - that thing has to be perfectly flat and perfectly straight and remain that way throughout.
Now is also the time to start thinking about how you will display this model in the future and whether or not you want to include some integral nuts and screws...
Beautifully executed rabbet ! How did you make it ? Did you use a milling machine or by hand ? Bravo !Good afternoon everyone.
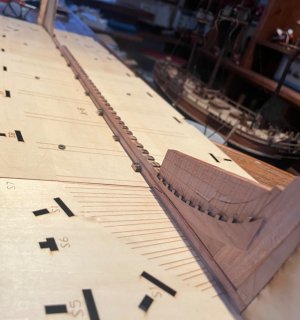
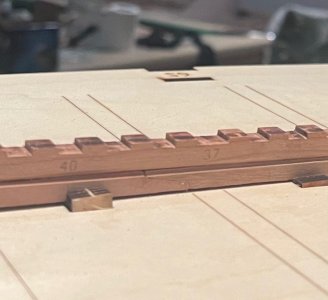
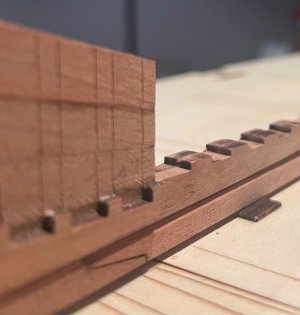
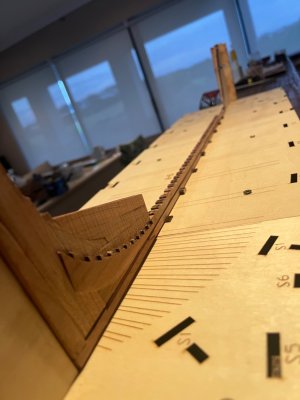
Progress on the keel. Made of 4 pieces joined by scarf joints. The rabbet is a 1.5. X 1.5mm “V” shaped. On the stem it is a 2.4 x1.5mm more U shaped. I have not finished the rabbet as I will do this once the ship is out the jig during final sanding.
View attachment 502497View attachment 502498View attachment 502499View attachment 502500
Cheers Grant
Alex R
- Joined
- Mar 1, 2022
- Messages
- 685
- Points
- 308

Hi Grant. Remarkably put together, congrats!
I love the look of neat scarf joints in the early afternoon (demi-cit.) .
I love the look of neat scarf joints in the early afternoon (demi-cit.) .
Paul,Looking good, Grant.
A suggestion if I may: beware that the keel does not seem to be sitting firmly on the work surface. This will create all manner of chaos in the future - that thing has to be perfectly flat and perfectly straight and remain that way throughout.
Now is also the time to start thinking about how you will display this model in the future and whether or not you want to include some integral nuts and screws...
Great idea. How have you done that in your models ? I imagine one would drill a reinforced hole through the keel and keelson and pre-position a threaded insert or a screw ?
Alex Rosas
I filed off a small nut to make it fit into the width of the keel and epoxied it in place. I have a screw that passes through my build-board into that integral nut. I inserted several of these along the length of the keel but only use two of them...Paul,
Great idea. How have you done that in your models ? I imagine one would drill a reinforced hole through the keel and keelson and pre-position a threaded insert or a screw ?
Alex Rosas
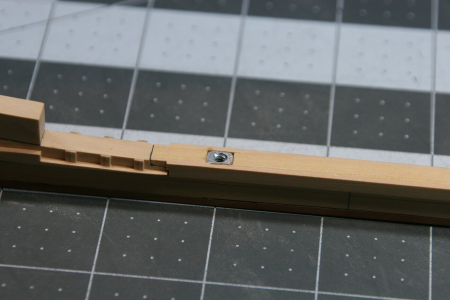
Some good advice gleefully accepted Paul- thanksLooking good, Grant.
A suggestion if I may: beware that the keel does not seem to be sitting firmly on the work surface. This will create all manner of chaos in the future - that thing has to be perfectly flat and perfectly straight and remain that way throughout.
Now is also the time to start thinking about how you will display this model in the future and whether or not you want to include some integral nuts and screws...
I hope that I did get it straight…..hmmm. I did just plonk it down for the photos so it is not seated however I will triple check when I get home. I think it’s all good. (My Dad always used say “…..and you know what THINK did….”

I have been doing plenty of thinking of how I want to display and build this ship and I still have not got a clear objective. The design of the kit is more limiting than I hoped for which also predetermines a fair amount of presentation. In the mean time I will build the center line timbers(probably nail these) and make 50 odd frames. Nothing will be set and at a point I need to build the framing jig. By then I hope to have an outcome in mind.
Clever Paul, so my bubble wrap and cardboard build stand won’t cut it for this oneI filed off a small nut to make it fit into the width of the keel and epoxied it in place. I have a screw that passes through my build-board into that integral nut. I inserted several of these along the length of the keel but only use two of them...
View attachment 502510
 . Cheers Grant


