HMS Enterprise 1774 POF 1:48.

This weekend I started playing a little with my new venture. Being Grant, I decided to start with Section 4 which in my opinion should be section 1.

I extracted all the laser cut parts which came out very easily, identified them and laid them on the 1:1 diagram (like a big wooden puzzle):
View attachment 501702
The aft deadwood and stem :
View attachment 501703
All parts come in pairs and need to be glued together:
View attachment 501704
I decided not to caulk this section and the char was removed and some of the deadwood parts glued together.
The notches for the aft cant frames were added:
View attachment 501705
The deadwood section was tapered top to bottom and fore to aft. This is not shown in the instructions however it is something which is obvious…? The manner in which the kit includes the aft cant frame notches does not seem correct however I am sticking with it.
View attachment 501707View attachment 501708
I included the V shaped rabbet for this section although I will only finish these after the frames are on. The stem and keel for this section are added:
View attachment 501709View attachment 501710
I am Learning as I go so I’m pretty sure I’m missing something although I seem in line with the instructions.

I am a little concerned with my kit selection as there are a fair number who started this project with only a handlful who actually finished. So far I am enjoying it tremendously.
Cheers Grant
Hi Grant . Congratulations on the wonderful work. Keep sending us updates !
Are yiu going to include mast and sail in your model ?
 
Wow, Grant, it has not even been a week since you started your build log, and already, there is standing room only. A testament to your skills, as your Victory build illustrates. With the limited amount of time I have these days, I can only follow a few build logs. Yours, sir, will be one of them. I appreciate how make your builds your own and somehow, like your Victory, I expect your Enterprise will have a "Grant flavor" to it.

Super start and it seems you've got some momentum going. Unfurl those Studding Sails!!
Thank you kindly Ken. I appreciate your confidence in my ability to do justice to this very fine kit from Tom. Some nerves and self doubt definitely exist while I embark on this new venture.
Grant, my dear friend
Good luck with your new build
I'll be following your progress
Good morning Shota. Thank you very much. Hopefully I can follow in your POF footsteps.They are pretty big footsteps :D
Really very impressive, it's the first time I've discovered this kind of kit. Congratulations and thank you for sharing this information.
Thank you.
Grant, I just opened a South African Cabernet Sauvignon to toast your new project. Cheers, have fun and I'm in the third row watching! Magic Mike
Welcome aboard Mike. That is so cool to hear some of our SA wine has found its way to Texas USA. I hope you enjoyed it.Thumbsup.
Wow looks great
Thank you kindly
Grant,
Good luck with the build
Very beautiful choice and looking good so far
Also one of my wanted for the backlog
Cheers
Guy
Good morning Guy. Thank you. Yes this kit is really good quality however reviewing other logs seems to be really difficult to get right…..Eish.
You have started a very nice project Grant

I build these POF models, not easy I think, but a nice challenge

Regards Henk
Good morning Henk. Thank you for looking in it is much appreciated. I know you are right about POF builds so I need to really focus on this one and see if I can get it reasonable.
Cheers Grant
 
Dang it. I missed the start and am now relegated to the second row. I've ordered a high-top table with a few bar stools so I can see over the people in front of me...hope Arlene won't mind that I redecorated your hobby space...
Paul, I hope there's a place for me behind that bar counter? Because I missed the beginning too, and it's hard to see from the gallery.
 
This weekend I started playing a little with my new venture. Being Grant, I decided to start with Section 4 which in my opinion should be section 1.

I extracted all the laser cut parts which came out very easily, identified them and laid them on the 1:1 diagram (like a big wooden puzzle):
View attachment 501702
The aft deadwood and stem :
View attachment 501703
All parts come in pairs and need to be glued together:
View attachment 501704
I decided not to caulk this section and the char was removed and some of the deadwood parts glued together.
The notches for the aft cant frames were added:
View attachment 501705
The deadwood section was tapered top to bottom and fore to aft. This is not shown in the instructions however it is something which is obvious…? The manner in which the kit includes the aft cant frame notches does not seem correct however I am sticking with it.
View attachment 501707View attachment 501708
I included the V shaped rabbet for this section although I will only finish these after the frames are on. The stem and keel for this section are added:
View attachment 501709View attachment 501710
I am Learning as I go so I’m pretty sure I’m missing something although I seem in line with the instructions.

I am a little concerned with my kit selection as there are a fair number who started this project with only a handlful who actually finished. So far I am enjoying it tremendously.
Cheers Grant
Looking at your pictures I remembered on my BN build I had to account for the bonding layer thickness. Also the char removal brings back bad memories.
I think POF is the way to go. When done with care and precision, it will yield a beautiful result.
 
Paul, I hope there's a place for me behind that bar counter? Because I missed the beginning too, and it's hard to see from the gallery.
Good morning Sasha. For you I have some reserved seats only because you will spot my mistakes and help me rectify them Thumbsup . Super cool to have you checking out my POF attempt. Cheers Grant
 
Looking at your pictures I remembered on my BN build I had to account for the bonding layer thickness. Also the char removal brings back bad memories.
I think POF is the way to go. When done with care and precision, it will yield a beautiful result.
Good morning Johan. The char removal ………eish this is a mission and a half. I would almost prefer to cut out new parts from wood than do this char removal.
I think POF is the way to go. When done with care and precision, it will yield a beautiful result.
Let’s hope so….ROTF. Cheers Grant
 
Good morning
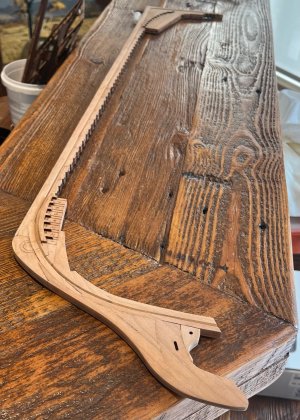
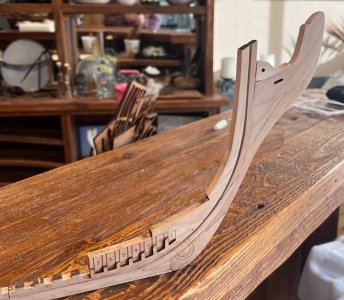
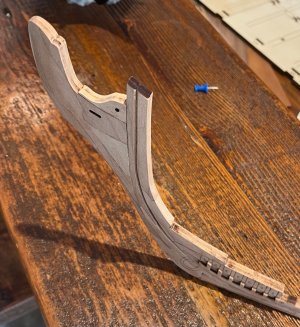
I continue with the center line timbers. The fore stem and knee was secured to the keel. The false keel comprising 4 separate parts was also glue on.
850ECBD6-CD63-4E51-A8CF-F61CE5472499.jpeg20A1B22F-C056-4147-8DCD-EC8C08E2FACA.jpeg597019D5-EB0E-4DCE-8C8D-7EEC1D1809DD.jpeg
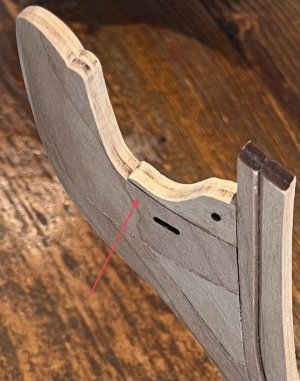
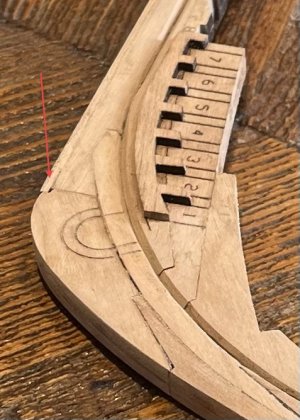
I did experience a few challenges which still need some work. When removing the chaff despite “being very careful “ I obviously changed the shape of the cuts to create some small gaps and a tiny deviation at the false keel join -These are so minimal, I doubt it will cause a problem later but we will find outROTF.
Cheers Grant
 
I did experience a few challenges which still need some work. When removing the chaff despite “being very careful “ I obviously changed the shape of the cuts to create some small gaps and a tiny deviation at the false keel join -These are so minimal, I doubt it will cause a problem later but we will find outROTF.
To be honest with you, I'm definitely not the most accurate builder you'll find on this site, meaning I had quite some out-of-spec parts on my hands on my BN build. With a never-ending supply of luck I ended up with a rather good looking model of the BN.
Bottom line; yes, it pays to be able to accurately craft your parts, but simultaneously I found that in general the kits are quite robust in the sense that they can absorb quite some mismanagement before becoming truly unusable.
(And then there's the making-it-work workaround...)
 
Good morning
I continue with the center line timbers. The fore stem and knee was secured to the keel. The false keel comprising 4 separate parts was also glue on.
View attachment 504482View attachment 504480View attachment 504481
I did experience a few challenges which still need some work. When removing the chaff despite “being very careful “ I obviously changed the shape of the cuts to create some small gaps and a tiny deviation at the false keel join -
That looks neat in itself, Grant.
Because this is the basis of everything, I would still try to remove the little deviation. Even if it is in the jig later, there is some tension in it. You have to be careful that you are 'working against' that. Otherwise it becomes an addition.
These are so minimal, I doubt it will cause a problem later but we will find out.
I wouldn't take the gamble. For such a beautiful kit. And ‘later’ ….. you will kick your head …… I knew it …….
Regards, Peter
 
To be honest with you, I'm definitely not the most accurate builder you'll find on this site, meaning I had quite some out-of-spec parts on my hands on my BN build. With a never-ending supply of luck I ended up with a rather good looking model of the BN.
Bottom line; yes, it pays to be able to accurately craft your parts, but simultaneously I found that in general the kits are quite robust in the sense that they can absorb quite some mismanagement before becoming truly unusable.
(And then there's the making-it-work workaround...)
But of course, the more accurate you're able to build, the better a model comes out. Redo's are part of that process; trying to get your model as close to nominal as you can.
 
This will be a weird, mostly unrelated post.

I am on 2-3 other forums, all dealing with another couple of my hobbies; archery and rimfire rifles. I've been visiting those regularly for twenty years.

I've only been on the ship building forums for several months or less.

I mean the following with great respect and even admiration. The vocabulary of many of the writers on this forum is very impressive and without bluster! I find myself having to look up a few words like "febrile" by Alex as he describes his intermittent phases of excitement over his long-term build of the Enterprise.

Of course this is also the most civil and respectful forum I've ever experienced.

Kudos to the crew. :)
(Look at me, using a ship term (crew?) in a sentence! :cool:
 
Last edited:
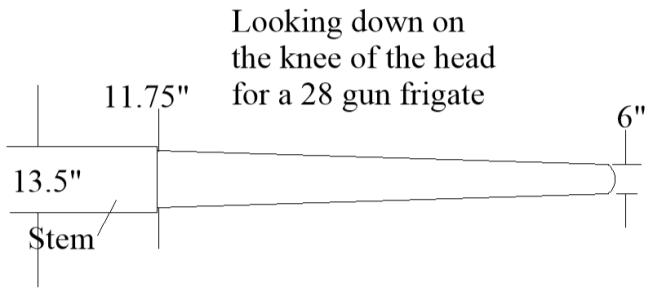
Grant, will you be tapering the knee of the head? From the contract:
The knee of the head to extend to the upper side of the upper cheek, to be 11¾ ins thick at the stem and 6 ins at the fore end
which is quite noticeable. When this is not done the figure heads look quite bowlegged. :)
1741092399064.png
 
Last edited:
I did experience a few challenges which still need some work. When removing the chaff despite “being very careful “ I obviously changed the shape of the cuts to create some small gaps and a tiny deviation at the false keel join -These are so minimal, I doubt it will cause a problem later but we will find out
Grant, I ran into the same problem with the Oseberg. Just barely (and I do mean barely) cleaning up the laser-induced taper caused the two halves of my keel to differ in size by quite a bit. This seems to be an issue that is lost on kit producers. They "precision" cut the parts with a laser exactly to size - and yes, the bottom face is to size, but the top face of the part is smaller. Leaving it alone either causes unsightly gaps and poor glue joints, or crooked joinery. Squaring it up makes the overall part too small. :eek: CNC routed kits would be a possible solution, but at the same time, those end mill cutters are such a small diameter that as they dull, they will deflect also, creating taper as well. The advantage though, is that the deflection would generally make the part larger on the bottom face, allowing you to square the parts up to exact size.
 
Grant, I ran into the same problem with the Oseberg. Just barely (and I do mean barely) cleaning up the laser-induced taper caused the two halves of my keel to differ in size by quite a bit. This seems to be an issue that is lost on kit producers. They "precision" cut the parts with a laser exactly to size - and yes, the bottom face is to size, but the top face of the part is smaller. Leaving it alone either causes unsightly gaps and poor glue joints, or crooked joinery. Squaring it up makes the overall part too small. :eek: CNC routed kits would be a possible solution, but at the same time, those end mill cutters are such a small diameter that as they dull, they will deflect also, creating taper as well. The advantage though, is that the deflection would generally make the part larger on the bottom face, allowing you to square the parts up to exact size.
Hi Russ,

I happen to be building a CNC based kit right now and the producer intentionally cut everything just a bit oversized. While others have complained about this - I have found it very user-friendly. Anyway, I agree with your assessment (CNC makes for a better building experience over-against laser char and taper).
 
To be honest with you, I'm definitely not the most accurate builder you'll find on this site, meaning I had quite some out-of-spec parts on my hands on my BN build. With a never-ending supply of luck I ended up with a rather good looking model of the BN.
Bottom line; yes, it pays to be able to accurately craft your parts, but simultaneously I found that in general the kits are quite robust in the sense that they can absorb quite some mismanagement before becoming truly unusable.
(And then there's the making-it-work workaround...)
Good afternoon Johan. I’m with you. I can always get “close enough “ on my modelling but never that 100% and luck is mostly not on my side ROTF. I have measured and checked the areas which I think could cause consternation and it seems ok….from a rookie perspective.
That looks neat in itself, Grant.
Because this is the basis of everything, I would still try to remove the little deviation. Even if it is in the jig later, there is some tension in it. You have to be careful that you are 'working against' that. Otherwise it becomes an addition.

I wouldn't take the gamble. For such a beautiful kit. And ‘later’ ….. you will kick your head …… I knew it …….
Regards, Peter
Good afternoon Peter. The deviation is more in appearance than a knock on to the frames etc. I have checked the centre timbers against the 1:1 scale drawing and everything is in the correct place……That being said it is concerning that I couldn’t get everything to fit spot on as indicated by the arrows. Loads of finishing to do and I can get these looking good.
E76C8C01-78CF-440C-9CD8-FB1155223293.jpeg257F4D46-D321-4986-B06F-4A1AFB36FE4E.jpeg
Lovely tidy work Grant. Gonna be a beaut !
Thanks Neil. You definitely have more confidence than I doROTF. I will give it a shot though.

Cheers Grant
 
I happen to be building a CNC based kit right now and the producer intentionally cut everything just a bit oversized.

And what an absolutely gorgeous model it is! I agree with you. I would rather have my parts start over sized and adjust to the drawings. That really isn't much different than cutting all your parts on a scroll saw. Either way, you end up having to adjust them, but at least you have some meat to work with at the start - and you don't have the unsightly char marks.
 
Back
Top