-

Win a Free Custom Engraved Brass Coin!!!
As a way to introduce our brass coins to the community, we will raffle off a free coin during the month of August. Follow link ABOVE for instructions for entering.
-

PRE-ORDER SHIPS IN SCALE TODAY!
The beloved Ships in Scale Magazine is back and charting a new course for 2026!
Discover new skills, new techniques, and new inspirations in every issue.
NOTE THAT OUR FIRST ISSUE WILL BE JAN/FEB 2026
You are using an out of date browser. It may not display this or other websites correctly.
You should upgrade or use an alternative browser.
You should upgrade or use an alternative browser.
HMS Enterprise 1774 POF 1:48.
- Thread starter GrantTyler
- Start date
- Watchers 85
-
- Tags
- caf model enterprise
Hello Grant, it's always annoying when parts are missing. But the nice thing is that Tom is really super nice and sends the missing or defective parts immediately. Your frames turned out absolutely perfect, and the entire hull also looks very clean.
Good morning Alberto. It is very strange. I picked up another beam with the same issue (no 24). I’m sure Tom will come to the party and sort this out.I run into the same problem with my hoy. A missing part is conceivabe, not so does a beam with pockets in wrong position, but this is it. Now all trust in CAF customer care, btw. Cheers!
Good morning Daniel. Yeah let’s hope there are no more. I already did some cussingMan, your build looks challenging enough as it is. Kudos for discovering the numbering errors, you just saved yourself much headache, cussing etc.
 - not too much tho.
Cheers Grant
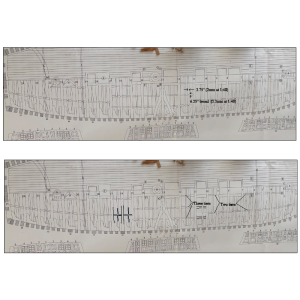
Hi Allan. Not 100% sure what you are querying. On the CAF build there are 2 deck levels displayed as shown by lines1 and 2 below:Hi Grant
How many tiers of carlings on each side are there in the fore and aft area of the main hatch?
Thanks
Allan
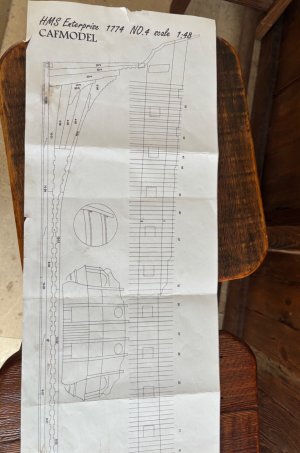

Or
There are 25 deck beams making up 25 tiers/sections of carlings.
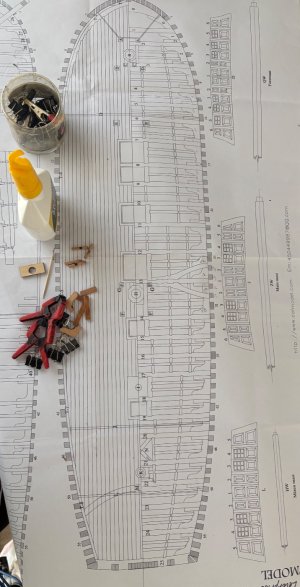
What I do know is that the carlings and beam pattern on this plan is not 100% accurate especially at the bow.
Cheers Grant
Good morning Gentlemen
While I wait for the new parts I am going to deviate to deck beams and carlings etc.
Firstly I need to poly the internal frames below the clamp line. I was very happy, indeed, how the Cherry came out. It looks way better in real life and try as I may I couldn’t share this with you guys:
Some pics:
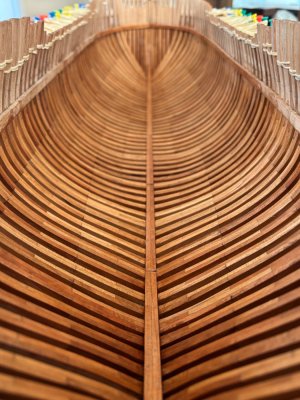
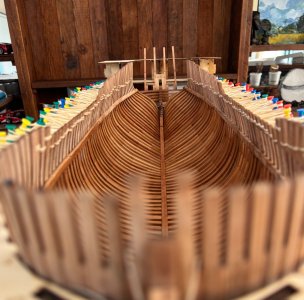
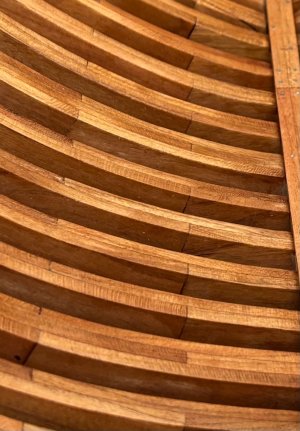
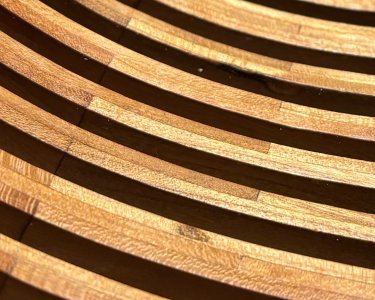
Very chuffed and then ……
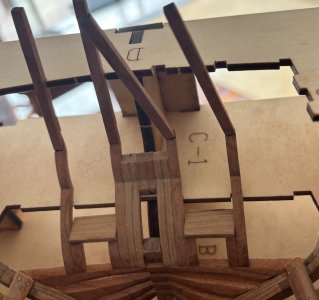
I knew this was going to happen just not while it is still in the cradle


Cheers Grant
While I wait for the new parts I am going to deviate to deck beams and carlings etc.
Firstly I need to poly the internal frames below the clamp line. I was very happy, indeed, how the Cherry came out. It looks way better in real life and try as I may I couldn’t share this with you guys:
Some pics:


Very chuffed and then ……

I knew this was going to happen just not while it is still in the cradle


Cheers Grant
- Joined
- Mar 1, 2022
- Messages
- 692
- Points
- 308

Auch...Good morning Gentlemen
While I wait for the new parts I am going to deviate to deck beams and carlings etc.
Firstly I need to poly the internal frames below the clamp line. I was very happy, indeed, how the Cherry came out. It looks way better in real life and try as I may I couldn’t share this with you guys:
Some pics:
View attachment 516330View attachment 516332View attachment 516331View attachment 516333
Very chuffed and then ……
View attachment 516334
I knew this was going to happen just not while it is still in the cradle

Cheers Grant
That drawing shows what I meant. Sorry for any confusion. From the contract and your drawing below.There are 25 deck beams making up 25 tiers/sections of carlings.
Lower deck
To have 3 tier of fir Carlings on each side from the second room before the Main Hatch, to the second room abaft the main mast room,
from thence forward & Abaft to have 2 tiers, the Carlings to be 6 ¼ ins broad, & 5½ ins deep, to be scored on upon the Beams 1⅛ ins aloft, & ¾ ins below, The ledges to be of fir 3¾ ins broad, & 3½ ins deep, to be placed not more the 12 ins, nor less than 9 ins asunder. All the Carlings & ledges from the fore hatch forward to be of oak
Upper Deck
To have 3 Tier of Carlings on each side from the second room abaft the main mast room to the second room afore the main hatch, from thence forward to have 2 tier, & in wake of the forecastle to be of oak, the Carlings to be 7 ins broad, & 5½ ins deep; the ledges also to be oak in wake of the said forecastle & from the mizen mast aft to have half beams to be let into oak carlings of sufficient distance from the side to shift the knees, the half beams to be fir 7 ins broad, & 5 ins deep.
I may be misinterpreting the phrase "to the second room" but have shown what I THINK they mean on the second version of drawing below. In the end, if the decks are planked, it will never be seen anyway.
Allan
- Joined
- Oct 17, 2020
- Messages
- 1,691
- Points
- 488

Hi Allan, sure with these kit designs there is to go crazy but , good modeling.FrankThat drawing shows what I meant. Sorry for any confusion. From the contract and your drawing below.
Lower deck
To have 3 tier of fir Carlings on each side from the second room before the Main Hatch, to the second room abaft the main mast room,
from thence forward & Abaft to have 2 tiers, the Carlings to be 6 ¼ ins broad, & 5½ ins deep, to be scored on upon the Beams 1⅛ ins aloft, & ¾ ins below, The ledges to be of fir 3¾ ins broad, & 3½ ins deep, to be placed not more the 12 ins, nor less than 9 ins asunder. All the Carlings & ledges from the fore hatch forward to be of oak
Upper Deck
To have 3 Tier of Carlings on each side from the second room abaft the main mast room to the second room afore the main hatch, from thence forward to have 2 tier, & in wake of the forecastle to be of oak, the Carlings to be 7 ins broad, & 5½ ins deep; the ledges also to be oak in wake of the said forecastle & from the mizen mast aft to have half beams to be let into oak carlings of sufficient distance from the side to shift the knees, the half beams to be fir 7 ins broad, & 5 ins deep.
I may be misinterpreting the phrase "to the second room" but have shown what I THINK they mean on the second version of drawing below. In the end, if the decks are planked, it will never be seen anyway.
Allan
View attachment 516335
- Joined
- Sep 10, 2024
- Messages
- 1,022
- Points
- 393

Your frames look fantastic Grant ... well ... um ... except for a couple.  It's modeling rule #53 - "Any part that protrudes, no matter how much or how little, WILL be snagged and broken." I had a couple like that on Oseberg, I just didn't show them. Shhh...
 It's modeling rule #53 - "Any part that protrudes, no matter how much or how little, WILL be snagged and broken." I had a couple like that on Oseberg, I just didn't show them. Shhh...
Wow! That cherry looks fabulous!
Hi Tobias. Thank you very much. It can be very frustrating however it is what it is. My experience with Tom from CAF is very good so far. I’m sure he will deliver. Cheers GrantHello Grant, it's always annoying when parts are missing. But the nice thing is that Tom is really super nice and sends the missing or defective parts immediately. Your frames turned out absolutely perfect, and the entire hull also looks very clean.
Hi GrantGood morning Gentlemen
While I wait for the new parts I am going to deviate to deck beams and carlings etc.
Firstly I need to poly the internal frames below the clamp line. I was very happy, indeed, how the Cherry came out. It looks way better in real life and try as I may I couldn’t share this with you guys:
Some pics:
View attachment 516330View attachment 516332View attachment 516331View attachment 516333
Very chuffed and then ……
View attachment 516334
I knew this was going to happen just not while it is still in the cradle

Cheers Grant
Very nice color
I voted your post with a ‘WOW’, Grant. Because of the nice and warm wood colors after the poly. And also because of the broken ‘spider leg’. Those pointing parts can give you shivers. Maybe a little plankt of some foam over the top for protection?Good morning Gentlemen
While I wait for the new parts I am going to deviate to deck beams and carlings etc.
Firstly I need to poly the internal frames below the clamp line. I was very happy, indeed, how the Cherry came out. It looks way better in real life and try as I may I couldn’t share this with you guys:
Some pics:
View attachment 516330View attachment 516332View attachment 516331View attachment 516333
Very chuffed and then ……
View attachment 516334
I knew this was going to happen just not while it is still in the cradle

Cheers Grant
Regards, Peter
Last edited:
Thanks Allan. I now know what 3 and 2 tier carlings areThat drawing shows what I meant. Sorry for any confusion. From the contract and your drawing below.
Lower deck
To have 3 tier of fir Carlings on each side from the second room before the Main Hatch, to the second room abaft the main mast room,
from thence forward & Abaft to have 2 tiers, the Carlings to be 6 ¼ ins broad, & 5½ ins deep, to be scored on upon the Beams 1⅛ ins aloft, & ¾ ins below, The ledges to be of fir 3¾ ins broad, & 3½ ins deep, to be placed not more the 12 ins, nor less than 9 ins asunder. All the Carlings & ledges from the fore hatch forward to be of oak
Upper Deck
To have 3 Tier of Carlings on each side from the second room abaft the main mast room to the second room afore the main hatch, from thence forward to have 2 tier, & in wake of the forecastle to be of oak, the Carlings to be 7 ins broad, & 5½ ins deep; the ledges also to be oak in wake of the said forecastle & from the mizen mast aft to have half beams to be let into oak carlings of sufficient distance from the side to shift the knees, the half beams to be fir 7 ins broad, & 5 ins deep.
I may be misinterpreting the phrase "to the second room" but have shown what I THINK they mean on the second version of drawing below. In the end, if the decks are planked, it will never be seen anyway.
Allan
View attachment 516335
 . Cheers Grant
True storyHi Allan, sure with these kit designs there is to go crazy but , good modeling.Frank
Thank you kindly Russ. Rule #53….I guess I broke that ruleYour frames look fantastic Grant ... well ... um ... except for a couple.It's modeling rule #53 - "Any part that protrudes, no matter how much or how little, WILL be snagged and broken." I had a couple like that on Oseberg, I just didn't show them. Shhh...

 . Cheers Grant
Thanks Paul. It is quite a chameleon colour and changes depending on the light. Doesn’t photo as good as it looks so I’m pretty happy with it. Cheers GrantWow! That cherry looks fabulous!
Thanks Gilbert. It took a fair amount of sanding and then sanding again with the grain to get it right. I’m am very pleased with the outcome tho. Cheers GrantHi Grant
Very nice color
Good evening Peter and thank you. You are correct, I should think of protecting those spindly little things. I did say I would break them when I fitted them.I voted your post with a ‘WOW’, Grant. Because of the nice and warm wood colors after the poly. And also because of the broken ‘spider leg’. Those pointing parts can give you shivers. Maybe a little plankton some foam over the top for protection?
Regards, Peter
Your "trying" is obvious in the great success you have achieved.right now I’m just trying to make this a reasonable model.. Cheers Grant
Allan


