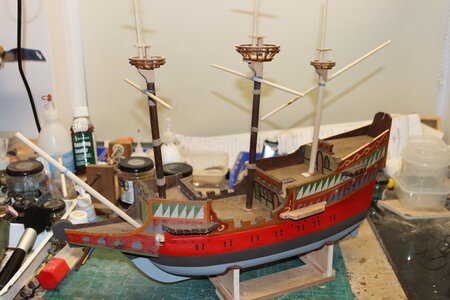
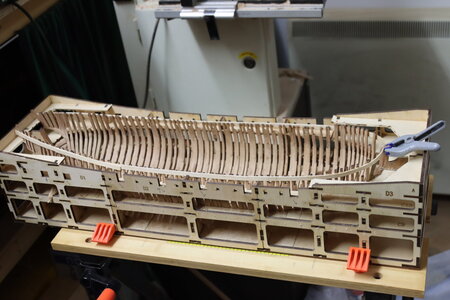
HMS Granado 1/48, POF, CAF models

Time to start using that excellent jig!
The next logical step was to mount the keel assembly into the jig. I used garden twist tie to hold the keel down snug to the jig baseboard (school of hard knocks - I once didn't hold a keel down on an early model, and found it had risen in the middle slightly. Every time I look at it I Imagine I can see it hogging)
I puzzled over the stern transoms for quite a while, as I couldn't see the kit instructions to be workable (too many indeterminate contact points) and there was quite a bit of forward and backwards 'slop' (movement) where they entered the sternpost. In the end I worked out that I could slot the transoms loose into the sternpost, lock them in still loose with the sternpost knee 3F-1, then mount frames 53 in place temporally, trimming the ends of the transoms as required. When happy, I then glued transoms 5K and 5L-1 onto frames 53 as I permanently fixed the frames.
The lower transoms are still loose, and will be glued from underneath when I have the ship out of the jig. It might sound complicated, but it has given me a nearly perfect fit.
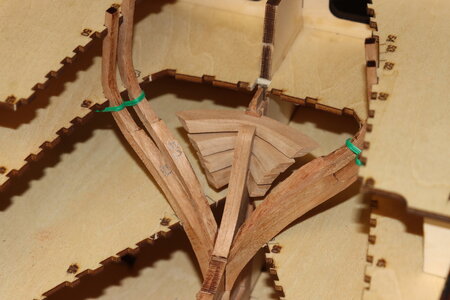
IMG_0581.JPG
The transoms are still loose at this stage. The green bits are gardening twist-tie holding frames 52 and 51 into the jig.
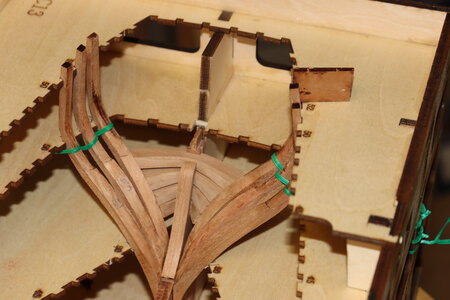
_MG_0588.JPG
Frame 53 in place, and the top two transoms glued.

Next - move to the bow.
The kit provides two jigs to form the hawse pieces (a - f) They go together very nicely, but be prepared to have to trim the C10-2 and C12-2 depending on how much sanding you have done on the back face of the frames. Also check very carefully the thickness of the spacers 2A-1 to 4. Mine were too thick and had to be adjusted to get the spacing right.
I haven't actually mounted them permanently on the stem and keel. My intention, when I have all the other frames mounted, is to cut off the front of the jig so I can gain better access to the stem, and fit the hawse frames very accurately to the rabbet lines. I've also left the first cant frame unglued to the external strengthening band so I can shift it slightly if necessary. (Good example of how you need to be reading instructions some way ahead of you, and visualising the required steps)
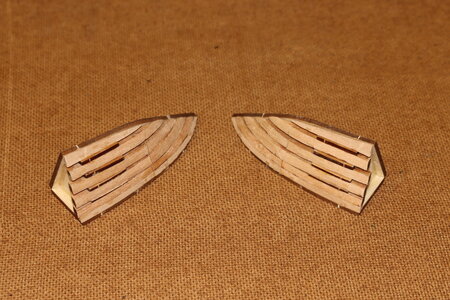
IMG_0551.JPG

All for now, dinner calls!

Ted
 
Time for a bit more rambling!

There are 57 frames in Granado, with either one, two or three layers of timber. As such, you really need to get some sort of production line going.
I started by assembling frames 10 and 27, as they are drawn out in the instruction manual and thus give you a good idea as to what you are supposed to do. I completed the frames using the method advocated in the manual, using the various packings included in the kit to allow for the decrease in thickness of the frame from keel to toprail but soon ran in to trouble, as I found that tiny differences in the thickness of the frame billets plus oversize packers made the task very difficult, and each frame seemed to be different in thickness . In addition, the frame layers didn't sit together very well, with tiny gaps where they ran alongside each other
This was a b****r, as I didn't fancy having to make new packers for every square frame (about 35) However, I then realised that the two and three layer frames had at least one continuously plane surface in their construction, so hit upon a solution that worked for me, and might be of use to other builders.

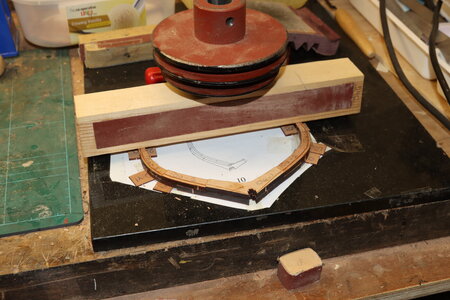
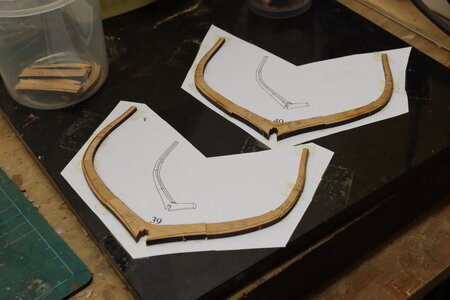
I first cut up the massive sheet of paper on which all the frames were printed. These were taped down in turn onto my 'plane table', which is simply a kitchen worktop bought in a local bargain shop for a couple of pounds ($3 ?) The first layer of the frame was then glued and stuck down outer face up over the drawing using double-sided sticky tape under all the joints (see photo below)
When dry, the drawing was released from the plane table with the frame still stuck to the paper. Then, being very careful, the paper was peeled back off the frame layer, taking the double-sided tape with it.
The second frame layer was then stuck down onto the first layer 'back to back', and immediately wrapped with thin cotton, in the hand, ensuring all the joints were closed up and the lateral alignment correct.
When everything was dry, the frame was cleaned up, ready for the next stage, which was to grind the edges of the frame to remove the char, and bevel the frame to follow the shape of the hull using the guide lines lasered on the frame.

IMG_0536.JPG
Rib 10 under construction using method shown in the instructions. Using packers.

_MG_0590.JPG
Modified method. First layer glued face up using double sided tape under all the joints

_MG_0596.JPG
Final layer glued onto the back of the first layer and secured with thin thread. This is two layer frame - the three layer frame just has a second plane surface

On completion of all the frames, they were glued onto the keel after having very carefully set them to the right height to match the keel rabbet and the gunport sills.
At this point, I screwed a fore and aft line of small screws into the outside surface of the jig, so I could wrap elastic bands around each frame and then tension them around the most convenient screw to ensure the frames were firmly held against the jig. I don't claim any of these ramblings as a 'new idea' - people have been using them for years!

IMG_0650.JPG
Use of elastic bands to hold tops of frames against jig


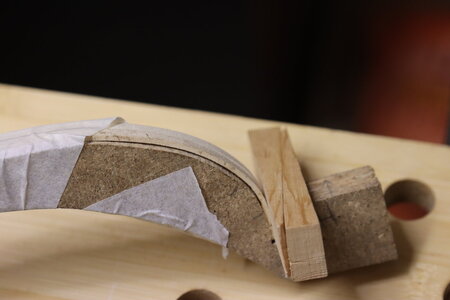
With frames held quite firmly in the jig, I now had a reasonably curved outer line to the frames at toprail level and was then able to glue a softwood 'sacrificial strake to the outside of the frames, thus holding them in place for future operations. The strake will eventually be ground off when I come to shape the outside of the hull.

IMG_0621.JPG
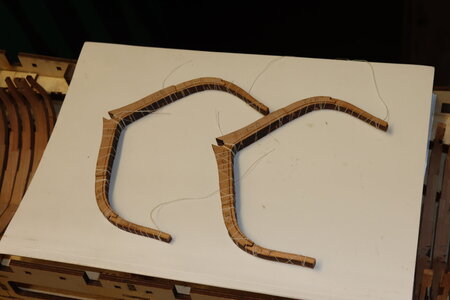
Softwood 'sacrificial strake being held in my scrapwood jig after boiling.
 
Hi to all. I am unsure for my next, but for sure, CAF project. Maybe you can give me a some input for my upcomming decision.

My favorites are the Renommee or Granado. I love large ships so POF ship Renommee would be my 1st choice.
But i hope that the promises will be kept that all following sessions where released 2022 or 2023. What do you think? It would sad buy the renomme and the next sessions will not be released. So it looks that the Granado is now on focus for ongoing development. Do you have more infos for this or maybe i get a feedback from CAF directly?

Best whishes Martin

current building: ZHL Royal Carolina
Hallo Martin alias @Petfet1
we wish you all the BEST and a HAPPY BIRTHDAY
Birthday-Cake
Sorry for beining off topic, but I would like also to ask, if you made a decision? Did you buy and started the Granado?
Maybe you would like also to show us the work on this model
 
I've reached a bit of a milestone with 'Granado', in that I have finished all the frames, and I'm now ready to start fairing up the hull.
'What?' do I hear you say - 'I thought Ted was building 'La Salamandre!'
Well, yes - he was!
I'd better tell you the tale.

Many, many years ago, when I was a youngster, I loved the 'Hornblower' books by C S Forester, and in one of them is a very detailed account of the workings of a Bomb Ketch, which absolutely fascinated me.
Move on to 1976, and I was subscribing to 'Model Shipwright' - a British quarterly publication focussing on all sorts of ship models (MS started in 1973, but ceased publication in 2013) In June 1976 there appeared an article by Bob Lightley on the construction of his HMS Granado, which was a horizontally split model to show the interior. This model ended up in the National Maritime Museum in London, and has since become the model that a lot of people have mentioned in SOS.
Interest re-kindled, but other models requiring construction.
In 1989, Peter Goodwin's book 'The Bomb Vessel Granado' appeared in the 'Anatomy of the ship' series (Cost me a whole £18!) Things were looking good, but you can't hurry these things, and I had just started building 'Natterer' (Link below)
I then found in 1999 a pristine copy of Boudriot's 'The Bomb Ketch Salamandre' in a second-hand maritime bookshop I used to frequent (now closed) Full drawings, sections, tables - the lot. It was also 'put away' for the future.

Then I found SOS, and found there was a kit of 'Salamandre' on the market, so promptly bought it in (I think) 2019. A nice kit from CAF, but it had to go on the shelf until I finished Bob Hunt's 'Kingfisher' I finally made a start in 2020, and had got all the frames thrown up, when suddenly CAF released a kit of 'Granado' - (B****r, D**n, and worse)

Well this was a dilemma! I realised that I actually wanted to build 'Granado', and that I wasn't really getting pleasure building 'Salamandre'.
Serious discussions with SWMBO ensued, with consideration of cost, pleasure and SABLE entering the picture. In the end I decided to shelve 'Salamandre' for the moment and purchase 'Granado'. So there we have it - a gestation period of about 60 years!


Now I expect you might like to see what I have done so far. I started the build about six months ago, and have progressed at a fair rate for me (Usually glacially slow). However, I found I had lost my writing muse, and couldn't start the build log! But, I've now got the frames complete, and my conscience has managed to kick me in to submission.

I don't propose to detail the unpacking of the kit, as several members have already done this in excellent detail. Suffice to say the contents were first class, the laser and CNC routing exceptional, and the instructions head and shoulders above 'Salamandre'.
I also don't propose to go in to a lot of detail on my build, as again it has been very well covered by others. What I will do is to update you at (hopefully) regular intervals, together with my notes covering modifications, errors, mistakes to avoid and so on. Even after nearly 70 years of modelling, I often make mistakes, but the difference is I know how I can generally rectify matters.

I'm going to close this update for tonight, but will come back to you in a day or two to post the start of the kit. In the meantime, I'll leave you with a picture showing progress to date.

Ted


View attachment 284501
All the frames completed, but only the cant frames are fixed at this point. I now have to start second fitting and fairing
What a great guy you are. I read with maximum pleasure your memories
I've reached a bit of a milestone with 'Granado', in that I have finished all the frames, and I'm now ready to start fairing up the hull.
'What?' do I hear you say - 'I thought Ted was building 'La Salamandre!'
Well, yes - he was!
I'd better tell you the tale.

Many, many years ago, when I was a youngster, I loved the 'Hornblower' books by C S Forester, and in one of them is a very detailed account of the workings of a Bomb Ketch, which absolutely fascinated me.
Move on to 1976, and I was subscribing to 'Model Shipwright' - a British quarterly publication focussing on all sorts of ship models (MS started in 1973, but ceased publication in 2013) In June 1976 there appeared an article by Bob Lightley on the construction of his HMS Granado, which was a horizontally split model to show the interior. This model ended up in the National Maritime Museum in London, and has since become the model that a lot of people have mentioned in SOS.
Interest re-kindled, but other models requiring construction.
In 1989, Peter Goodwin's book 'The Bomb Vessel Granado' appeared in the 'Anatomy of the ship' series (Cost me a whole £18!) Things were looking good, but you can't hurry these things, and I had just started building 'Natterer' (Link below)
I then found in 1999 a pristine copy of Boudriot's 'The Bomb Ketch Salamandre' in a second-hand maritime bookshop I used to frequent (now closed) Full drawings, sections, tables - the lot. It was also 'put away' for the future.

Then I found SOS, and found there was a kit of 'Salamandre' on the market, so promptly bought it in (I think) 2019. A nice kit from CAF, but it had to go on the shelf until I finished Bob Hunt's 'Kingfisher' I finally made a start in 2020, and had got all the frames thrown up, when suddenly CAF released a kit of 'Granado' - (B****r, D**n, and worse)

Well this was a dilemma! I realised that I actually wanted to build 'Granado', and that I wasn't really getting pleasure building 'Salamandre'.
Serious discussions with SWMBO ensued, with consideration of cost, pleasure and SABLE entering the picture. In the end I decided to shelve 'Salamandre' for the moment and purchase 'Granado'. So there we have it - a gestation period of about 60 years!


Now I expect you might like to see what I have done so far. I started the build about six months ago, and have progressed at a fair rate for me (Usually glacially slow). However, I found I had lost my writing muse, and couldn't start the build log! But, I've now got the frames complete, and my conscience has managed to kick me in to submission.

I don't propose to detail the unpacking of the kit, as several members have already done this in excellent detail. Suffice to say the contents were first class, the laser and CNC routing exceptional, and the instructions head and shoulders above 'Salamandre'.
I also don't propose to go in to a lot of detail on my build, as again it has been very well covered by others. What I will do is to update you at (hopefully) regular intervals, together with my notes covering modifications, errors, mistakes to avoid and so on. Even after nearly 70 years of modelling, I often make mistakes, but the difference is I know how I can generally rectify matters.

I'm going to close this update for tonight, but will come back to you in a day or two to post the start of the kit. In the meantime, I'll leave you with a picture showing progress to date.

Ted


View attachment 284501
All the frames completed, but only the cant frames are fixed at this point. I now have to start second fitting and fairing
What a great guy you are. Your history as a reader of Forester's tales and your interensting in modelship crafting really moved me, as I did the very same as a youngster. Rispect, man!
 
Hi Frank48

POF: plank on frame ( realistic kind of building ships)
CAF: Chinese high quality ship kit developer, provider and seller
ZHL: Chinese ship kit seller

you can google to see more details….

Best wishes tanti auguri Martin
Good to know about it!
 
Hi Albertmary

Many thanks for your kind comments! - Forrester has a lot to answer for!

Ted
 
Well - quite a while since I posted any progress on Granado!
The reason is simple - I haven't made much.

Let me tell you the tale...........
I have a very good friend (John) who loves model boats. The only problem is that he is very definitely not a ship modeller!
He's not a member of this or any other forum (doesn't even own a computer) and he's happy for me to write about his problem.
John's father built him a model of the 'Golden Hind' in the 1950's. Those of you who are around my age (74) will know that there wasn't much around in the way of ship model kits at that time, so his father sent off for a set of plans from Percival Marshall (a well known supplier from that time), collected some balsawood and plywood and made what has proved to be a very rough model of the ship, largely ignoring the plans!
As happens, the model ended up in the attic, where it was knocked about for around 50 years, until John's father died, when it was found during the house clearance. It was very damaged at this point, with a lot of dents in the balsawood hull, only two lower masts left standing and hardly any rigging.
Now John decided he would like to restore the ship in memory of his father, but didn't really have a clue how to go about it. All his experience was in fairly small modern electric boats, bought ready to run or donated by friends. After a couple of years of asking advice from me and other friends, I realised he wasn't getting anywhere, so I offered to take the ship, order appropriate fittings and 'restore' the ship to something workable. This would entail repairing the hull, sorting out the gun-ports and providing masts. John would then have a go at some basic re-painting and rigging.
So I started last February, never thinking it would take me this long! Great hilarity when we found there were six gun-ports to Starboard and seven to port, but we decided to retain this anomaly in memory of John's father.

Anyway to cut a long story short, I've only some of the lower hull painting to sort, and I'll be back on 'Granado' - Promise!


IMG_0672a.jpg
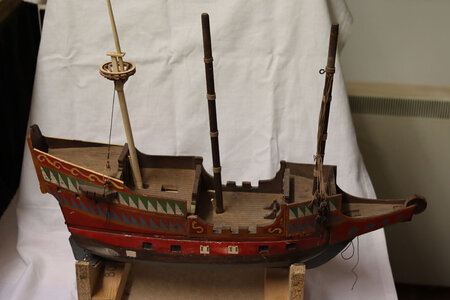
The Golden Hind more or less as delivered by John. I knocked up a mizzen mast and sorted two gun-ports to get John's approval for the proposed work, and infilled a rather dubious-looking gun-port very close to the waterline.

So, now you are up to date with what I have been doing! I'll post something in a day or two regarding some work I have managed on Granado, plus a list of problems I have encountered this far.

Ted
 
How is it that something you thought you would finish in a couple of days suddenly takes two weeks?
Any way - I have now finished the 'restoration' work for John (picture below), and can move on with Granado.

IMG_0709.JPG
My input was limited to making new masts, sorting gunports, repairing the lower hull and painting the lower hull. I also made replacement channels, catheads and various bits and pieces to go on later.
John will now re-paint all the upper hull decoration, and have a go at the rigging (simplified).
If John does manage to complete her, I'll post a picture sometime in the future, but that may be some way off!

An interesting little project, but I was surprised at how long it took.

Anyway, back to Granado in the following post!

Ted
 
I left you all at the start of March with a picture showing you how I bent the temporary reinforcing strake to be glued on the outside of the frames. This strake is very necessary in order to be able to obtain a good gunwhale line and must be in place before you start sanding the inside of the hull.

IMG_0631.JPG
Glueing the temporary strake to the outside of the hull

IMG_0691.JPG
Temporary strake glued in place. Forward cant frames left off at this stage.

After this, the internal sanding can begin. I use a proxxon pen sander for the majority of this, but stick a rougher grade of sandpaper to the oscillating head, as the grade proxxon supply is useless for this job. Sanding the inside is not as straightforward as you might think, as there will inevitably be differences in frame heights which all have to be sanded out to leave a nice smooth, flowing surface. A case of just persevere!
Anyway, that's the task I'm on with at present.

Now, I said I would give you a list of problems and inconsistencies I have encountered, so here goes. Please note these are the problems I found with my kit - you may not have any, or different issues. I have called them problems, but they are pretty minor, and in no way reflect on the quality of the kit, which is superb:--

Keel assembly: Leave off curved figurehead support pieces - too easy to knock off at this stage
Ensure all keel pieces are flat and not warped in any way
Tie keel down in three or four places to prevent movement
Rib 16; Piece a-6 too thick
Rib 36: Four pieces a-3 found - you only need two
Rib 18: Piece a-1 has no chamfer lines (also a-3 and a-4)
Ribs 10,12,16,36,41: Found to be a little 'slack' when installed in jig - May be peculiar to my assembly.
Rib 17: Piece b-2 has inner chamfer line - ignore. Template C8 may also need to be relieved slightly
Rib 18: Piece a-2 has outer chamfer line - ignore. Template C8 may also need to be relieved slightly
Rib 32: Piece a-1 shown as two pieces, but isn't. Also applies to some others
Rib 20: Numbering incorrect - a-3 should be b-3
Rib 55: Billet drawing in handbook shows it on billet 5i, but not on billet 5
Pieces 3F-3, 4j-i1&2, h1&2: Suggest leave off until later - too easy to damage at this stage
Hawse timbers: See earlier post regarding assembly
Transoms: See earlier post regarding assembly
Fitting ribs to keel: Take great care in setting to bearding line and gunport cill heights on jig.

Nothing major, but it might help you, particularly if this is your first POF kit

Ted
 
I left you all at the start of March with a picture showing you how I bent the temporary reinforcing strake to be glued on the outside of the frames. This strake is very necessary in order to be able to obtain a good gunwhale line and must be in place before you start sanding the inside of the hull.

View attachment 312666
Glueing the temporary strake to the outside of the hull

View attachment 312667
Temporary strake glued in place. Forward cant frames left off at this stage.

After this, the internal sanding can begin. I use a proxxon pen sander for the majority of this, but stick a rougher grade of sandpaper to the oscillating head, as the grade proxxon supply is useless for this job. Sanding the inside is not as straightforward as you might think, as there will inevitably be differences in frame heights which all have to be sanded out to leave a nice smooth, flowing surface. A case of just persevere!
Anyway, that's the task I'm on with at present.

Now, I said I would give you a list of problems and inconsistencies I have encountered, so here goes. Please note these are the problems I found with my kit - you may not have any, or different issues. I have called them problems, but they are pretty minor, and in no way reflect on the quality of the kit, which is superb:--

Keel assembly: Leave off curved figurehead support pieces - too easy to knock off at this stage
Ensure all keel pieces are flat and not warped in any way
Tie keel down in three or four places to prevent movement
Rib 16; Piece a-6 too thick
Rib 36: Four pieces a-3 found - you only need two
Rib 18: Piece a-1 has no chamfer lines (also a-3 and a-4)
Ribs 10,12,16,36,41: Found to be a little 'slack' when installed in jig - May be peculiar to my assembly.
Rib 17: Piece b-2 has inner chamfer line - ignore. Template C8 may also need to be relieved slightly
Rib 18: Piece a-2 has outer chamfer line - ignore. Template C8 may also need to be relieved slightly
Rib 32: Piece a-1 shown as two pieces, but isn't. Also applies to some others
Rib 20: Numbering incorrect - a-3 should be b-3
Rib 55: Billet drawing in handbook shows it on billet 5i, but not on billet 5
Pieces 3F-3, 4j-i1&2, h1&2: Suggest leave off until later - too easy to damage at this stage
Hawse timbers: See earlier post regarding assembly
Transoms: See earlier post regarding assembly
Fitting ribs to keel: Take great care in setting to bearding line and gunport cill heights on jig.

Nothing major, but it might help you, particularly if this is your first POF kit

Ted
I think this should be shared with Tom and maybe he can correct these minor issues

@CAFmodel
 
I think this should be shared with Tom and maybe he can correct these minor issues
Hi Zoly,
Interesting observation!
The issues i have raised are minor, and I would imagine experienced modellers would not have any problems with them. I'm sure Tom will be reading these posts, and will decide whether he needs to make any changes.
The points I have raised are more likely to be of interest to those modellers who are perhaps starting with Granado as their first POF, and will hopefully take them as the sort of issues to watch out for.

Ted
 
Hi Ted,
I must admit I have been struggling with my Granado kit. The inner horizontal stringers are too thick to bend to the inner frames. Perhaps I should purchase some thinner stock.
 
Hi Ted,
I must admit I have been struggling with my Granado kit. The inner horizontal stringers are too thick to bend to the inner frames. Perhaps I should purchase some thinner stock.
Hi Bryian,
I must admit i looked at the inner strakes with a bit of surprise. Not there yet, but I think I will first try steaming and bending, and if that fails then move on to laminating. There is a third way that involves soaking in pure ammonia, but I'm reluctant to go down that route - It works, and somewhere in my workshop I have a piece of 4mm square stock with an overhand knot in it, but it's messy and potentially dangerous, and leaves the timber looking 'washed out'

Ted
 
I am working on the upper one with 2mm thickness - soacking and with the heating iron bending was no bigger problem.
Partly wet and fixing with some clamps at the location where they should be (at the inner bow) they also get the slight torsion which is necessary.
Waited over night until they are completely dry - and they stay like they should......
Let us see, how it is working with the lower ones.....
 
Back
Top