I was recently asked to post a photo of Kingfisher/ King's Fisher, in a different thread, and had members asking me to do a log, and also had a fair number of 'likes'.
I bought the kit from Bob Hunt at Lauck Street Shipyard, but unfortunately it is no longer available, which is a huge loss as it is such a superb kit. However, as Bob says, he can't compete with the Chinese on costs.
There are however a number of members out there who have the kit, but have not yet made a start, and a lot of the building techniques/details are common to any ship of the period.
My effort is nearly complete, so I'll run a series of photos illustrating various building points.
Tell me if you get bored!
HMS Kingfisher (also spelled King's Fisher or Kingsfisher) was the second ship in the 14-gun Swan class of ship sloops, to which design 25 vessels were built in the 1760s and 1770s. She was launched on 13 July 1770 at Chatham Dockyard, and completed there on 21 November 1770. She took part in the American Revolutionary War, enforcing the blockade of the Delaware Bay, and served in the Battle of Turtle Gut Inlet, near Cape May, New Jersey. While under the temporary command of Lieutenant Hugh Christian, she was burnt by her own crew to avoid capture on 7 August 1778 in Narragansett Bay during the Battle of Rhode Island. (Taken from Wikipedia)
The fully framed kit is at 1/48 scale, and comes out at around two feet or 600mm on the gundeck, so makes a reasonably sized model.

In the building jig, frames going in, with all the other frames hanging up above. The jig has been modified from the kit as supplied, with each section bolted through the baseboard and held in by a butterfly nut (See below) They were then fully aligned with a horizontal batten running fore and aft. It meant any section of the jig could be accurately removed and replaced as necessary.
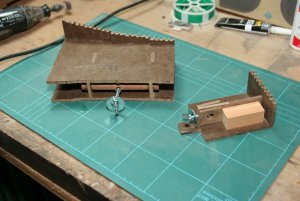
Sections of jig as described above.
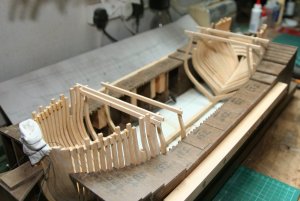
Frames going in, with spacer blocks between each frame. The horizontal battens across some of the frames are temporary, and help in the alignment. The centreline is marked on the crosspieces, and a thread run from bow to stern just above them. It is then possible to align your viewpoint using the thread and the keel to ensure the frames are centralized. Any misalignment can then be rectified by removing the offending part of the jig and easing the slots as necessary. It really works!
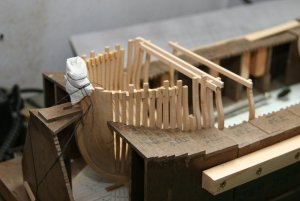
Closer view of sharp end. The kitchen roll paper is protecting the ends of the bollard timbers (or knightheads)

And the blunt end.

Being typically perverse, I decided to add all the infill timbers between the frames just above the keel. (Not included in the kit)
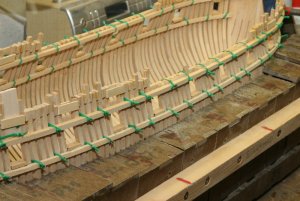
Ann is still wondering what happened to her roll of gardening wire - It is ideal for attaching temporary battens to the frames to keep everything lined up as you insert the spacer blocks at the top of the frames.
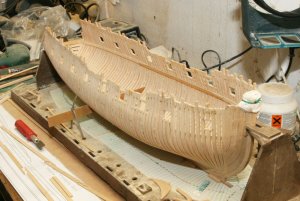
Hull fully framed, blocked, jig removed and faired up internally and externally. Upper deck clamp in place to hold the gundeck beams. The rather odd hold-down construction in the centre is a temporary measure to hold the keel down as I corrected a slight hog in the keel, caused by some of the infill timbers above the keel being slightly too thick.
A good place to stop - will post more in a few days.
Any queries, then just get in touch.
Ted
I bought the kit from Bob Hunt at Lauck Street Shipyard, but unfortunately it is no longer available, which is a huge loss as it is such a superb kit. However, as Bob says, he can't compete with the Chinese on costs.
There are however a number of members out there who have the kit, but have not yet made a start, and a lot of the building techniques/details are common to any ship of the period.
My effort is nearly complete, so I'll run a series of photos illustrating various building points.
Tell me if you get bored!
HMS Kingfisher (also spelled King's Fisher or Kingsfisher) was the second ship in the 14-gun Swan class of ship sloops, to which design 25 vessels were built in the 1760s and 1770s. She was launched on 13 July 1770 at Chatham Dockyard, and completed there on 21 November 1770. She took part in the American Revolutionary War, enforcing the blockade of the Delaware Bay, and served in the Battle of Turtle Gut Inlet, near Cape May, New Jersey. While under the temporary command of Lieutenant Hugh Christian, she was burnt by her own crew to avoid capture on 7 August 1778 in Narragansett Bay during the Battle of Rhode Island. (Taken from Wikipedia)
The fully framed kit is at 1/48 scale, and comes out at around two feet or 600mm on the gundeck, so makes a reasonably sized model.

In the building jig, frames going in, with all the other frames hanging up above. The jig has been modified from the kit as supplied, with each section bolted through the baseboard and held in by a butterfly nut (See below) They were then fully aligned with a horizontal batten running fore and aft. It meant any section of the jig could be accurately removed and replaced as necessary.

Sections of jig as described above.

Frames going in, with spacer blocks between each frame. The horizontal battens across some of the frames are temporary, and help in the alignment. The centreline is marked on the crosspieces, and a thread run from bow to stern just above them. It is then possible to align your viewpoint using the thread and the keel to ensure the frames are centralized. Any misalignment can then be rectified by removing the offending part of the jig and easing the slots as necessary. It really works!

Closer view of sharp end. The kitchen roll paper is protecting the ends of the bollard timbers (or knightheads)

And the blunt end.

Being typically perverse, I decided to add all the infill timbers between the frames just above the keel. (Not included in the kit)

Ann is still wondering what happened to her roll of gardening wire - It is ideal for attaching temporary battens to the frames to keep everything lined up as you insert the spacer blocks at the top of the frames.

Hull fully framed, blocked, jig removed and faired up internally and externally. Upper deck clamp in place to hold the gundeck beams. The rather odd hold-down construction in the centre is a temporary measure to hold the keel down as I corrected a slight hog in the keel, caused by some of the infill timbers above the keel being slightly too thick.
A good place to stop - will post more in a few days.
Any queries, then just get in touch.
Ted


