Thanks, Gennaro for the proper name of the straps - i.e.: Gudgeons! Love learning!!Makes perfect sense to me. Gudgeons rest on planking, not framing.
-

Win a Free Custom Engraved Brass Coin!!!
As a way to introduce our brass coins to the community, we will raffle off a free coin during the month of August. Follow link ABOVE for instructions for entering.
-

PRE-ORDER SHIPS IN SCALE TODAY!
The beloved Ships in Scale Magazine is back and charting a new course for 2026!
Discover new skills, new techniques, and new inspirations in every issue.
NOTE THAT OUR FIRST ISSUE WILL BE JAN/FEB 2026
You are using an out of date browser. It may not display this or other websites correctly.
You should upgrade or use an alternative browser.
You should upgrade or use an alternative browser.
HMS Serapis - Scratch Build [COMPLETED BUILD]
- Thread starter BradNSW
- Start date
- Watchers 20
-
- Tags
- 1782 completed build serapis
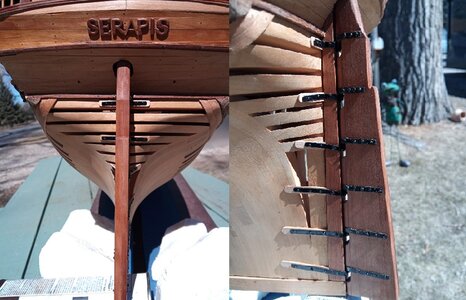
Completed the rudder assembly. A few pics to show how it turned out. I'm satisfied with the result and glad I took the time to turn all the tiny brass nails! The spacers under the gudgeons do look "odd" like Uwek said they would. I could not make the gudgeons lay flat, since there is a difference of thickness between the sternpost and the frames that equals the plank thickness. I'm glad to finish the rudder, as we move the workshop from Loveland, CO and head to Breckenridge, CO, for some spring skiing in a few days!! Next job will be to put in the stern cannon ports!

I decided to redo the hinges on the main deck cannon ports. I initially made the hinges and attached them to a single bar (left photo), which I saw on a few ship model photos. After looking at many more model photos, I think the U-bolt type hinges I attempted to duplicate are more accurate. Middle is unpainted correction, and Right photo is final product. Port side is complete, as we had a heat wave at Breckenridge, CO the last few days. Fortunately, it's supposed to snow for the next three days, so the Stbd side may have to wait till the spring skiing is over!!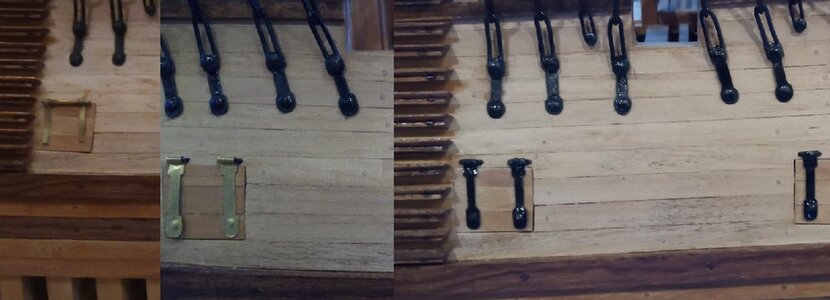

Looking much better - you made a good decision to redo them
Hallo @BradNSWFirst post on my build. I started in the 1980s, from plans bought from NMM in Greenwich. Kids stopped progress from late 80's, until recently. Being retired, I'm making good progress. i will dig through some photos to show recent progress.
I have a unique "workshop". When COVID broke out, we rented the house and took off in or 5th wheel trailer, which has been a unique place to work (see attached photo).
The museum curator who sent plans, replied they had no "actual" plans for the "unfortunate" ship Serapis but he sent the plans for Roebuck, which was the lead ship of thirteen 44 gun frigates, of which Roebuck was one. The plans list the thirteen shipyards the plans were delivered to and which ship each shipyard built. (see attached photo).
we wish you all the BEST and a HAPPY BIRTHDAY


Hope you are well and work on your Serapis?!?
During a year absence for this forum, much has been accomplished. We bought a home in Colorado, so my workshop is no longer a camping trailer. I completed the Serapis, mostly staining and small detail work. Having a home, I next tackled the issue of displaying it.
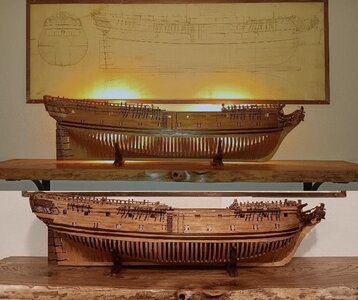
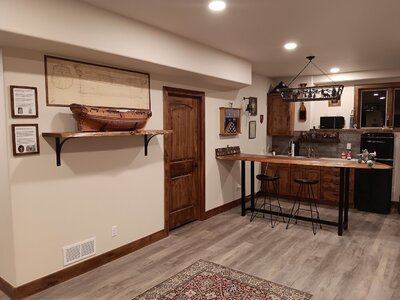
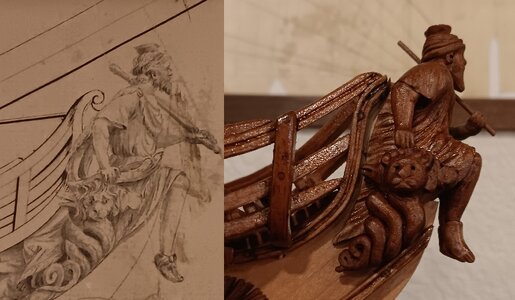
She was built over 40 years (25-year absence, while the daughters grew up and I pursued a Nay career). The plans of Roebuck (lead ship in the class) ordered in the 1980s, were in very bad shape. So, I ordered plans of the HMS Serapis 1782 for ideas on the figurehead and stern carving. I framed these "new" 1782 plans and mounted them to the wall above the model.
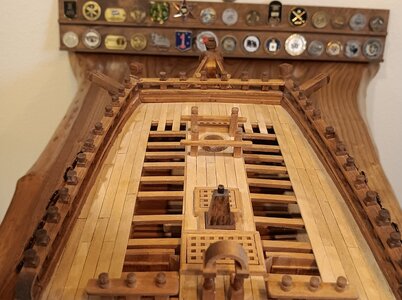
She is placed on a live edge slab of Siberian Elm, finished with WATCO wood. I embedded two flush LED lights into the wall behind the model to highlight the Navy Board framing. One photo show lights on, and the other with the lights off. The other photo is the matching Siberian Elm bar, and plaques, which pay homage to my 20+ years in the US Navy.
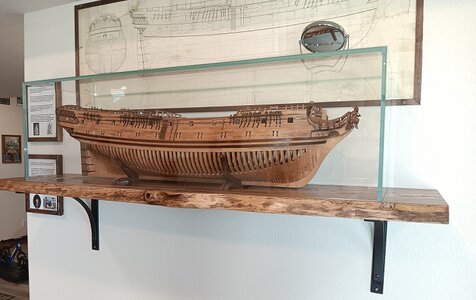
I am in the process of having a glass case built. I will include a small 6" magnifying mirror on top of the case for use in viewing the deck equipment, as the shelf is high, protecting it from young grandchildren.
Looking for my next project, I am enviously eyeing Ken's build log of HMS Blanford. I'm not sure I want to go through the scratch build process from plans, when such a detailed model, with such high-quality wood is available. My thought is, build the kit and add my own custom touches during the build...any feedback on this kit as the basis for a semi-custom project would be appreciated!!


Congratulations for the result of the last one year - a new home model finished and already planning the next ------ >>> Great
Maybe when you have time you could show us with some more photos the final result
BTW: a great place to show her
BTW: a great place to show her
A beautiful model, nicely displayed, Brad.During a year absence for this forum, much has been accomplished. We bought a home in Colorado, so my workshop is no longer a camping trailer. I completed the Serapis, mostly staining and small detail work. Having a home, I next tackled the issue of displaying it.
She was built over 40 years (25-year absence, while the daughters grew up and I pursued a Nay career). The plans of Roebuck (lead ship in the class) ordered in the 1980s, were in very bad shape. So, I ordered plans of the HMS Serapis 1782 for ideas on the figurehead and stern carving. I framed these "new" 1782 plans and mounted them to the wall above the model.
She is placed on a live edge slab of Siberian Elm, finished with WATCO wood. I embedded two flush LED lights into the wall behind the model to highlight the Navy Board framing. One photo show lights on, and the other with the lights off. The other photo is the matching Siberian Elm bar, and plaques, which pay homage to my 20+ years in the US Navy.
I am in the process of having a glass case built. I will include a small 6" magnifying mirror on top of the case for use in viewing the deck equipment, as the shelf is high, protecting it from young grandchildren.
Looking for my next project, I am enviously eyeing Ken's build log of HMS Blanford. I'm not sure I want to go through the scratch build process from plans, when such a detailed model, with such high-quality wood is available. My thought is, build the kit and add my own custom touches during the build...any feedback on this kit as the basis for a semi-custom project would be appreciated!!
View attachment 413434View attachment 413436
Regards, Peter
Hi Brad, I just spent most of my lunch break skimming your build report. A wonderful experience! Congratulations on finishing this marvelous project!
Uwe,Maybe when you have time you could show us with some more photos the final result
BTW: a great place to show her.
I took a few pictures that show the use of Watco wood oil to "paint" the model. I used clear, light walnut and dark walnut. Only two types of wood (Pear for the carvings and alder for hull and planking/etc).
Figurehead - Greek and Egyptian god Serapis and his three headed dog Cerebrus, who guarded the gates to hell)
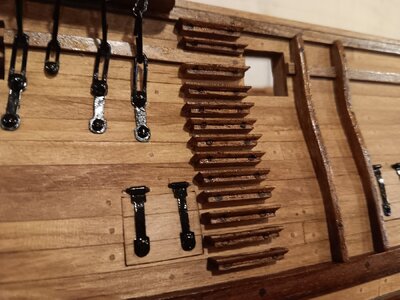
Quarterdeck ladder, rubbing strakes, and cannon ports
Foredeck from midships
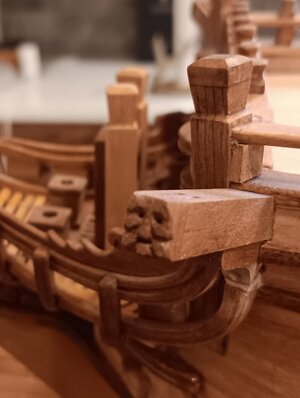
Cathead detail
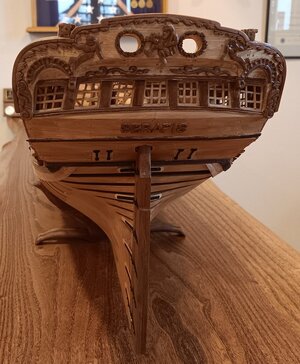
Stern (my first attempts at any carving)
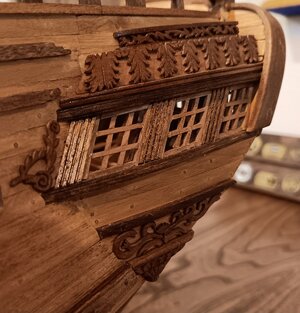
Quarter Galley
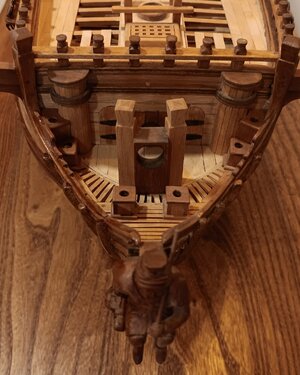
Beakhead bulkhead and seats of ease
Thank you for the kind words and I hope you were able to take on some sustenance, during your lunch break!Hi Brad, I just spent most of my lunch break skimming your build report. A wonderful experience! Congratulations on finishing this marvelous project!
Thank you Peter. It's nice to have home to display it in.A beautiful model, nicely displayed, Brad.
Regards, Peter
As I put it back on the shelf, I noticed I had not shown the cradles. I carved them from leftover pear wood, with no idea of what I was trying to carve.
I just traced the hull form at the two frame locations I wanted the cradles to go. Then I just started whittling away.
What slowly emerged were some long "paws" and a long "neck" with a "bird" shaped head. I thought about more intricate carving but stopped, stained it and was pleased with the result.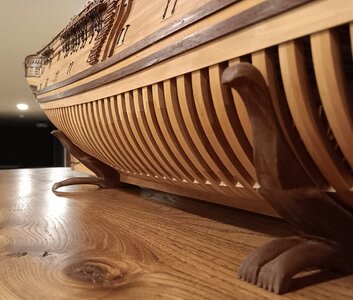

- Joined
- Dec 16, 2016
- Messages
- 1,212
- Points
- 493

Hi Brad, I spent a pleasant evening reading through your log and am in admiration on what you’ve achieved. To start such a build as a first POF scratch takes courage and commitment and to pull it off in the way that you have deserves a big round of applause. I’m impressed with the way that you tackled the carvings and improved as you went along, they are the icing on the cake. I wouldn’t even dream of attempting challenge like that, well done. I also like the way that you’re displaying it, I don’t know wether it enhances your kitchen or your nice kitchen enhances the model, maybe my wife will let me display Blandford in our kitchen, I doubt it. Ken
Last edited:
Thank you Ken for the kind words. I was young and naive when I started it in the mid 1980s! It sure would have helped to have a forum like this. All I had was a few reference books, with pictures of Navy Board Models, and a set of plans from NMM.
Unfortunately, I only made two visits to the Naval Acadamy museum during by four years there. Their collection of Prisoner of War models, done with bone as a building material inspired me. I naively figured if a sailor with rudimentary tools could make something so beautiful, it couldn't be "that hard"!!!
Unfortunately, I only made two visits to the Naval Acadamy museum during by four years there. Their collection of Prisoner of War models, done with bone as a building material inspired me. I naively figured if a sailor with rudimentary tools could make something so beautiful, it couldn't be "that hard"!!!


