Seen this done b4, somewhere. They had the model divided and placed on separate pull out drawers.
-

Win a Free Custom Engraved Brass Coin!!!
As a way to introduce our brass coins to the community, we will raffle off a free coin during the month of August. Follow link ABOVE for instructions for entering.
-

PRE-ORDER SHIPS IN SCALE TODAY!
The beloved Ships in Scale Magazine is back and charting a new course for 2026!
Discover new skills, new techniques, and new inspirations in every issue.
NOTE THAT OUR FIRST ISSUE WILL BE JAN/FEB 2026
You are using an out of date browser. It may not display this or other websites correctly.
You should upgrade or use an alternative browser.
You should upgrade or use an alternative browser.
Saw it on FBKen, May be you have seen my build log on dutch forum or foto's on Facebook. Later on I will show you that I made a box with pull out drawers.
- Joined
- Apr 10, 2020
- Messages
- 132
- Points
- 213

In 2019 there was a presentation of a lot of models by its builders at Batavialand in the Netherlands. I was there with my Victory. As visitor there was Igor Capinos, a well known modelbuilder from Oecraine. Het took a number of pictures and posted them on Facebook. Later others reposted them.
See:
See:
WOW - for the details
and
WOW - for the execution of this unusual modeling
Very good work and a very good eye for the details, (like copper and lead floor etc.)
and
WOW - for the execution of this unusual modeling
Very good work and a very good eye for the details, (like copper and lead floor etc.)

- Joined
- Apr 10, 2020
- Messages
- 132
- Points
- 213

Update 5
Now I will continue by explaining how I filled the orlopdeck with all his structures.
For this I used two figures.


Fig. McGowan: Orlopdeck

 Fig: McKay: Orlopdeck.
I made a print of the McKay layout on scale and put it on my model.

So I could see what comes where.

And I could make the necessary openings in the deck for gratings and hatches.


Here you see some gratings and the upper parts of the riders. Between the outer and the inner planking on top of the frames, you see a copper wire. That is one of the wires for the powersuply for the lighting with leds. Through the starbordside runs the + wire and through the portside the – wire.The leds are in pairs with a resistor between them.
Next is the pumphousing around the mainmast.
Left you see the four walls and right a few of them mounted around the mainmast with the pumps
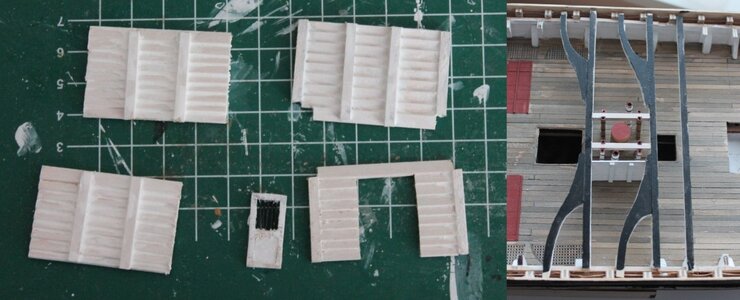
At the aft side of the orlopdeck there are some cabins on both sides. Below how it looks like on the Victory.

I made the front of these cabins as follows:
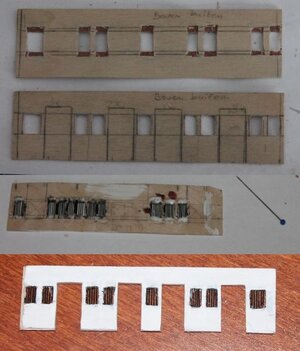
And the doors on a similar manner resulting in:

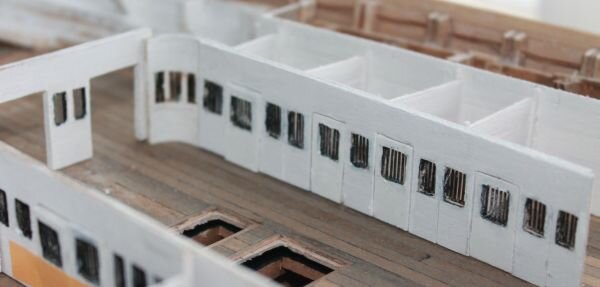
And the rounding as follows.

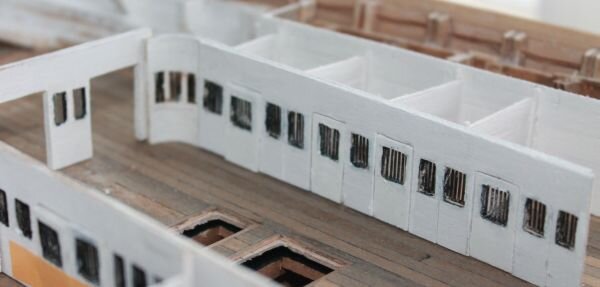
And finally on the model it looks like


Here you see top left the storeroom of the captain and the admiral. Below on the left the cabin of the carpenter and two storerooms of the mariners and the cabin of the ships chirurg. In the middle left you see the bottom of the storeroom for gunpowder cartridges.
The rest will be filled later.
Will be continued.
Now I will continue by explaining how I filled the orlopdeck with all his structures.
For this I used two figures.


Fig. McGowan: Orlopdeck


I made a print of the McKay layout on scale and put it on my model.

So I could see what comes where.

And I could make the necessary openings in the deck for gratings and hatches.


Here you see some gratings and the upper parts of the riders. Between the outer and the inner planking on top of the frames, you see a copper wire. That is one of the wires for the powersuply for the lighting with leds. Through the starbordside runs the + wire and through the portside the – wire.The leds are in pairs with a resistor between them.
Next is the pumphousing around the mainmast.
Left you see the four walls and right a few of them mounted around the mainmast with the pumps

At the aft side of the orlopdeck there are some cabins on both sides. Below how it looks like on the Victory.

I made the front of these cabins as follows:

And the doors on a similar manner resulting in:

And the rounding as follows.

And finally on the model it looks like


Here you see top left the storeroom of the captain and the admiral. Below on the left the cabin of the carpenter and two storerooms of the mariners and the cabin of the ships chirurg. In the middle left you see the bottom of the storeroom for gunpowder cartridges.
The rest will be filled later.
Will be continued.


Last edited:
- Joined
- May 26, 2019
- Messages
- 154
- Points
- 113

Very clever
Paul
Paul
- Joined
- Apr 10, 2020
- Messages
- 132
- Points
- 213

Update 6
We will continue with detailing the orlopdeck.

This is the storage of gunpowder bags in the hanging magazine.
And next the unit of the complete hanging magizine ready to be placed on the deck.

I finished some more things and placed the deckbeams.

Left you see the cable tier with the red floor and the sailroom in construction.

You are looking here to the cable tiers on the side and the doors to the hanging magazine in the center. Marines on guard.

This the sailroom (left) with cloth for sales and right the hanging magazine.
Now we start building the front of this deck, here is the layout.


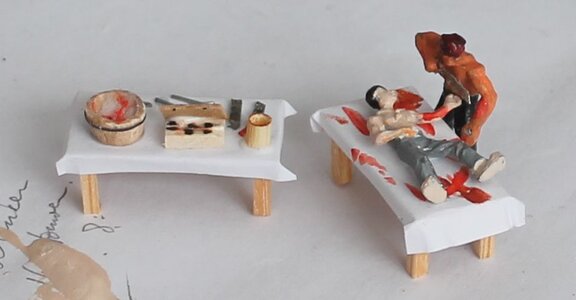
This area is the place where in battle the ships chirurg is working. Meaning: mostly only amputating damaged arms or legs. This is also the area where Nelson died on oct 21 in 1805.
It is not Nelson on the table.
Here I am making the divisions of the rooms and workplaces for the carpenter and others.

I made the workplaces upside down and placed the carpenter equipment in place against the wall.

I made also a storage rack for the timbers of the carpenter,
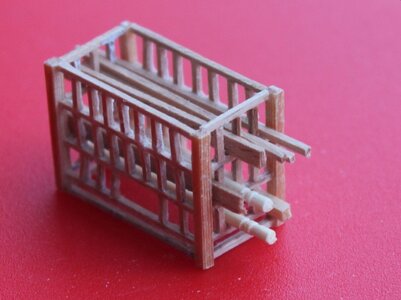
There is also a workplace for ropes and blocks.

Here you see the storage of ropes in the rope-room.
And here an overview. Below the carpenters workplace and on top the rope and block room. Around the foremast you see three hatches to rooms in the hold. Above the mast is the entry to the lightroom. On the left two entries to the gunpowder rooms.
Finally the orlopdeck looks like above.
Will be continued.
We will continue with detailing the orlopdeck.

This is the storage of gunpowder bags in the hanging magazine.
And next the unit of the complete hanging magizine ready to be placed on the deck.

I finished some more things and placed the deckbeams.

Left you see the cable tier with the red floor and the sailroom in construction.

You are looking here to the cable tiers on the side and the doors to the hanging magazine in the center. Marines on guard.

This the sailroom (left) with cloth for sales and right the hanging magazine.
Now we start building the front of this deck, here is the layout.


This area is the place where in battle the ships chirurg is working. Meaning: mostly only amputating damaged arms or legs. This is also the area where Nelson died on oct 21 in 1805.
It is not Nelson on the table.
Here I am making the divisions of the rooms and workplaces for the carpenter and others.

I made the workplaces upside down and placed the carpenter equipment in place against the wall.

I made also a storage rack for the timbers of the carpenter,

There is also a workplace for ropes and blocks.

Here you see the storage of ropes in the rope-room.
And here an overview. Below the carpenters workplace and on top the rope and block room. Around the foremast you see three hatches to rooms in the hold. Above the mast is the entry to the lightroom. On the left two entries to the gunpowder rooms.

Finally the orlopdeck looks like above.
Will be continued.
Last edited:
- Joined
- May 26, 2019
- Messages
- 154
- Points
- 113

Such wonderful work, a real gift of workmanship, to think up these wonderful items you make. A much higher class of skills then me but I'm happy with what I can do.Update 6
We will continue with detailing the orlopdeck.

This is the storage of gunpowder bags in the hanging magazine.
And next the unit of the complete hanging magizine ready to be placed on the deck.

I finished some more things and placed the deckbeams.

Left you see the cable tier with the red floor and the sailroom in construction.

You are looking here to the cable tiers on the side and the doors to the hanging magazine in the center. Marines on guard.

This the sailroom (left) with cloth for sales and right the hanging magazine.
Now we start building the front of this deck, here is the layout.


This area is the place where in battle the ships chirurg is working. Meaning: mostly only amputating damaged arms or legs. This is also the area where Nelson died on oct 21 in 1805.
It is not Nelson on the table.
Here I am making the divisions of the rooms and workplaces for the carpenter and others.

I made the workplaces upside down and placed the carpenter equipment in place against the wall.

I made also a storage rack for the timbers of the carpenter,

There is also a workplace for ropes and blocks.

Here you see the storage of ropes in the rope-room.
And here an overview. Below the carpenters workplace and on top the rope and block room. Around the foremast you see three hatches to rooms in the hold. Above the mast is the entry to the lightroom. On th left two entries to the gunpowder rooms.

Finally the orlopdeck looks like above.
Will be continued.
Glad to see the Marines on duty!
Keep well
Paul
Excellent detail! Superb craftsmanship! It is nice to see the details of each deck.Update 6
We will continue with detailing the orlopdeck.

This is the storage of gunpowder bags in the hanging magazine.
And next the unit of the complete hanging magizine ready to be placed on the deck.

I finished some more things and placed the deckbeams.

Left you see the cable tier with the red floor and the sailroom in construction.

You are looking here to the cable tiers on the side and the doors to the hanging magazine in the center. Marines on guard.

This the sailroom (left) with cloth for sales and right the hanging magazine.
Now we start building the front of this deck, here is the layout.


This area is the place where in battle the ships chirurg is working. Meaning: mostly only amputating damaged arms or legs. This is also the area where Nelson died on oct 21 in 1805.
It is not Nelson on the table.
Here I am making the divisions of the rooms and workplaces for the carpenter and others.

I made the workplaces upside down and placed the carpenter equipment in place against the wall.

I made also a storage rack for the timbers of the carpenter,

There is also a workplace for ropes and blocks.

Here you see the storage of ropes in the rope-room.
And here an overview. Below the carpenters workplace and on top the rope and block room. Around the foremast you see three hatches to rooms in the hold. Above the mast is the entry to the lightroom. On th left two entries to the gunpowder rooms.

Finally the orlopdeck looks like above.
Will be continued.
- Joined
- Apr 10, 2020
- Messages
- 132
- Points
- 213

Update 7
After the orlopdeck the lowergundeck is the next one.
First I saw the lowergudeck from the upperstructure and I glued iton a piece of 1mm plexiwood in the form of the uppergundeck, so that it fits onto the orlopdeck.
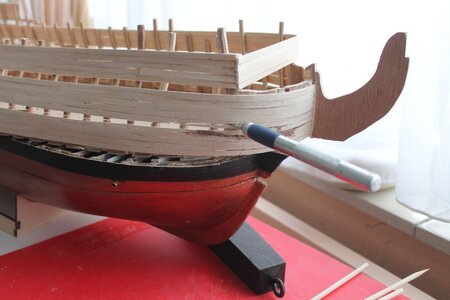

With a print of the decklayout I visualize what I have to build here.

I start with controlling the height of the gunports with the guns.
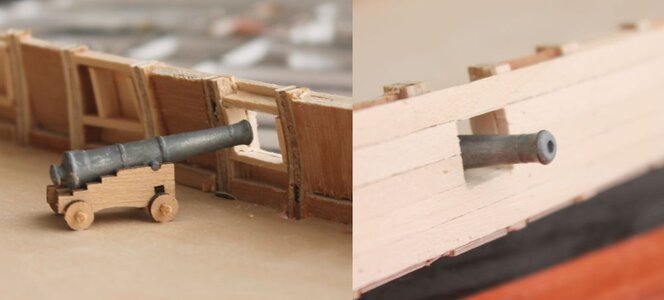
This is the gun belonging to the crosssection of the Victory. For this model I need 30 guns of this format and 70 a bit smaller. I don't want to buy them so I have to make them myself. I decided to make them by pouring epoxy in a latex mall.
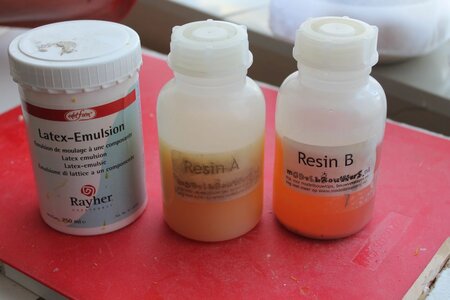
Here you see the bottles with latex and 2-component resin I used.
I fixed the 4 guns I had with clay onto a wire and poured them a few times into the latex, until I had some thickness.
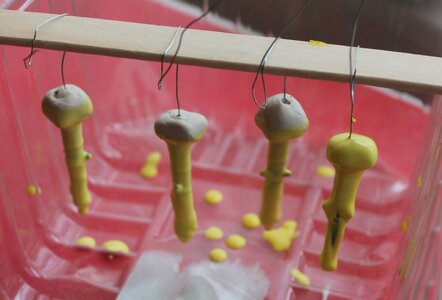
Then I removed the latex from the guns and filled the “condoms” with resin.


Here you see some stages in creating and finishing the guns.

The result in close up. They are 40 mm long.

The total production.
Then I made all the gunports in the side wall. To be sure they are all the same size and height to the floor I use a simple tool.
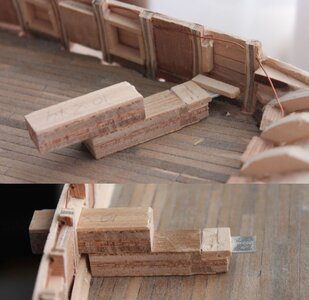
On one side there is a piece of metal I used to give the underside of the gunport the correct height. With the other side I checked the dimensions of the opening of the gunports.
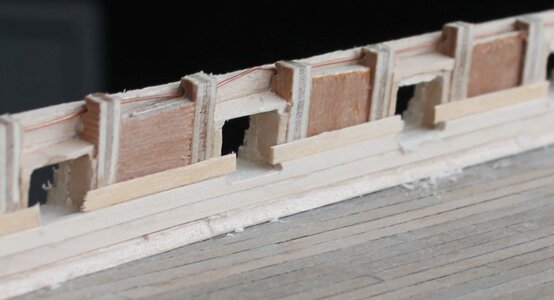
Then I made the innerside of the wall resulting in an empty deck with all the gunports.

Then I made the capstan.

Here you see all the parts and the final result.
Next the guns, they are all painted black an mounted.

Then I started with the innerside of the wall at the bow. The innerside is painted white and some knees are mounted.


At the fore part of the lowergundeck the anchorcable enters into the ship. This part sometimes was used to keep live stock for dinner for the the captain, admiral and officers.


Will be continued.
After the orlopdeck the lowergundeck is the next one.
First I saw the lowergudeck from the upperstructure and I glued iton a piece of 1mm plexiwood in the form of the uppergundeck, so that it fits onto the orlopdeck.


With a print of the decklayout I visualize what I have to build here.

I start with controlling the height of the gunports with the guns.

This is the gun belonging to the crosssection of the Victory. For this model I need 30 guns of this format and 70 a bit smaller. I don't want to buy them so I have to make them myself. I decided to make them by pouring epoxy in a latex mall.

Here you see the bottles with latex and 2-component resin I used.
I fixed the 4 guns I had with clay onto a wire and poured them a few times into the latex, until I had some thickness.

Then I removed the latex from the guns and filled the “condoms” with resin.


Here you see some stages in creating and finishing the guns.

The result in close up. They are 40 mm long.

The total production.
Then I made all the gunports in the side wall. To be sure they are all the same size and height to the floor I use a simple tool.

On one side there is a piece of metal I used to give the underside of the gunport the correct height. With the other side I checked the dimensions of the opening of the gunports.

Then I made the innerside of the wall resulting in an empty deck with all the gunports.

Then I made the capstan.

Here you see all the parts and the final result.
Next the guns, they are all painted black an mounted.

Then I started with the innerside of the wall at the bow. The innerside is painted white and some knees are mounted.


At the fore part of the lowergundeck the anchorcable enters into the ship. This part sometimes was used to keep live stock for dinner for the the captain, admiral and officers.


Will be continued.
Last edited:
- Joined
- Apr 10, 2020
- Messages
- 132
- Points
- 213

Update 8
Now I will continue with filling the lowergundeck with details.
The deck looks like as follows

On the outside I have mounted all the portlids on real hinges, so that they can open and close.

Top picture lids closed and below open. The cables to open them are led through brass tubes in the side wall. Inside there are tackles to open and close them.

Also visible are the lights.
Earlier I have shown how the capstan was made. When the anchors has to be hauled up there were 120 men needed on both levels of the capstan. So I needed here 120 men.
I made them from FIMO clay.
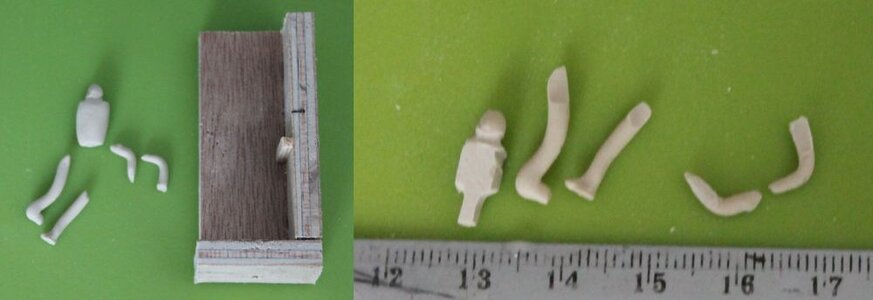
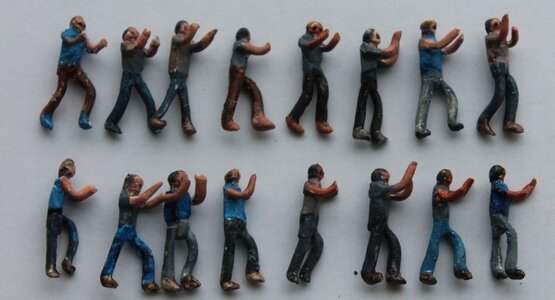
First I made a number of body parts and then I glued them together in some steps.

After painting it looks likes below.
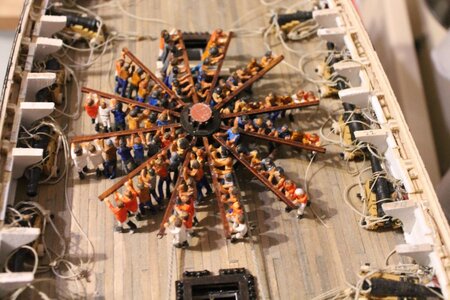
And after placing them on the deck this is the result. Here are only 88 men placed. They were a bit too wide for placing 10 on a bar.
The pump section is mounted around the main mast. Look at the gun equipment on the side ot the deckbeams.
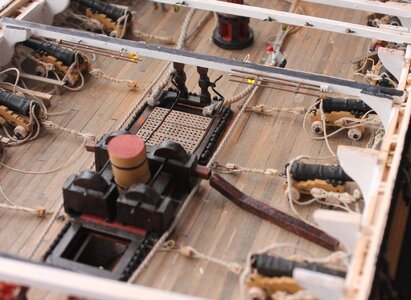
After placing a number of deckbeams with lights it looks like this.

Only the tiller of the rudder has to be placed.
This is the tiller mounted on the rudderhead with two side tackles. The rudderhead is a short peace because of separating the decks made possible.

After mounting them it was time to test the movement.

And finally it looks like as follow
The whole completed deck is the following.

To be continued.
.
Now I will continue with filling the lowergundeck with details.
The deck looks like as follows

On the outside I have mounted all the portlids on real hinges, so that they can open and close.

Top picture lids closed and below open. The cables to open them are led through brass tubes in the side wall. Inside there are tackles to open and close them.

Also visible are the lights.
Earlier I have shown how the capstan was made. When the anchors has to be hauled up there were 120 men needed on both levels of the capstan. So I needed here 120 men.
I made them from FIMO clay.

First I made a number of body parts and then I glued them together in some steps.

After painting it looks likes below.


And after placing them on the deck this is the result. Here are only 88 men placed. They were a bit too wide for placing 10 on a bar.
The pump section is mounted around the main mast. Look at the gun equipment on the side ot the deckbeams.

After placing a number of deckbeams with lights it looks like this.

Only the tiller of the rudder has to be placed.
This is the tiller mounted on the rudderhead with two side tackles. The rudderhead is a short peace because of separating the decks made possible.

After mounting them it was time to test the movement.

And finally it looks like as follow
The whole completed deck is the following.

To be continued.
.
Last edited:
Just -> WOW !!!
- Joined
- May 26, 2019
- Messages
- 154
- Points
- 113

Wonderful, clever work!
Paul
Paul
Hallo @janzwartHi all,
A few years ago I build the HMS Victory with the DeAgostino kit. And then I found the book of John McKay "The 100 gun-gun ship Victory". This book shows all the details necessary to build the Victory from scratch.
After the DeAgostini model was finished, and visited the Victory in Portsmouth, I decided to build the Victory from scratch, included all the internal details.
Of that build I made a report on the dutch forum: https://www.modelbouwforum.nl/threads/hms-victory-binnenste-buiten.212385/
It is in Dutch, but I will post here the most essential things, so you can follow it also.
we wish you all the BEST and a HAPPY BIRTHDAY

How is your work on your HMS Victory going? Any update possible?
Wow, you have put an enormous amount of time and energy into this model. Great effort. 
WOW, WOW I THOUGHT I HAVE SEEN IT ALL BUT NO THIS IS JUST AMAZING, WORDS CAN NOT DESCRIBE THIS. GOD BLESS STAY SAFE ALL DON
I have never seen or thought of building and presenting a ship in this layered manner before with the storage and presentation drawers cabinet. It is truly mind boggling to see the level of detail and amount of items required. Your work deserves gallery recognition but I don't know how that can be practically done without omissions.Wow, you have put an enormous amount of time and energy into this model. Great effort.


 Take a moment or more for relaxation along the way. You deserve them.


