


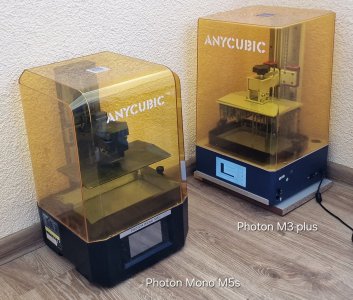
Way back, I tried every which way to make finely detailed parts using an FDM printer but even with it well dialled in so that I had minimal to zero surface artifacts, it simply wasn't capable of the surface finish and degree of detail I was seeking. I then took the plunge and bought a resin printer and couldn't believe just how good it was. I don't think I touched the Ender 3 again for a year or two save for the odd bit of toolmaking, though I do now use FDM a lot for other things. It's a bit like a pillar drill versus a milling machine; different tools for different jobs, albeit there is some overlap.

-

SUBSCRIBE TO SHIPS IN SCALE TODAY!
The beloved Ships in Scale Magazine is back and charting a new course for 2026!
Discover new skills, new techniques, and new inspirations in every issue.
NOTE THAT OUR NEXT ISSUE WILL BE July/August 2026 -

Win a Free Custom Engraved Brass Coin!!!
As a way to introduce our brass coins to the community, we will raffle off a free coin during the month of August. Follow link ABOVE for instructions for entering.
You are using an out of date browser. It may not display this or other websites correctly.
You should upgrade or use an alternative browser.
You should upgrade or use an alternative browser.
Integration of 3D Modeling and Printing of plastic details into Wooden Ship Model Construction (HMS Victory | Cutter Alert) by Serikoff


The SLA printer is in a league of its own compared to the others. Laser printing at 20 microns delivers excellent results. Everything I’ve printed came from these laser printers:yeah it's the figureheads and various ornamentations that I was looking at printing. I don't like the britannia metal things. I actually used a 3d scanner to scan the items in question and have them in an stl format. I tried to print one of the figureheads, but the result was not good enough for me. So that's why I was thinking of getting a resin printer.

- Joined
- Aug 22, 2026
- Messages
- 10
- Points
- 0

What program are you using to sculpt your parts?In this thread, I will discuss topics such as:
1. 3D modeling (drawing adaptation, software, parameters),
2. Preparing STL files for 3D printing (slicer, parameters, settings),
3. 3D printing (hardware, software, settings, and life hacks),
4. Post-processing and preparation for painting or galvanizing,
5. Results of copper plating (electroplating) of plastic parts,
6. Results of copper blackening after electroplating as an option for creating only metal parts from plastic.
This entire thread will primarily be a collection of links to posts from my model building threads, where I discuss each aspect of a given topic in detail.
*Despite the skepticism surrounding 3D-printed parts—some consider them inauthentic and not canonical since they're not made of wood or metal—I hold a slightly different opinion. If printed parts look good and are well-painted, does it really matter what lies beneath the paint? If this process can simplify or speed up production, why not take advantage of it? I've always been intrigued by new possibilities, especially those that help me overcome my laziness. After all, modeling one part and replicating it multiple times is far more efficient than crafting each piece individually.
View attachment 485641 View attachment 485642
View attachment 485648 View attachment 485649
This is the introductory section (prologue), where I discuss errors such as:
1. Issues with scaling,
2. Correct positioning and supports,
3. Eliminating visible print layers, post-processing, and painting, etc.
>>> Link to the post "Errors in 3D" <<<

3D Blender >>>What program are you using to sculpt your parts?
Thanks to a forum member @g8rfan99 , I now have a 3D model of the figurehead for the brig *Le Faune*—a project I might start once I finish all my current ones. The figure is rendered in incredibly high resolution and boasts superb detail.
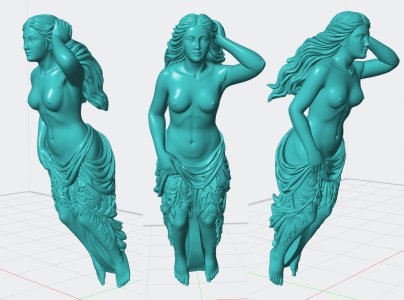
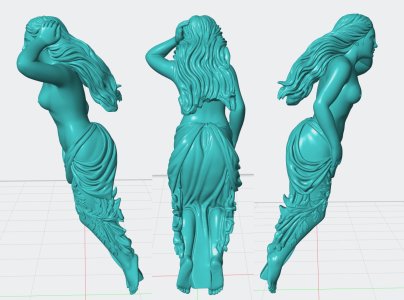
I calculated its position, and it is perfect for this model. Unlike the "duck" figure on *Le Cygne*, this shape is not only beautiful but also does not require the sort of curls at the top found above the Swan; instead, the girl's hair rests neatly in that space.
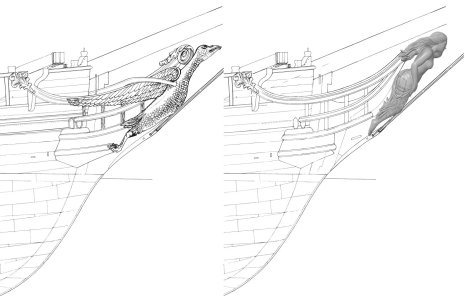
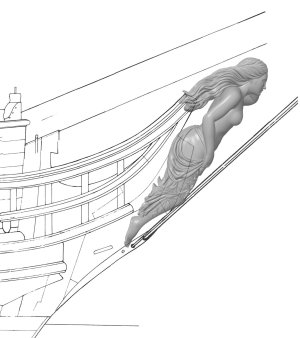
The figure doesn't interfere with the rigging or the bowsprit and complements the stem perfectly. In short, I really like it. And if I do end up building another model after my current projects, it will definitely be *Le Faune*, based on the Seawatch monograph for the brig *Le Cygne*.
I calculated its position, and it is perfect for this model. Unlike the "duck" figure on *Le Cygne*, this shape is not only beautiful but also does not require the sort of curls at the top found above the Swan; instead, the girl's hair rests neatly in that space.
The figure doesn't interfere with the rigging or the bowsprit and complements the stem perfectly. In short, I really like it. And if I do end up building another model after my current projects, it will definitely be *Le Faune*, based on the Seawatch monograph for the brig *Le Cygne*.
To ensure the information doesn't get lost in my Victory review, I’m adding links here to the posts where I demonstrated
how I modeled 3D objects using blueprints and AI.
Here is the link to the first two parts featuring my 3D work >>>
And here are a couple of images for illustration:


how I modeled 3D objects using blueprints and AI.
Here is the link to the first two parts featuring my 3D work >>>
And here are a couple of images for illustration:
I’m also reposting the full write-up about how a friend and I generated complex sculptural elements using two AI tools.
I think this topic will be of interest to many who are into 3D but don’t follow my reviews.
I used the Gemini AI to generate 2D images of the required elements from various angles. This task wasn't as simple as it might seem; sometimes the AI produced perfect results, while at other times it stubbornly refused to cooperate.
Next, with the help of a friend, @g8rfan99 from the forum, I generated 3D objects (in STL format) based on the reference photos. He volunteered to help out of gratitude for my contributions to the forum and my detailed explanations of the various processes—especially electroplating. He used Meshy AI, a paid program for generating 3D shapes from photographs. The results weren't always usable, so it took many attempts... but it was still hundreds of times faster than modeling everything by hand. For instance, the lantern would initially come out with seven sides instead of eight, or there would be severe distortions or the addition of unwanted details (I won't show those results, though there were quite a few); still, here is the final outcome.
Let's start with the simplest element and work our way up in complexity, culminating in the figurehead.
Flashlight.
Here is what I generated using Gemini based on a few photos of the original museum and images from the internet:

I thought Meshy AI would handle this task, but it stubbornly kept generating 7 faces instead of 8. In the end, though, we got the better of it, and the AI produced a decent result (yes, it needs a few minor tweaks—which are quick and easy—but overall, it’s a success):

Stern.
Initially, I thought about generating the entire stern in one go, so I could later extract all the necessary 3D details from that file. Here is what Gemini and I came up with:


But it would be all too simple if that were actually true... and 3D modelers would lose their jobs (though, unfortunately, that is the direction things are heading). So, I had to generate all the elements separately... and here is what I came up with using Gemini:

The swirls turned out without any issues—I’m not showing them here—but the shapes above required a bit more work. I also made two signs at once (see the photo below): one standard version, and another that Gemini created based on its own interpretation. I liked the latter so much that I decided to make that one too.

And the surprisingly complex figure in the bottom photo turned out perfectly on the first try. I simply added a few good photos to Gemini, and it produced this:

Next, there was still a lot of work to be done on the "garlands," braided ropes, and the arch spanning the entire gallery... and in the end, here is what the paid version of Meshy AI managed to generate:

As I mentioned, each element was generated separately; I then scaled them within the software and assembled them into a single composition, creating two versions of the signs.

Here are the 3D shapes up close:


With that, all the stern elements are ready, and after some minor tweaks to a few small areas, the whole thing is ready for 3D printing...
And now, for the most interesting part... the Figurehead.
I gathered the best photos and renders I could find online and used Gemini to generate this:


To me, it turned out really well! Yes, there are some illogical decorative elements inside, but overall, I consider it a success. The sizing was based on my model's dimensions. Not every scroll matches the original exactly, but everything is logical and works well together.

We spent a long time working on the 3D file in Meshy AI... the cherubs would end up with three arms or seven fingers, or the back view would look odd... but eventually, by breaking the model down into three sections, we got this:

There is still some tweaking to be done here—adjusting the scrolls on the inner surface, removing extra limbs, filling in the inside of the shield, correcting the incorrect lettering on it, and a few other details... but! These are all minor tasks taking just a few minutes, compared to the hours (or even days or months) spent creating this figure from scratch.

I want to express my huge thanks to Frank, who helped me generate all of this using the paid version of Meshy AI! Although I generated all the source material myself in Gemini, I wouldn't have succeeded without Frank's help!
I think this topic will be of interest to many who are into 3D but don’t follow my reviews.
I used the Gemini AI to generate 2D images of the required elements from various angles. This task wasn't as simple as it might seem; sometimes the AI produced perfect results, while at other times it stubbornly refused to cooperate.
Next, with the help of a friend, @g8rfan99 from the forum, I generated 3D objects (in STL format) based on the reference photos. He volunteered to help out of gratitude for my contributions to the forum and my detailed explanations of the various processes—especially electroplating. He used Meshy AI, a paid program for generating 3D shapes from photographs. The results weren't always usable, so it took many attempts... but it was still hundreds of times faster than modeling everything by hand. For instance, the lantern would initially come out with seven sides instead of eight, or there would be severe distortions or the addition of unwanted details (I won't show those results, though there were quite a few); still, here is the final outcome.
Let's start with the simplest element and work our way up in complexity, culminating in the figurehead.
Flashlight.
Here is what I generated using Gemini based on a few photos of the original museum and images from the internet:
I thought Meshy AI would handle this task, but it stubbornly kept generating 7 faces instead of 8. In the end, though, we got the better of it, and the AI produced a decent result (yes, it needs a few minor tweaks—which are quick and easy—but overall, it’s a success):
Stern.
Initially, I thought about generating the entire stern in one go, so I could later extract all the necessary 3D details from that file. Here is what Gemini and I came up with:
But it would be all too simple if that were actually true... and 3D modelers would lose their jobs (though, unfortunately, that is the direction things are heading). So, I had to generate all the elements separately... and here is what I came up with using Gemini:
The swirls turned out without any issues—I’m not showing them here—but the shapes above required a bit more work. I also made two signs at once (see the photo below): one standard version, and another that Gemini created based on its own interpretation. I liked the latter so much that I decided to make that one too.
And the surprisingly complex figure in the bottom photo turned out perfectly on the first try. I simply added a few good photos to Gemini, and it produced this:
Next, there was still a lot of work to be done on the "garlands," braided ropes, and the arch spanning the entire gallery... and in the end, here is what the paid version of Meshy AI managed to generate:
As I mentioned, each element was generated separately; I then scaled them within the software and assembled them into a single composition, creating two versions of the signs.
Here are the 3D shapes up close:
With that, all the stern elements are ready, and after some minor tweaks to a few small areas, the whole thing is ready for 3D printing...
And now, for the most interesting part... the Figurehead.
I gathered the best photos and renders I could find online and used Gemini to generate this:
To me, it turned out really well! Yes, there are some illogical decorative elements inside, but overall, I consider it a success. The sizing was based on my model's dimensions. Not every scroll matches the original exactly, but everything is logical and works well together.
We spent a long time working on the 3D file in Meshy AI... the cherubs would end up with three arms or seven fingers, or the back view would look odd... but eventually, by breaking the model down into three sections, we got this:
There is still some tweaking to be done here—adjusting the scrolls on the inner surface, removing extra limbs, filling in the inside of the shield, correcting the incorrect lettering on it, and a few other details... but! These are all minor tasks taking just a few minutes, compared to the hours (or even days or months) spent creating this figure from scratch.
I want to express my huge thanks to Frank, who helped me generate all of this using the paid version of Meshy AI! Although I generated all the source material myself in Gemini, I wouldn't have succeeded without Frank's help!