Thanks. Of course, look over my shoulder, but try not to notice all the mistakes!!Hello Carl A nice steamship, I'd be happy to look over your shoulder.
-

Win a Free Custom Engraved Brass Coin!!!
As a way to introduce our brass coins to the community, we will raffle off a free coin during the month of August. Follow link ABOVE for instructions for entering.
-

PRE-ORDER SHIPS IN SCALE TODAY!
The beloved Ships in Scale Magazine is back and charting a new course for 2026!
Discover new skills, new techniques, and new inspirations in every issue.
NOTE THAT OUR FIRST ISSUE WILL BE JAN/FEB 2026
You are using an out of date browser. It may not display this or other websites correctly.
You should upgrade or use an alternative browser.
You should upgrade or use an alternative browser.
- Joined
- Jun 17, 2023
- Messages
- 595
- Points
- 308

We are model builders, so mistakes can sometimes creep in. The trick is to cover up the mistakes so that no one notices them. And if you do get noticed.....so what. Each model is unique and the alleged errors make it unique. So far I haven't discovered any errors in your model, so everything is fine. Have fun building further.
Thanks for your comments. They are well appreciated!!We are model builders, so mistakes can sometimes creep in. The trick is to cover up the mistakes so that no one notices them. And if you do get noticed.....so what. Each model is unique and the alleged errors make it unique. So far I haven't discovered any errors in your model, so everything is fine. Have fun building further.
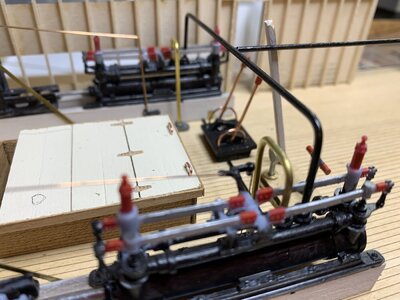
That’s going to look very nice and detailed steam engine, Carl. And some scratch build item are always nice to see.I finished the engine room fittings. The kit does not include any materials for the steam pipes, leaving it up to the builder to fashion their own. I built the pipes from brass 1.5 rods and connected them to the intakes for the cylinders, and also added steam output pipes, leading below deck. Many boats like this - this one was built in 1904 and lasted into the 1930s - had electric lighting so I made a steam-powered electric generator, made from bits and pieces from other projects. I still have to add other things - storage for the firewood, maybe a steam safety valve. But most of the finicky work is done.View attachment 386242View attachment 386243
View attachment 386244
View attachment 386245
View attachment 386246
Regards, Peter
Thanks for the positive feedback Peter. I do enjoy building a lot of extras! Regards, CarlThat’s going to look very nice and detailed steam engine, Carl. And some scratch build item are always nice to see.
Regards, Peter
An interesting project that’s looking really good Carl.
Thanks Roger!!An interesting project that’s looking really good Carl.
Good morning Carl. Wow that steam engine with so many details is fabulous. I enjoy your attention to detail on the stairs , doors and windows. Thanks for sharing the dry brushing video, I never quite get that right. Cheers GrantI finished the engine room fittings. The kit does not include any materials for the steam pipes, leaving it up to the builder to fashion their own. I built the pipes from brass 1.5 rods and connected them to the intakes for the cylinders, and also added steam output pipes, leading below deck. Many boats like this - this one was built in 1904 and lasted into the 1930s - had electric lighting so I made a steam-powered electric generator, made from bits and pieces from other projects. I still have to add other things - storage for the firewood, maybe a steam safety valve. But most of the finicky work is done.View attachment 386242View attachment 386243
View attachment 386244
View attachment 386245
View attachment 386246
Thanks Grant. I really appreciate your feedback. I do enjoy making all the extra stuff. I'm been busy adding some more details...stay tuned!
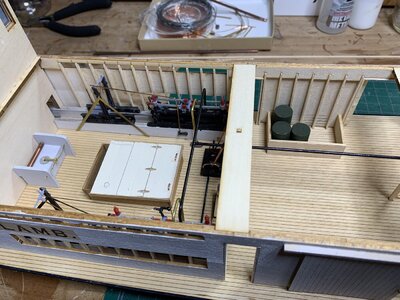
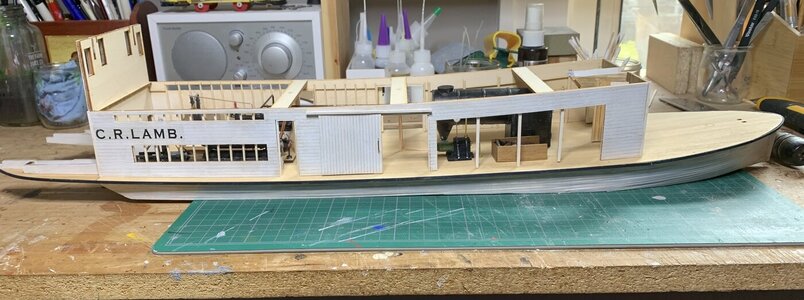
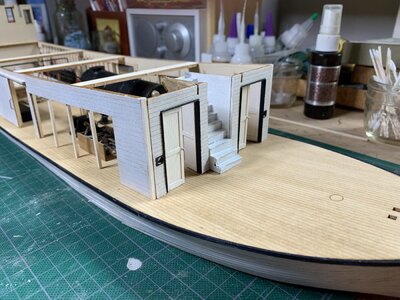
The engine room still looked too empty, so I added a few additional extras, including some oil barrels and a housing for the steering mechanism. There's still room for more cargo, so additional items might be added. The walls on the main deck are now up and soon I will begin working on the next level. So far I have been impressed with how well the parts fit together.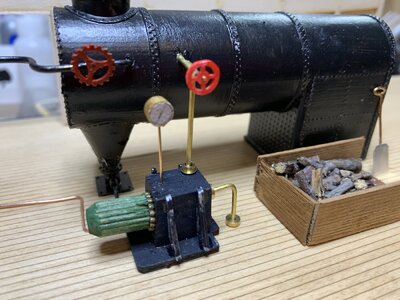


- Joined
- Dec 31, 2017
- Messages
- 292
- Points
- 158

Looks great. You’re moving fast. What about the wiring? Does that get added later?
I've had a lot of time, so I'm able to spend 2-3 hours or more each day -the benefit of retirement. So far the only thing I did for the wiring was to make a hole on the deck to show where the wires thread through from the outside. The manual says it's "precut", only the one at the bottom of the hull is pre-cut. The one on the deck isn't. You have to cut your own hole. I checked this out with Darryl at the Inter-Action Hobbies. So far I have written to him about 6 or 7 times with questions. He is quite happy to help.
The lighting installation starts getting added when you have to place the roof over the main deck cabin/engine room.
I have never done any sort of lighting before, so I am now in the process asking him for more clarification and how to advice. I'll pass that along when I get more info. Cheers!
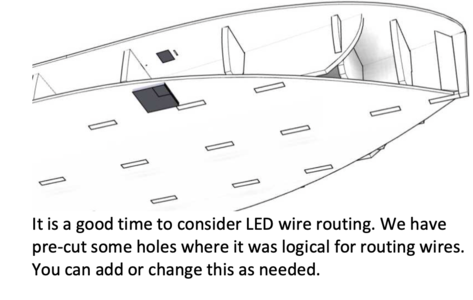
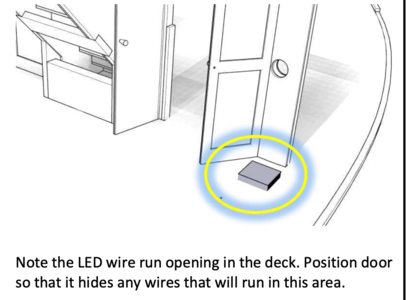
The lighting installation starts getting added when you have to place the roof over the main deck cabin/engine room.
I have never done any sort of lighting before, so I am now in the process asking him for more clarification and how to advice. I'll pass that along when I get more info. Cheers!


I've added more stuff to the engine room - storage barrels, fire buckets. Now it's time to prepare and get the engine room roof ready for installation. To make the roof, you need to glue an etched deck layer on top of another layer. These have to be perfectly aligned. I made a mistake - the layers are not perfectly superimposed. And you can see the gap that was formed as a result. I don't think that this is a fatal error, but it bothers me that I did not take as much care as I should have.
The next step is to attach rafters. There is a scribed line (white arrow) that you need to observe in gluing these so that the rafters are flush to the side walls. However, I was worried that if my main cabin (engine room) walls were out of alignment or a bit distorted, even a slight bit, that this could affect the fit of the rafters. And so I added a few test rafters and then lay it over the engine room to check the fit. And sure enough, there were gaps. On one side rafters were a bit too long, while on the other, they were a bit too short. So once I aligned the roof properly, I made some new scribe lines. Hopefully this will compensate for the gaps and the rafters will now be flush.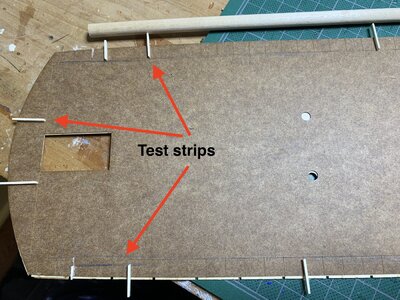
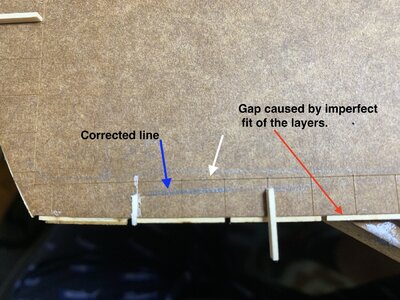
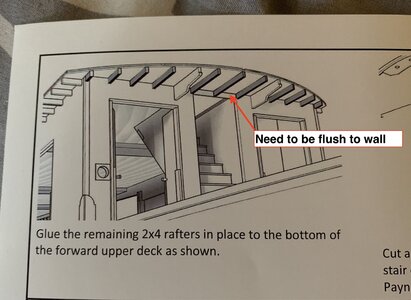
The next step is to attach rafters. There is a scribed line (white arrow) that you need to observe in gluing these so that the rafters are flush to the side walls. However, I was worried that if my main cabin (engine room) walls were out of alignment or a bit distorted, even a slight bit, that this could affect the fit of the rafters. And so I added a few test rafters and then lay it over the engine room to check the fit. And sure enough, there were gaps. On one side rafters were a bit too long, while on the other, they were a bit too short. So once I aligned the roof properly, I made some new scribe lines. Hopefully this will compensate for the gaps and the rafters will now be flush.


I finished attaching the rafters to the engine room roof. I also decided to paint the ceiling. The unpainted ceiling is a dark brown colour and so I painted it a parchment colour. That way the room would show more light. The photo shows the green masking tape.
The next step is to assemble the parlour. This comes with a number of decals to provide details to the interior walls. Late in the life of this steamboat during the 1930s it was used for excursions. It was fitted out with lounge chairs, and a bar. There were also occasional musical bands.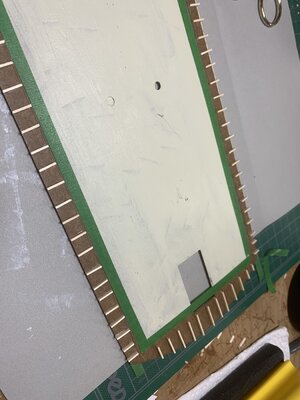
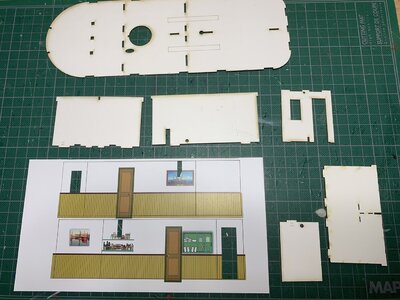
The next step is to assemble the parlour. This comes with a number of decals to provide details to the interior walls. Late in the life of this steamboat during the 1930s it was used for excursions. It was fitted out with lounge chairs, and a bar. There were also occasional musical bands.


The repetitive pattern of the rafter gives a neat appearance. It's good that you paid so much attention to it. Nice job, Carl.I finished attaching the rafters to the engine room roof. I also decided to paint the ceiling. The unpainted ceiling is a dark brown colour and so I painted it a parchment colour. That way the room would show more light. The photo shows the green masking tape.
The next step is to assemble the parlour. This comes with a number of decals to provide details to the interior walls. Late in the life of this steamboat during the 1930s it was used for excursions. It was fitted out with lounge chairs, and a bar. There were also occasional musical bands. View attachment 387231
View attachment 387232
Regards, Peter
- Joined
- Dec 16, 2016
- Messages
- 1,178
- Points
- 493

Carl, That looks to be a very nice boat that you’re building and you are certainly doing it justice. It’s not what I would normally consider to build or follow but you’ve caught my eye with this interesting and well presented log. I’m on board for the journey.
Thanks Peter. The whole kit seems to include some very realistic detail, all to the appropriate scale.The repetitive pattern of the rafter gives a neat appearance. It's good that you paid so much attention to it. Nice job, Carl.
Regards, Peter
Thanks Ken, I appreciate your feedback....Keep you eye out for all the mistakes I will be attempting to cover up!Carl, That looks to be a very nice boat that you’re building and you are certainly doing it justice. It’s not what I would normally consider to build or follow but you’ve caught my eye with this interesting and well presented log. I’m on board for the journey.
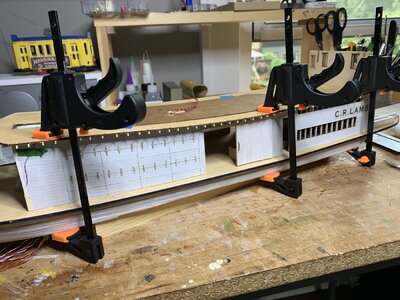
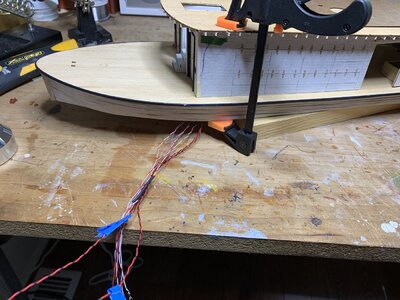
I have been spending my time planning how the LED lighting will work. This model has quite a bit of it (12 fixtures), spread over 3 decks as well as outdoor. I have never done any lighting, or soldering so all this is new to me. So fo the past week or so I have been learning about this as well as practicing soldering. I have had a lot of help from a fellow modeler (Rob Smith) who is very experienced in this. So, at this point I have wired the engine room and will be starting on the next deck. A challenge for me will be soldering the very fine wires to tiny spots on a number of light strips. With the engine room lighting completed, I have attached the engine room roof. I still have not yet assembled the main deck cabin (see previous post), since some of the lighting needs to be installed first.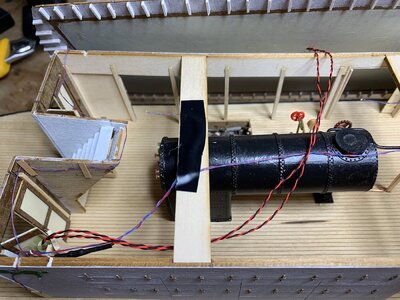


Attachments
- Joined
- Dec 31, 2017
- Messages
- 292
- Points
- 158

Carl, it looks like you left the inside walls of the engine room unpainted. Is that correct? Did you stain them at all?

