-

Win a Free Custom Engraved Brass Coin!!!
As a way to introduce our brass coins to the community, we will raffle off a free coin during the month of August. Follow link ABOVE for instructions for entering.
You are using an out of date browser. It may not display this or other websites correctly.
You should upgrade or use an alternative browser.
You should upgrade or use an alternative browser.
Kingfisher 1770 1:48 POF [COMPLETED BUILD]
- Thread starter dockattner
- Start date
- Watchers 146
Thank you, Mirek!Witaj
Pięknie Pawle wykonałeś te elementy . Pozdrawiam Mirek
- Joined
- Oct 15, 2017
- Messages
- 1,189
- Points
- 443

Paul, I'm slowly making progress through your wonderful build log. Now on page #159. I have to say your ship's wheel may be one of my favorite elements of your build! Masterfully done, conceptually as well as the execution. Certainly a few quality brackets above the kit's wheel. Speaking of wheels. The wheels inside that big brain of yours must always be turning. Thanks for sharing your thoughts and approach on this important element. Very valuable stuff.I started with the kit provided steering wheel...and quickly discovered the central hub was not provided. Of course, it is no great difficulty to make a circle with a hole in it:
View attachment 483217
I then added the kit-provided spokes and the outer ring:
View attachment 483218
I wasn't too excited about this look, so I tried to round off the outer ring:
View attachment 483219
Hmm...not exactly a high-precision outcome.
After a bit of research and the accumulation of the requisite level of courage...I decided to give it another shot, but this time using milled parts. I created four 'worktables' that would fit into the dividing attachment of my mill. Each of these 'worktables' had a boxwood board attached to it with rubber cement (three with 1 mm box and the fourth with 2 mm box):
View attachment 483220
Time to make some circles:
View attachment 483221
View attachment 483222
View attachment 483223
All four:
View attachment 483224
Now I needed to mill 1 mm slots in the 2 mm board to receive the spokes (every 36 degrees):
View attachment 483225
Here is the 2 mm hub and the 2 mm outer ring with loose-fit spokes - the opposing 1 mm outer ring sits to the left:
View attachment 483226
So why did I make four rings? Two of the rings were just barely dimensionally narrower than the main outer rings - I was hoping to use them decoratively. Here you can see one added to the main outer ring:
View attachment 483227
Next, I thinned down this decorative ring:
View attachment 483228
Progressing...
View attachment 483229
I decided to go back and add some details to the decorative ring:
View attachment 483230
The kit-provided wheel is to the left:
View attachment 483231
View attachment 483233
Below you can see the built-up stanchions and a central barrel where the rope will wrap (I made the barrel on the mill with the dividing accessory):
View attachment 483232
And now all the parts glued together:
View attachment 483234
View attachment 483235
View attachment 483236
View attachment 483237
View attachment 483238
And finally, sitting loose on the ship:
View attachment 483239
View attachment 483240
That's two full days of my life sitting there. I have now removed this breathtakingly fragile wheel and placed it into storage.
Thanks for the visit! You are a fine bunch!
Thanks, Ken. It's a fun retrospective as I watch you liking your way through my past. I'm not always so great about showing my work processes but I made it a point to on the wheel because I believe anyone with a mill could create a really nice ship's wheel for their build. As the saying goes: if I can do it...Paul, I'm slowly making progress through your wonderful build log. Now on page #159. I have to say your ship's wheel may be one of my favorite elements of your build! Masterfully done, conceptually as well as the execution. Certainly a few quality brackets above the kit's wheel. Speaking of wheels. The wheels inside that big brain of yours must always be turning. Thanks for sharing your thoughts and approach on this important element. Very valuable stuff.
- Joined
- Oct 15, 2017
- Messages
- 1,189
- Points
- 443

Well, I'm up to date now and all I can say is "WOW"! During your Vasa build your skills were evident Paul, but you've really gained your stride in the skills area, exponentially! Your default mode may be "deliberate", but no longer at a cost to your agility. It seems you've developed some best practices around fabrication that you are very comfortable with. It is humbling to me, but should be inspirational to all of us who strive to get better. It also seems you've lost your aversion to electrically powered mechanical tools. 
I think if the Kingfisher was still in circulation your build would certainly account for incremental sales and Bob Hunt might owe you royalties. As always, thanks for sharing Paul.
I think if the Kingfisher was still in circulation your build would certainly account for incremental sales and Bob Hunt might owe you royalties.
 As always, thanks for sharing Paul.
Absolutely stunning, Paul. I’m caught up for now, but..
Hi Paul,
Nice little jig for milling your octogonal gun pedestals, simple but effective.
Nice little jig for milling your octogonal gun pedestals, simple but effective.
Oh boy! You are at it again, great work, great techniques. I like your idea to hold and mill those drift rail octagon shapes, effective and clever. I’ll steal that method for future reference if I may?
Milling is cheating…lol…just kidding! Excellent results Paul, it seems you are at home with power tools. 
Excellent work, Paul.
Very nice technique in the way you milled the hexagonal columns, I've made a bookmark for myself straight away.
Very nice technique in the way you milled the hexagonal columns, I've made a bookmark for myself straight away.
Thanks, Marc!Absolutely stunning, Paul. I’m caught up for now, but..
I like the way how you solve the way creating parts (use of the drill) we learning a lot in this log.
Hi Paul,
Nice little jig for milling your octogonal gun pedestals, simple but effective.
Excellent work, Paul.
Very nice technique in the way you milled the hexagonal columns, I've made a bookmark for myself straight away.
Thank you, gentlemen. Very simple once I imagined a way to do it...Oh boy! You are at it again, great work, great techniques. I like your idea to hold and mill those drift rail octagon shapes, effective and clever. I’ll steal that method for future reference if I may?
Cheating indeed! Glorious, marvelous cheating!Milling is cheating…lol…just kidding! Excellent results Paul, it seems you are at home with power tools.
Hello Friends,
Next up for me was the fabrication of the quarter badge. As I understand it, a quarter badge is sort of like a faux quarter gallery. It lines up with a light (window) and is more decorative than anything else.
Rather than bore you with words, here is a photo essay that shows my solution to this challenging construction:
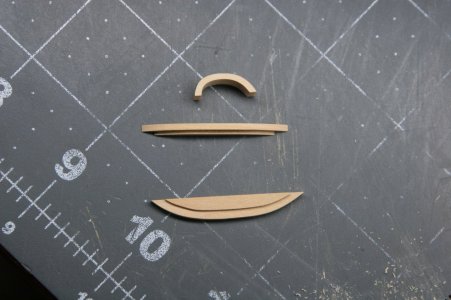
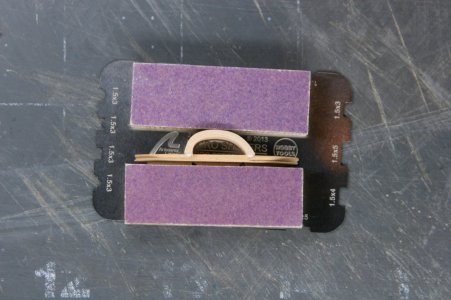
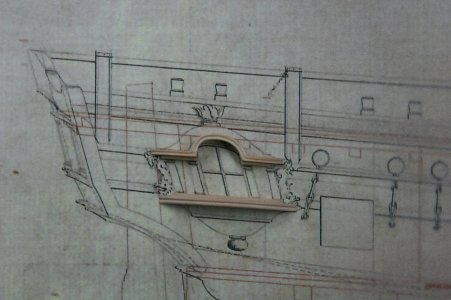
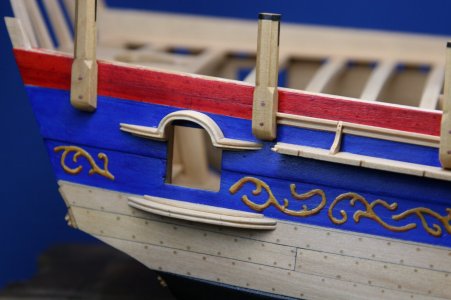
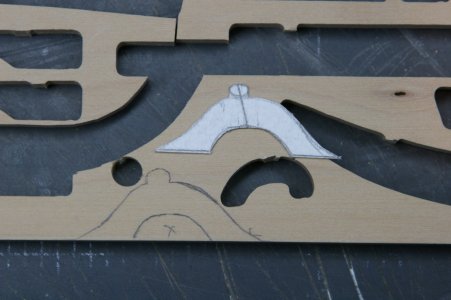
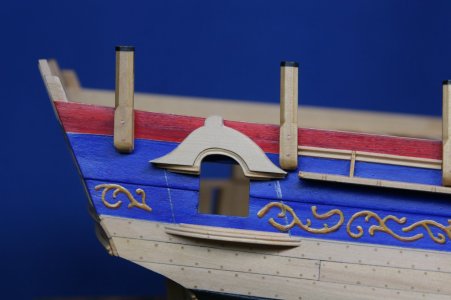
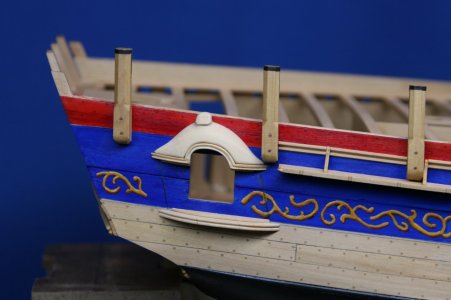
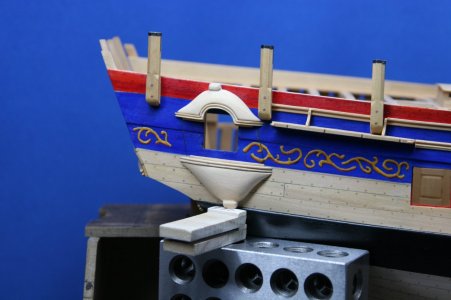
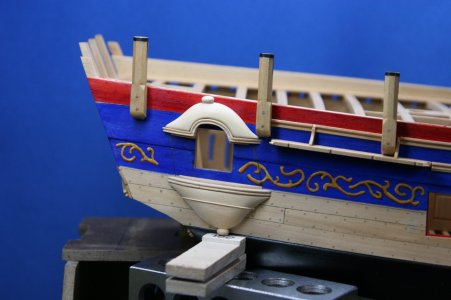
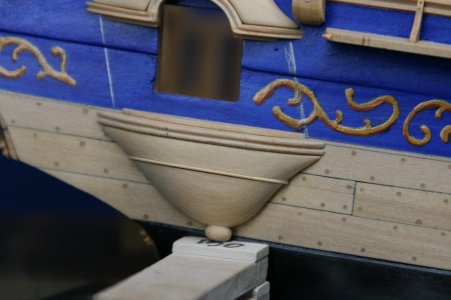
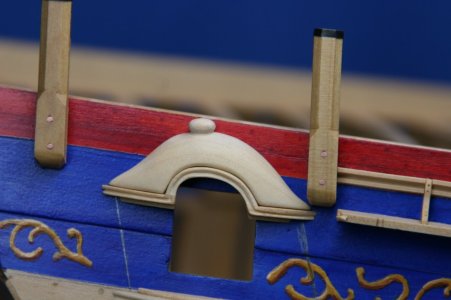
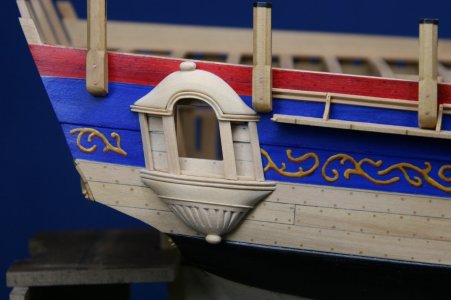
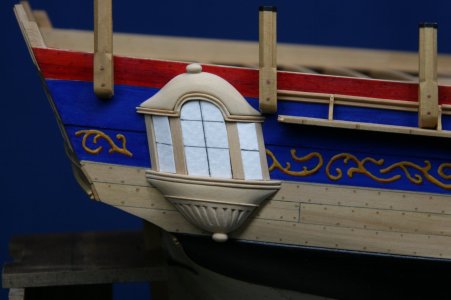
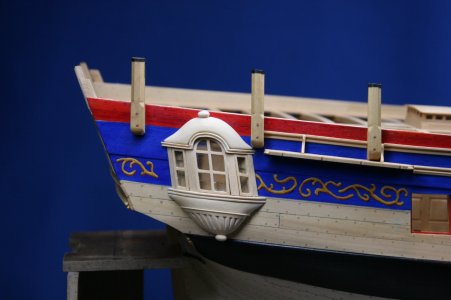
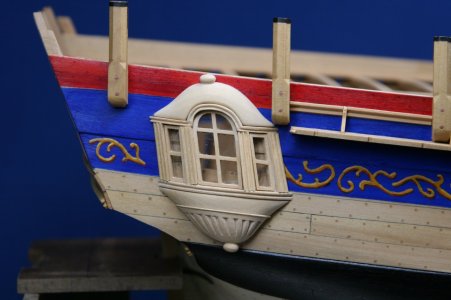

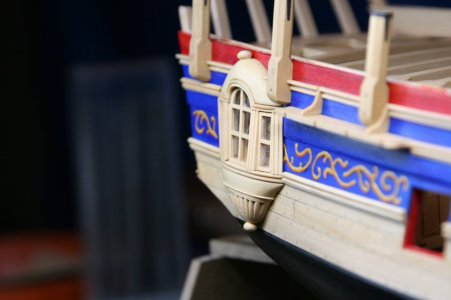
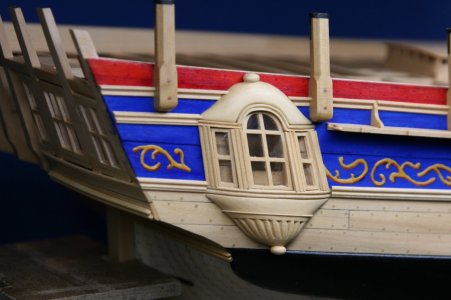
I'm going to think about adding some decorative bits flanking the quarter badge (carved scrolls or something similar) - but first I want to figure out how the stern is decorated as these should be consistent with one another.
This was a fun little project. I could do it better if I were to make it again because I backed myself into a few corners that led to a few shortcomings - but I'm slowly learning.
Thanks for stopping by!
Next up for me was the fabrication of the quarter badge. As I understand it, a quarter badge is sort of like a faux quarter gallery. It lines up with a light (window) and is more decorative than anything else.
Rather than bore you with words, here is a photo essay that shows my solution to this challenging construction:


I'm going to think about adding some decorative bits flanking the quarter badge (carved scrolls or something similar) - but first I want to figure out how the stern is decorated as these should be consistent with one another.
This was a fun little project. I could do it better if I were to make it again because I backed myself into a few corners that led to a few shortcomings - but I'm slowly learning.
Thanks for stopping by!
Paul,Hello Friends,
Next up for me was the fabrication of the quarter badge. As I understand it, a quarter badge is sort of like a faux quarter gallery. It lines up with a light (window) and is more decorative than anything else.
Rather than bore you with words, here is a photo essay that shows my solution to this challenging construction:
View attachment 489409
View attachment 489410
View attachment 489411
View attachment 489412
View attachment 489413
View attachment 489414
View attachment 489415
View attachment 489416
View attachment 489417
View attachment 489418
View attachment 489419
View attachment 489420
View attachment 489421
View attachment 489422
View attachment 489423
View attachment 489424
View attachment 489425
View attachment 489426
I'm going to think about adding some decorative bits flanking the quarter badge (carved scrolls or something similar) - but first I want to figure out how the stern is decorated as these should be consistent with one another.
This was a fun little project. I could do it better if I were to make it again because I backed myself into a few corners that led to a few shortcomings - but I'm slowly learning.
Thanks for stopping by!
Are you sure you didn't sneak a CNC machine into your shop?
True storyIncredible and beautiful, Its incredibly beautiful!
- Joined
- Oct 23, 2018
- Messages
- 863
- Points
- 403

The quarter badge is looking fantastic. Your model becomes better and better.
My remarks commence with the usual.... OMG this is beautiful!!!Hello Friends,
Next up for me was the fabrication of the quarter badge. As I understand it, a quarter badge is sort of like a faux quarter gallery. It lines up with a light (window) and is more decorative than anything else.
Rather than bore you with words, here is a photo essay that shows my solution to this challenging construction:
View attachment 489409
View attachment 489410
View attachment 489411
View attachment 489412
View attachment 489413
View attachment 489414
View attachment 489415
View attachment 489416
View attachment 489417
View attachment 489418
View attachment 489419
View attachment 489420
View attachment 489421
View attachment 489422
View attachment 489423
View attachment 489424
View attachment 489425
View attachment 489426
I'm going to think about adding some decorative bits flanking the quarter badge (carved scrolls or something similar) - but first I want to figure out how the stern is decorated as these should be consistent with one another.
This was a fun little project. I could do it better if I were to make it again because I backed myself into a few corners that led to a few shortcomings - but I'm slowly learning.
Thanks for stopping by!
Followed by the usual questions on how you achieved such perfection. I know there was sandpaper involved.
But really, how did you create the recesses in the lower decoration and how did you get that knob so perfectly smooth, levelled and formed?
Also is the proud ridge of the lower decoration a separate piece of wood or part of the whole?
Thanks Paul the magician.
Michael
Good morning Paul. I’m away for a few days and I have 3 pages of catch up to do - nice. I always appreciate the accuracy and detail of your work but how you scratch build with such quality is what always astounds me. Legendary stuff. I have been doing some Winnie the Poo thinking  on how to build my Bounty quarter badge and still don’t have the answer……maybe buy a milling machine although I’m not sure this would even help me. (Arlene would slowly kill me
 ).
).
 .
.
Cheers Grant
 ).
).……Grant can’tAs the saying goes: if I can do it...
 .
.Cheers Grant
DittoThanks Paul the magician.


