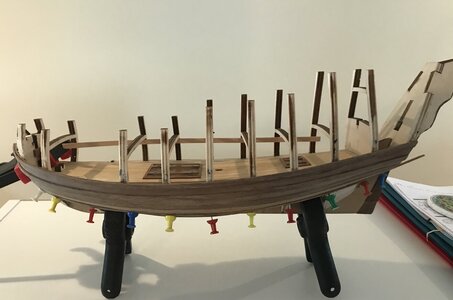
Bingo, just for chuckles I set a thermometer in that area of my little boatyard. Currently the Humidity is 68%, the outside temperature is at 78F/25C, the temperature inside at the window glass is 80F/26C and the temperature on the bookcase (three feet from the window) is 74F/C. For the majority of days in June we’ve had outside temperatures in the high 80’s to mid 90’s and high Humidity. So if I were to do the math..My bet is on the combination of heat ánd humidity. Especially if you bonded the planks with tension against the grain to follow the decks curvature, which would result in peel stresses on the bond in itself. Add the heat and humidity to the mix and you have yourself a nice recipe for "disaster".
You are using an out of date browser. It may not display this or other websites correctly.
You should upgrade or use an alternative browser.
You should upgrade or use an alternative browser.
Willem Barentsz by Kolderstok AD 1596
- Thread starter Pathfinder65
- Start date
- Watchers 32
- Joined
- Jan 9, 2020
- Messages
- 10,377
- Points
- 938

I agree Jan. I think that if more planking had been laid down, it would have helped. In any case, my friend, it is what it is and is just another lesson well learnt.I‘m thinking that fully planked and sealed there would not be much of a distortion problem. The hull in this case had the minimum amount of planks glued up. Three to a side, so there was a lot of wiggle room at the top and bottom.
Indeed one more item to add to the build bible. It's not a great crisis since I'm just starting that part of the build. I can see that there needs to be quite an amount of "fitting" before any of those planks are glued up permanently. I've spent the morning perusing your log and reading your planking syllabus. I hoped to get started again this morning, but the great outdoors calls. It's a gorgeous day and family pool time. Chat soonI agree Jan. I think that if more planking had been laid down, it would have helped. In any case, my friend, it is what it is and is just another lesson well learnt.
- Joined
- Sep 3, 2021
- Messages
- 4,237
- Points
- 688

It's a business model, that's what it is...Yup, once in Walnut and then in Oak and then in

@Heinrich
Back on track, no pool time today.

Plank #4 below Wales glued in, plank #5 waiting to be mounted to conform to hull. I think in my case as quick measurement goes it will need to tapered to about 4mm at the stern to close the stern in.
@Heinrich. Did you find a variation in the thickness of the 6mm planks, I've found they vary from 1.10 to 1.9mm, the 6mm thickness variation is not much maybe .10 to .15mm. I don't know if other builders have noticed the variations, but I've gone through the stack of 6mm pieces and miked all of them. I realize that the 1.5 X 6.0 mm measurement is an approximation and a vendors supplying material in that range will result in variations in width and thickness. I'm a not to 100% accurate builder, (far from it) and I only noticed that when I glued in Plank #2,Plank #3 and Plank #4 that I didn't have a flush edge to edge fits. I've been using a "1.50 X 6.0mm" ( actual size 1.49 X 5.99mm) plank as a guide to check my fairing and also as guide for the next plank to be placed. Mind you this is not a complaint on my part just an interesting fact.
I think I've mentioned in another post each plank is an adventure on this build.

 BTW I've broken that bulkhead a few times. It will be glued back into place when I work my way up the hull.
Back on track, no pool time today.

Plank #4 below Wales glued in, plank #5 waiting to be mounted to conform to hull. I think in my case as quick measurement goes it will need to tapered to about 4mm at the stern to close the stern in.
@Heinrich. Did you find a variation in the thickness of the 6mm planks, I've found they vary from 1.10 to 1.9mm, the 6mm thickness variation is not much maybe .10 to .15mm. I don't know if other builders have noticed the variations, but I've gone through the stack of 6mm pieces and miked all of them. I realize that the 1.5 X 6.0 mm measurement is an approximation and a vendors supplying material in that range will result in variations in width and thickness. I'm a not to 100% accurate builder, (far from it) and I only noticed that when I glued in Plank #2,Plank #3 and Plank #4 that I didn't have a flush edge to edge fits. I've been using a "1.50 X 6.0mm" ( actual size 1.49 X 5.99mm) plank as a guide to check my fairing and also as guide for the next plank to be placed. Mind you this is not a complaint on my part just an interesting fact.
I think I've mentioned in another post each plank is an adventure on this build.
Last edited:
- Joined
- Sep 3, 2021
- Messages
- 4,237
- Points
- 688

In the Bluenose P.o.F. Group Build we established a BFC: Broken Frame Club. Maybe we should make you an honorary member of that club.BTW I've broken that bulkhead a few times. It will be glued back into place when I work my way up the hull.
In the Bluenose P.o.F. Group Build we established a BFC: Broken Frame Club. Maybe we should make you an honorary member of that club.
- Joined
- Jan 9, 2020
- Messages
- 10,377
- Points
- 938

Almost five in the morning here and no sleep - nor work. Jan, your planking really looks excellent - you have achieved a very good smoothness to that section. Yes, the thicknesses given are at best approximations. The varying thickness has never bothered me, neither has the beveling of the planks. If two planks of varying thickness are laid next to each other, so that they butt up perfectly, the little ridge caused by the thicker plank, offers exactly the tolerance you need when sanding the hull. That creates in effect a true, seamless fit.
- Joined
- Sep 3, 2021
- Messages
- 4,237
- Points
- 688

Oh, I know that all too well...I work on one side or the other and add bit of firmness to my touchand viola "KAPUT".

It definitely increases your vocabulary of inappropriate words.
Where did it go “George”?
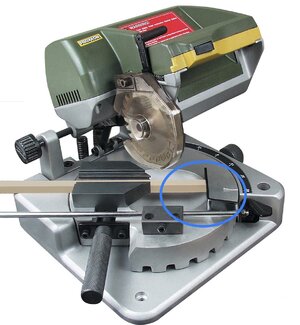
I had a interesting experience this morning using my Proxxon Chop/Miter saw for the first time to cut 3/4 X 3/4 inch Balsa. I needed six pieces 1 1/2 inches long. There is a attachment on the saw to aid in repeated length cuts. The blue circle in the photo.

I set up the piece to be cut using the stop to get the length I needed, the doorbell rang, UPS was delivering a package, back down to the shop, put on my safety glasses and cut off the first piece. ZIP, I’ve got no idea where the piece went. None, Nada, haven’t found it yet.
MY BAD, one is supposed to flip the cutting gauge stop (in the blue circle) out of the way before activating the saw. So a safety note, I was distracted, didn’t think about what I was doing.


I had a interesting experience this morning using my Proxxon Chop/Miter saw for the first time to cut 3/4 X 3/4 inch Balsa. I needed six pieces 1 1/2 inches long. There is a attachment on the saw to aid in repeated length cuts. The blue circle in the photo.

I set up the piece to be cut using the stop to get the length I needed, the doorbell rang, UPS was delivering a package, back down to the shop, put on my safety glasses and cut off the first piece. ZIP, I’ve got no idea where the piece went. None, Nada, haven’t found it yet.
MY BAD, one is supposed to flip the cutting gauge stop (in the blue circle) out of the way before activating the saw. So a safety note, I was distracted, didn’t think about what I was doing.
YupPay attention my friend. Luckily it was a missing piece of balsa, it could have been a missing piece of something far worse.
Moving the stop out of the way for each cut should not be necessary. I use stop blocks on a mitersaw all the time. Small pieces can fly and slowing your cross-cuts down can help. You might want to put some kind of backstop near the saw. Crosscuts should not pinch the cutoff between the stop block and blade. Practice first on scrap.Where did it go “George”?
I had a interesting experience this morning using my Proxxon Chop/Miter saw for the first time to cut 3/4 X 3/4 inch Balsa. I needed six pieces 1 1/2 inches long. There is a attachment on the saw to aid in repeated length cuts. The blue circle in the photo.
View attachment 318420
I set up the piece to be cut using the stop to get the length I needed, the doorbell rang, UPS was delivering a package, back down to the shop, put on my safety glasses and cut off the first piece. ZIP, I’ve got no idea where the piece went. None, Nada, haven’t found it yet.
MY BAD, one is supposed to flip the cutting gauge stop (in the blue circle) out of the way before activating the saw. So a safety note, I was distracted, didn’t think about what I was doing.
Thank you for your post. Learning to use this little tool will take some time on my part.Moving the stop out of the way for each cut should not be necessary. I use stop blocks on a mitersaw all the time. Small pieces can fly and slowing your cross-cuts down can help. You might want to put some kind of backstop near the saw. Crosscuts should not pinch the cutoff between the stop block and blade. Practice first on scrap.
Good morning Jan. Eish! I want one of those... looks amazing. Cheers GrantWhere did it go “George”?
I had a interesting experience this morning using my Proxxon Chop/Miter saw for the first time to cut 3/4 X 3/4 inch Balsa. I needed six pieces 1 1/2 inches long. There is a attachment on the saw to aid in repeated length cuts. The blue circle in the photo.
View attachment 318420
I set up the piece to be cut using the stop to get the length I needed, the doorbell rang, UPS was delivering a package, back down to the shop, put on my safety glasses and cut off the first piece. ZIP, I’ve got no idea where the piece went. None, Nada, haven’t found it yet.
MY BAD, one is supposed to flip the cutting gauge stop (in the blue circle) out of the way before activating the saw. So a safety note, I was distracted, didn’t think about what I was doing.
@Heinrich, I'm having bit of a problem visualizing the the placement of the the "Garboard" plank.

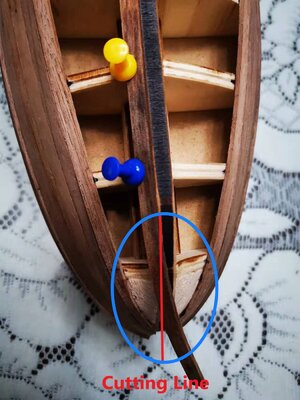
(Photo by Heinrich)
The picture you posted shows the cut at the bow starting at Bulkhead #2 and ending between Bulkhead #1and the stem. At least that is what think I see.

(Photo by Heinrich)
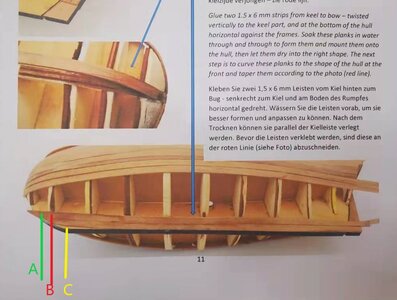
Looking at Kolderstock's instructions the cut looks like it starts at Bulkhead #3 and ends at Bulkhead #2. I've laid the the five planks below the wale and I'm trying to fit the Garboard plank. Does the that plank butt up against and lay even with edge of the false keel on the rest of the bulkheads??

(Photo by Heinrich)
The picture you posted shows the cut at the bow starting at Bulkhead #2 and ending between Bulkhead #1and the stem. At least that is what think I see.

(Photo by Heinrich)
Looking at Kolderstock's instructions the cut looks like it starts at Bulkhead #3 and ends at Bulkhead #2. I've laid the the five planks below the wale and I'm trying to fit the Garboard plank. Does the that plank butt up against and lay even with edge of the false keel on the rest of the bulkheads??
- Joined
- Jan 9, 2020
- Messages
- 10,377
- Points
- 938

Jan I followed the line exactly as on my picture. Obviously the exact point at which you will cut the garboard strake will differ from builder to builder. T\I have merely tried to explain the way of determining that point. Why dont you rather wait for me with the garboard strakes and plank your first one above the wales?
Excellent idea. I fiddled with that bit for two days, gave up and laid some planks on the Duyfken.Jan I followed the line exactly as on my picture. Obviously the exact point at which you will cut the garboard strake will differ from builder to builder. T\I have merely tried to explain the way of determining that point. Why dont you rather wait for me with the garboard strakes and plank your first one above the wales?
Hi Jan. Nice to see your progress with the planking. Step by step, not in a hurry. And good to see you have a excellent back-up by Heinrich.
Regards, Peter
Regards, Peter

