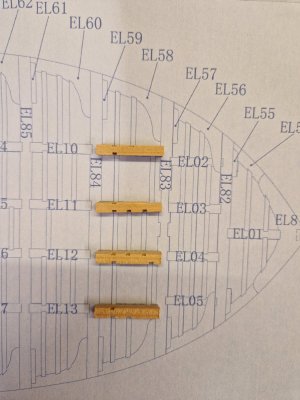
Indeed! That is a very nice finish, Glenn! A labor of love to apply something that thick...I cut mortises into the carlings for the ledges to come. Then I took all of the main deck piece out and laid them out the way they were mean to be installed.
I can't hold off on applying finish to the lower decks and the lower inboard portion of the frames. I did a little research in Fine Woodworking (leafed through a recent journal, I'm a cheapskate when it comes to magazine) and found an article on best wood finishes. The finish they recommended #1 that would be appropriate for what we do was polymerized boiled linseed and beeswax. So I bought the brand recommended.
View attachment 474972
It looks kind of resinous at first and almost sticky to wipe away, but it didn't cause a problem pulling down llint or brush bristles. I had to get back in and wipe all the cracks and crevices a second time and let it sit 24 hours. Fine Woodworking was right, the finish looks really nice close up. It's not glossy and not dull. And what I've noticed over the last several days is that it's only become more beautiful. Finally, a Top 10 article that yielded something useful..
View attachment 474973
After 24 hours
View attachment 474974
Everyone has their favorite finish. I like this one a lot and it is available in the States.
View attachment 474971
-

Win a Free Custom Engraved Brass Coin!!!
As a way to introduce our brass coins to the community, we will raffle off a free coin during the month of August. Follow link ABOVE for instructions for entering.
- Home
- Forums
- Ships of Scale Group Builds and Projects
- HMS Alert 1777 1:48 PoF Group Build
- HMS Alert 1777 1:48 Group Build Logs
You are using an out of date browser. It may not display this or other websites correctly.
You should upgrade or use an alternative browser.
You should upgrade or use an alternative browser.
Thank you Paul!Indeed! That is a very nice finish, Glenn! A labor of love to apply something that thick...
The application wasn't too tough, I could buff it back out with Kim wipes on a long pair of tweezers in spots. Although I don't think I'll ever ger it completely out of the mortise for the mast. The product is called "Tired and True".
For those who have built this before, I am starting to notice that there are no instructions for the jib. It's a nice feature on the schooner, offset, and I don't feel comfortable not installing parts for where it's mounted. Also, there's a very rough multi-sectioned rod that looks like parts could be octagonal if sanded with some patience. Is that the mast?
Are there more instructions besides the printed manual? I skipped the cabins because this is my first build with the majority of the decking beams and I've always wanted a model like that, but what was I supposed to do with all those pieces without any instructions? Wing it from the AOS book?
Are there more instructions besides the printed manual? I skipped the cabins because this is my first build with the majority of the decking beams and I've always wanted a model like that, but what was I supposed to do with all those pieces without any instructions? Wing it from the AOS book?
Great work, looking forward to the continuation. I really like this kit and the ship. You're doing well, don't stop. 

Ok, it's murky, but it's coming together.For those who have built this before, I am starting to notice that there are no instructions for the jib. It's a nice feature on the schooner, offset, and I don't feel comfortable not installing parts for where it's mounted. Also, there's a very rough multi-sectioned rod that looks like parts could be octagonal if sanded with some patience. Is that the mast?
Are there more instructions besides the printed manual? I skipped the cabins because this is my first build with the majority of the decking beams and I've always wanted a model like that, but what was I supposed to do with all those pieces without any instructions? Wing it from the AOS book?
The deck beams, carlings, and ledges are installed and smoothed down a bit. I'm curious how these were all attached in real life. I don't think they had good adhesives, were they nailed, trenelled, or just held together by excellent jointery? Mine, of course, involves a good dose of PVA.
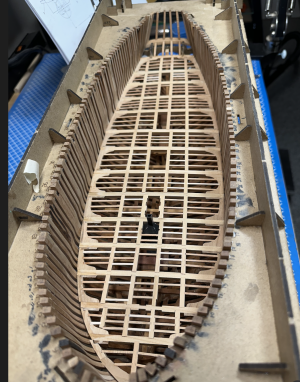
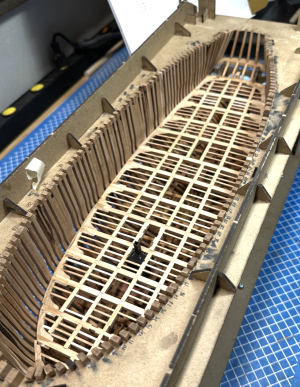
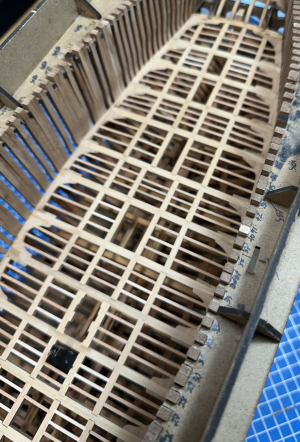
I knicked up my galley stove, so a little bit of touchup paint to come closer to the end. I wanted to install later but it doesn't fir between the carlings and so I thought it hard to go in earlier. I should have a bit less "enthusiastic" about getting the deck smoothed out, but it is what it is.
Now to install the waterway and prepare for the moment of truth: cutting the model from the jig.
Fantastic! A major milestone Glenn!The deck beams, carlings, and ledges are installed and smoothed down a bit. I'm curious how these were all attached in real life. I don't think they had good adhesives, were they nailed, trenelled, or just held together by excellent jointery? Mine, of course, involves a good dose of PVA.
View attachment 479360View attachment 479359
View attachment 479362
I knicked up my galley stove, so a little bit of touchup paint to come closer to the end. I wanted to install later but it doesn't fir between the carlings and so I thought it hard to go in earlier. I should have a bit less "enthusiastic" about getting the deck smoothed out, but it is what it is.
Now to install the waterway and prepare for the moment of truth: cutting the model from the jig.
Well done!
I see You are following the instructions too leaving the hull in its building berth until the carlings and ledges are done. I suppose You could cut it as soon as the hanging knees are in but the hole deck construction makes the hull is even sturdier. I thought about cutting it free as soon as the beams are fixed to give me more room to work, but this gives me confidence that it is well feasable like this.
There are some folks that did cut the hull free as soon as the thickstuff was fixed, and it worked well...
There are even some that cut their model in half and even that went well

Any way, Your deck looks fantastic with those perfectly straight run of the carlings. I hope I can get mine as straight as this!
I see You are following the instructions too leaving the hull in its building berth until the carlings and ledges are done. I suppose You could cut it as soon as the hanging knees are in but the hole deck construction makes the hull is even sturdier. I thought about cutting it free as soon as the beams are fixed to give me more room to work, but this gives me confidence that it is well feasable like this.
There are some folks that did cut the hull free as soon as the thickstuff was fixed, and it worked well...
There are even some that cut their model in half and even that went well

Any way, Your deck looks fantastic with those perfectly straight run of the carlings. I hope I can get mine as straight as this!
It's time to get her out of the jig.
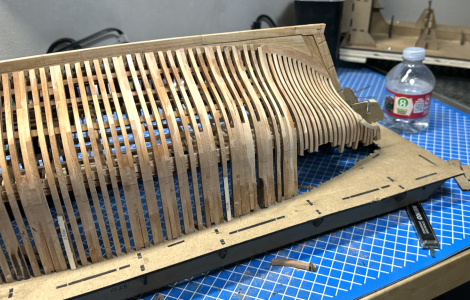
started with the hardest
Just before I put her back in the cradle for support as I cut into the last timbers.
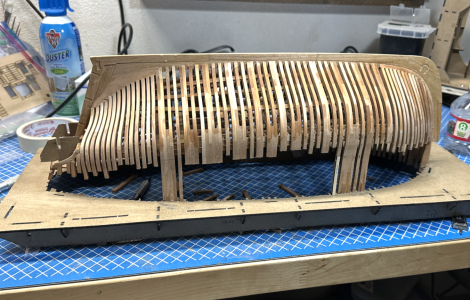
And she is free!!
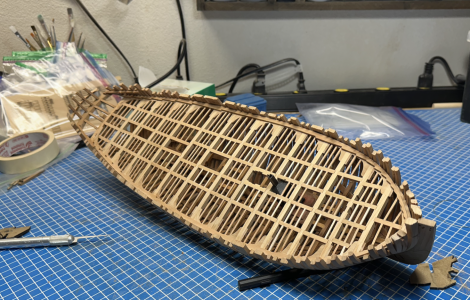
She sustained some damage back on the transom and I found out the hard way i put one of the 0.5 frames in the wrong spot, but I'm thrilled to leave the big jig behind,.Some repairs are done and the frame modification will follow. I am going to take a break from Alert and focus on my scratch build of a 1777 capstan based on scaling some plans from Toni Levine. Trying my hand at the capstan bars, lathe and mill work together on my less than superior equipment. I will miss this build in a week's time and fix the0.5 frame then, I have some scrap picked out already.

started with the hardest
Just before I put her back in the cradle for support as I cut into the last timbers.

And she is free!!

She sustained some damage back on the transom and I found out the hard way i put one of the 0.5 frames in the wrong spot, but I'm thrilled to leave the big jig behind,.Some repairs are done and the frame modification will follow. I am going to take a break from Alert and focus on my scratch build of a 1777 capstan based on scaling some plans from Toni Levine. Trying my hand at the capstan bars, lathe and mill work together on my less than superior equipment. I will miss this build in a week's time and fix the0.5 frame then, I have some scrap picked out already.
Sounds like a fun project Glenn! Toni built a swan class ship (Atalanta) on another forum and I use that for occasional reference for my Kingfisher. A talented modeler!I am going to take a break from Alert and focus on my scratch build of a 1777 capstan based on scaling some plans from Toni Levine.
Congrats, Glenn! It is a true moment, and yet another milestone! It sounds like you have so much fun...and love this build.
Fun when I have timeCongrats, Glenn! It is a true moment, and yet another milestone! It sounds like you have so much fun...and love this build.
How I love this little ship! Keep up the good work, you are doing great.It's time to get her out of the jig.
View attachment 481261
started with the hardest
Just before I put her back in the cradle for support as I cut into the last timbers.
View attachment 481262
And she is free!!
View attachment 481263
She sustained some damage back on the transom and I found out the hard way i put one of the 0.5 frames in the wrong spot, but I'm thrilled to leave the big jig behind,.Some repairs are done and the frame modification will follow. I am going to take a break from Alert and focus on my scratch build of a 1777 capstan based on scaling some plans from Toni Levine. Trying my hand at the capstan bars, lathe and mill work together on my less than superior equipment. I will miss this build in a week's time and fix the0.5 frame then, I have some scrap picked out already.
Wow! I understand that it is difficult but a Very impressive build. Is the kit still available?
Yes it is. It's at https://drydockmodelsandparts.com/, Zoltan will hook you up.Wow! I understand that it is difficult but a Very impressive build. Is the kit still available?
I warn you, the instructions are pretty difficult, but there's a lot of support here at SOS both in posted builds and kind people on the site willing to share their experience with the kit.
Thank you very much, it's appreciated.How I love this little ship! Keep up the good work, you are doing great.
Thanks and certainly with help from you!Congratulations, Glenn
looks beautiful


