


Good morning Paul. Your Moms “cup overflows” with great grandchildren. She looks really happy.
A gift to be treasured. Your Mom clearly loves you . Cheers Grant
A gift to be treasured. Your Mom clearly loves you
. Cheers Grant
 |
The beloved Ships in Scale Magazine is back and charting a new course for 2026! Discover new skills, new techniques, and new inspirations in every issue. NOTE THAT OUR NEXT ISSUE WILL BE July/August 2026 |
|
 |
As a way to introduce our brass coins to the community, we will raffle off a free coin during the month of August. Follow link ABOVE for instructions for entering. |
|
. Cheers Grant
Thanks, Grant. My mom is eternally happy - though she does like to worry about thingsGood morning Paul. Your Moms “cup overflows” with great grandchildren. She looks really happy.
A gift to be treasured. Your Mom clearly loves you
 . Actually, she likes to worry about everything
  . Most recently she is worried about running out of money (she has plenty - plus, I pay most of her bills). I assured her that I have a lot of camping gear she can borrow if she loses her house
  .
.

BullyI assured her that I have a lot of camping gear she can borrow if she loses her house

It's NICE camping gear! And a nice warm sleeping bag for the winter.Bully

Thanks for visiting, Marc! Much appreciated!Oval windows look amazing, Paul!
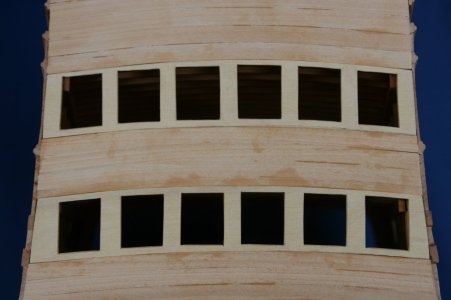
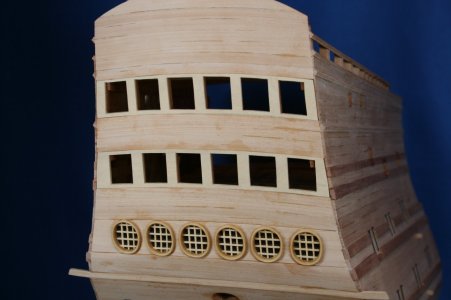
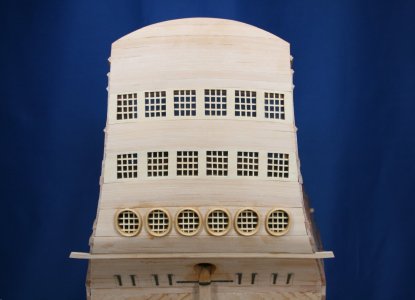

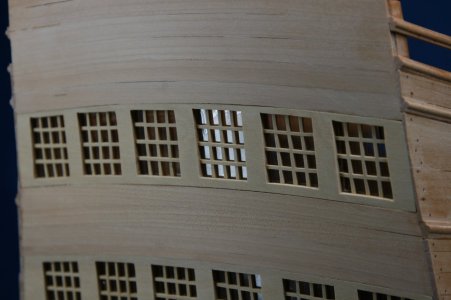

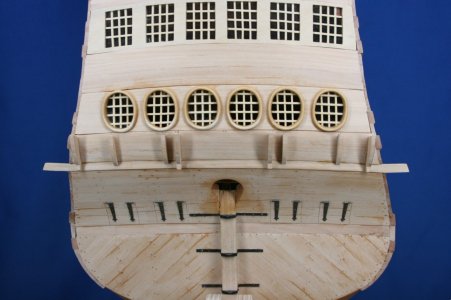



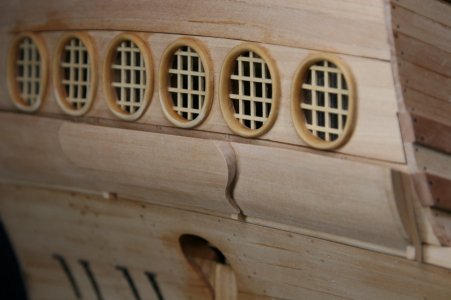



That gives a compleet different view on your model, Paul. She is coming alive!Attention now turned to the middle and upper rows of lights (windows). These were completed in the same manner as the lower row of oval windows.
First, a Castello panel was fit into the opening with rectangular window cutouts:
View attachment 606392
View attachment 606393
Next, the light divides were made with 1mm strips of Castello (notched on the mill as shown previously):
View attachment 606394
View attachment 606395
Once again, the glass is mica:
View attachment 606396
View attachment 606397
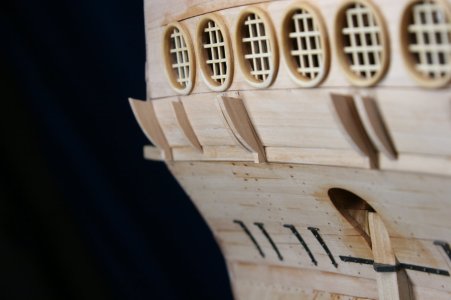
I then spent the next day or so noodling over the lower false balcony. Fortified now by information supplied by friends on this forum, I was able to replace the missing parts without tearing anything off.
View attachment 606398
View attachment 606399
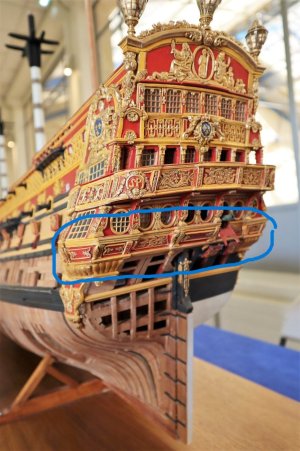
Of course, that makes no sense whatsoever to anyone who isn't looking at the plans for the Saint Philippe. Perhaps it would help if I showed you the stern of the Magerotte model which was built in conjunction with the development of the monograph.
I have indicated in blue what I am calling the lower false balcony. Please notice that it is not flat; rather, several of the panels are inset:
View attachment 606408
The inset panels in place:
View attachment 606400
View attachment 606401
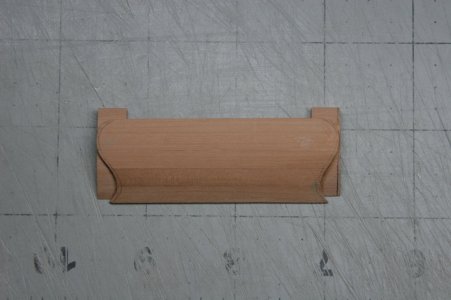
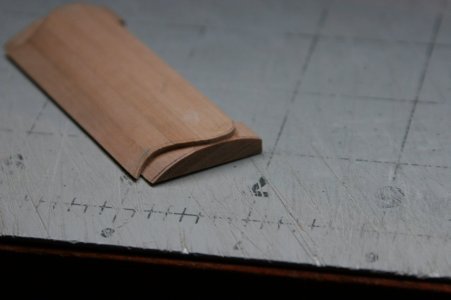
The 'outer' panels are more complicated. First, they are shaped on their ends where they overlap the inset panels. And to make things even more interesting you will notice that all of these panels are vertically bowed. As far as I can tell M. Magerotte made his panels flat - but the plans are clear.
Here was my solution to creating a return that fit to the curved inset panel while honoring the shaped ends:
View attachment 606402
View attachment 606403
The back side of this added bit was then painstakingly fit to the curved surface of the inset panel. Here is the result on the central outer panel:
View attachment 606404
View attachment 606405
I suspect carvings will hide much of what I have done here - but this approach does provide structural integrity to what is otherwise a somewhat flimsy structure.
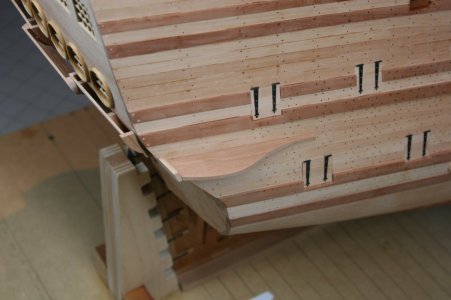
The faux lower balcony now wraps around the side of the ship:
View attachment 606406
View attachment 606407
This present work has my full attention (that is: I am being suitably challenged) - and it only gets harder from here. Hopefully my understanding of the plans will grow while fabricating each element in turn (knowing through doing).
And I thank you very much for the visit!



Very nice work Paul on a very difficult assembly. Ingenious the way your worked it out !Attention now turned to the middle and upper rows of lights (windows). These were completed in the same manner as the lower row of oval windows.
First, a Castello panel was fit into the opening with rectangular window cutouts:
View attachment 606392
View attachment 606393
Next, the light divides were made with 1mm strips of Castello (notched on the mill as shown previously):
View attachment 606394
View attachment 606395
Once again, the glass is mica:
View attachment 606396
View attachment 606397
I then spent the next day or so noodling over the lower false balcony. Fortified now by information supplied by friends on this forum, I was able to replace the missing parts without tearing anything off.
View attachment 606398
View attachment 606399
Of course, that makes no sense whatsoever to anyone who isn't looking at the plans for the Saint Philippe. Perhaps it would help if I showed you the stern of the Magerotte model which was built in conjunction with the development of the monograph.
I have indicated in blue what I am calling the lower false balcony. Please notice that it is not flat; rather, several of the panels are inset:
View attachment 606408
The inset panels in place:
View attachment 606400
View attachment 606401
The 'outer' panels are more complicated. First, they are shaped on their ends where they overlap the inset panels. And to make things even more interesting you will notice that all of these panels are vertically bowed. As far as I can tell M. Magerotte made his panels flat - but the plans are clear.
Here was my solution to creating a return that fit to the curved inset panel while honoring the shaped ends:
View attachment 606402
View attachment 606403
The back side of this added bit was then painstakingly fit to the curved surface of the inset panel. Here is the result on the central outer panel:
View attachment 606404
View attachment 606405
I suspect carvings will hide much of what I have done here - but this approach does provide structural integrity to what is otherwise a somewhat flimsy structure.
The faux lower balcony now wraps around the side of the ship:
View attachment 606406
View attachment 606407
This present work has my full attention (that is: I am being suitably challenged) - and it only gets harder from here. Hopefully my understanding of the plans will grow while fabricating each element in turn (knowing through doing).
And I thank you very much for the visit!

Oh, well. I remember having to live with similar flaws in my own work. One Can always improve. Many times, I have gone back and re-done areas under such well-considered criticism at the Naval Academy workshop. I never took it personally.Mmmm, I am very sorry to say, you can do that better Paul. The lines are not nice, not parallel, not symmetrical were they should not pleasing to the eye in my opinion. Sorrry!
View attachment 606442
Thanks, Jeff!Wonderful job !!! That looks fabulous !
That's a great question, Daniel. I probably won't do any tests, but I may very well start adding some of the carvings along the way. For example, there are places that will get hard to access and if I don't do the carvings I'll have a hard time fitting them at a later stage. With that said, I am definitely not in the mood to do carvings right now. Why that matters I'm not sureBeautiful work Paul. Will you be doing any test carvings as you're planking the ships transom?
...


