


Hope the fishing is good. If it seems hot and slow, try and get down deeper. Tungesten nymphs drop down faster!

-

SUBSCRIBE TO SHIPS IN SCALE TODAY!
The beloved Ships in Scale Magazine is back and charting a new course for 2026!
Discover new skills, new techniques, and new inspirations in every issue.
NOTE THAT OUR NEXT ISSUE WILL BE July/August 2026 -

Win a Free Custom Engraved Brass Coin!!!
As a way to introduce our brass coins to the community, we will raffle off a free coin during the month of August. Follow link ABOVE for instructions for entering.
You are using an out of date browser. It may not display this or other websites correctly.
You should upgrade or use an alternative browser.
You should upgrade or use an alternative browser.
Le Saint Philippe 1693 after Jean-Claude Lemineur (Ancre) in scale 1:48
- Thread starter dockattner
- Start date
- Watchers 101
-
- Tags
- 1:48 ancre saint philippe

- Joined
- Jul 27, 2021
- Messages
- 687
- Points
- 403

Have fun Paul! 

We almost caught the cycle yesterday morning: blue gill, sunfish, perch, a baby smallmouth, a baby largemouth, a baby walleye, and a 15-inch black crappie (what that guy was doing in three feet of water I can't say - but what a fight for a 6-year-old to take on!). The only species missing were a northern pike and a musky.

Ethan fishes with his dad so no problem for him to hold a fish. Damian's not so sure...
Ethan fishes with his dad so no problem for him to hold a fish. Damian's not so sure...
Last edited:

Nice to teach them the basics of fishing, Paul.We almost caught the cycle yesterday morning: blue gill, sunfish, perch, a baby smallmouth, a baby largemouth, a baby walleye, and a 15-inch black crappie (what that guy was doing in three feet of water I can't say - but what a fight for a 6-year-old to take on!). The only species missing were a northern pike and a musky.
View attachment 621116
Regards, Peter
Priceless memories for those young ones!
I still vividly remember my first bass out of a Minnesotta lake!
I still vividly remember my first bass out of a Minnesotta lake!


Is the boat POF or POB?
Carpet on steel...Is the boat POF or POB?

Yep, his face says it allDamian's not so sure...
.
- Joined
- Jul 18, 2024
- Messages
- 522
- Points
- 353
Reading this thread with pleasure and a grin on my face.


Paul,
Nice indeed!!!!
Nice indeed!!!!

I've been off of the forum for a while, so its nice to see how well this has developed.
I think the problem of re-doing is that with a small area almost complete there is a tendency to over focus on it. Maybe look at some other high-quality models like this and mask small areas to see how they match up!
I think the problem of re-doing is that with a small area almost complete there is a tendency to over focus on it. Maybe look at some other high-quality models like this and mask small areas to see how they match up!
Hello Friends!
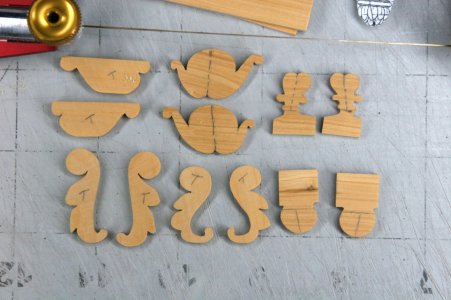
It's been a few weeks since I posted anything that pertained to model building. In mid-July I shared this image of rough-cut decoration blanks:
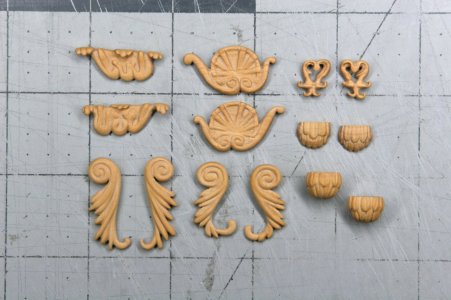
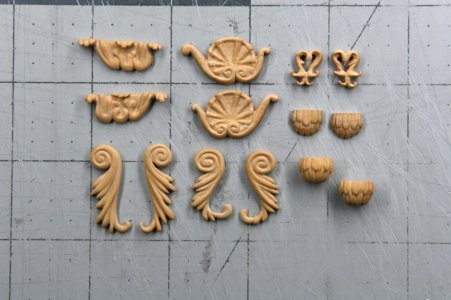
Here are those same pieces provisionally prepared (these still need to be fitted to the model):
A "single" picture that represents hours of work.
My Kingfisher had a few carvings, but I had to discover all over again how to do these detailed decorative pieces.
On the Kingfisher I mostly used chisels and micro-files for everything - and that is how I created the leafy ball things on the far right (middle and bottom). Basically, these were chip carved and then cleaned up.
But on all the remaining pieces I forced myself to embrace rotary carving. This took some practice and I hope I will continue to improve with more experience - but I was encouraged. Rotary carving feels very natural in my hands, and it can do some things that chisels can't do (and vice-versa) so it was good to practice this skill.
Experts in 17th century French ships will know I have failed to accurately (or even remotely) create acanthus leaves on several of these pieces. This is what happens when you try to carve from memory (the place we stayed in Northern Wisconsin didn't have internet and it never occured to me to print out the drawings). Imagine a place where you have to go to the public library to find WiFi.
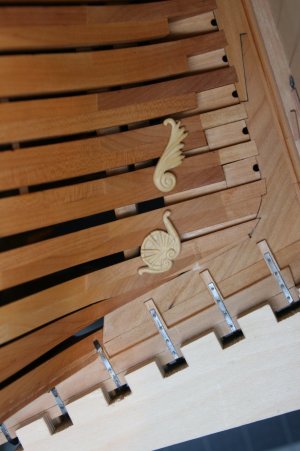
*** Now a decision needs to be made. Many people who carve in boxwood leave the carvings natural. A few others will use a solvent-cut bitumen or other 'aging' effect. My model is not going to be aged - but do I want to leave the boxwood natural - or try to tint it in the direction of my tung-oil treated pearwood? There is no way to get a perfect match - but do I want to reduce the contrast between these woods or embrace it? Hmm.
It's been a few weeks since I posted anything that pertained to model building. In mid-July I shared this image of rough-cut decoration blanks:
Here are those same pieces provisionally prepared (these still need to be fitted to the model):
A "single" picture that represents hours of work.
My Kingfisher had a few carvings, but I had to discover all over again how to do these detailed decorative pieces.
On the Kingfisher I mostly used chisels and micro-files for everything - and that is how I created the leafy ball things on the far right (middle and bottom). Basically, these were chip carved and then cleaned up.
But on all the remaining pieces I forced myself to embrace rotary carving. This took some practice and I hope I will continue to improve with more experience - but I was encouraged. Rotary carving feels very natural in my hands, and it can do some things that chisels can't do (and vice-versa) so it was good to practice this skill.
Experts in 17th century French ships will know I have failed to accurately (or even remotely) create acanthus leaves on several of these pieces. This is what happens when you try to carve from memory (the place we stayed in Northern Wisconsin didn't have internet and it never occured to me to print out the drawings). Imagine a place where you have to go to the public library to find WiFi
.*** Now a decision needs to be made. Many people who carve in boxwood leave the carvings natural. A few others will use a solvent-cut bitumen or other 'aging' effect. My model is not going to be aged - but do I want to leave the boxwood natural - or try to tint it in the direction of my tung-oil treated pearwood? There is no way to get a perfect match - but do I want to reduce the contrast between these woods or embrace it? Hmm.

- Joined
- Apr 20, 2020
- Messages
- 6,526
- Points
- 738

beautiful carving!!!!Hello Friends!
It's been a few weeks since I posted anything that pertained to model building. In mid-July I shared this image of rough-cut decoration blanks:
View attachment 624984
Here are those same pieces provisionally prepared (these still need to be fitted to the model):
View attachment 624985
View attachment 624987
A "single" picture that represents hours of work.
My Kingfisher had a few carvings, but I had to discover all over again how to do these detailed decorative pieces.
On the Kingfisher I mostly used chisels and micro-files for everything - and that is how I created the leafy ball things on the far right (middle and bottom). Basically, these were chip carved and then cleaned up.
But on all the remaining pieces I forced myself to embrace rotary carving. This took some practice and I hope I will continue to improve with more experience - but I was encouraged. Rotary carving feels very natural in my hands, and it can do some things that chisels can't do (and vice-versa) so it was good to practice this skill.
Experts in 17th century French ships will know I have failed to accurately (or even remotely) create acanthus leaves on several of these pieces. This is what happens when you try to carve from memory (the place we stayed in Northern Wisconsin didn't have internet and it never occured to me to print out the drawings). Imagine a place where you have to go to the public library to find WiFi
*** Now a decision needs to be made. Many people who carve in boxwood leave the carvings natural. A few others will use a solvent-cut bitumen or other 'aging' effect. My model is not going to be aged - but do I want to leave the boxwood natural - or try to tint it in the direction of my tung-oil treated pearwood? There is no way to get a perfect match - but do I want to reduce the contrast between these woods or embrace it? Hmm.
View attachment 625011


Wow Paul, your carvings look really good to me!
- Joined
- Jul 27, 2021
- Messages
- 687
- Points
- 403
Hej Paul, carvings looks super! About your contrast issue. In my opinion there is no "issue" you should "celebrate" the contrast between the pear and the boxwood as it let the carvings pop out in a natural way. I would not try to treat the boxwood in any way. Just my 2 cent.
best Dirk
best Dirk

Great work, especially "from memory" and while on vacation!!
I'm with Dirk, the contrasting colors of the wood is a great way to "paint" our model, making the carvings pop, without actual paint. Tack them in place plain and see if you like the contrasting effect.
Thanks for sharing!
I'm with Dirk, the contrasting colors of the wood is a great way to "paint" our model, making the carvings pop, without actual paint. Tack them in place plain and see if you like the contrasting effect.
Thanks for sharing!