-

SUBSCRIBE TO SHIPS IN SCALE TODAY!
The beloved Ships in Scale Magazine is back and charting a new course for 2026!
Discover new skills, new techniques, and new inspirations in every issue.
NOTE THAT OUR NEXT ISSUE WILL BE July/August 2026 -

Win a Free Custom Engraved Brass Coin!!!
As a way to introduce our brass coins to the community, we will raffle off a free coin during the month of August. Follow link ABOVE for instructions for entering.


You are using an out of date browser. It may not display this or other websites correctly.
You should upgrade or use an alternative browser.
You should upgrade or use an alternative browser.



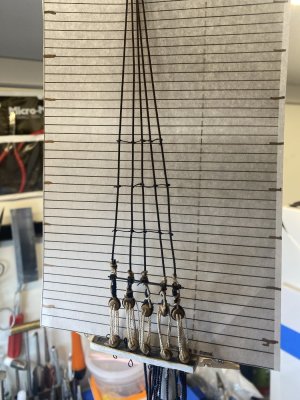
I think I've seen your profile name on posts here that I've visited over the course of the last year or so, So, maybe you'll yet see this reply.I would not use a jig like that because the distance between the pins that the shrouds are tied to will probably not match the distance between the lower deadeyes, making some ratlines too taut and others too loose. A jig like this does not take into account the wider gaps between some pairs of shrouds that exist to make a gap large enough for a gun port to to be clear of obstructions. Shrouds are usually NOT evenly spaced, as shown below.
You don't get that much more working space using a jig like this either. To ensure that the ratlines are the proper length between each shroud from top to bottom, it's best to tie the ratlines on the model.
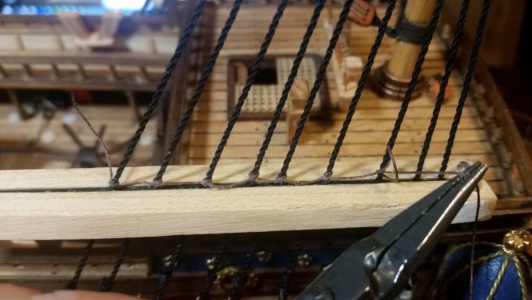
Use a tool like this, which is clamped onto the shrouds at each step, to keep the vertical spacing even. View attachment 364913
The tool not only helps keep the ratline clove hitches in straight, horizontal rows, but also prevents ratlines from being made too tight and drawing the shrouds too close together, distorting them from being straight. With the help of sewing needles, tweezers and/or needle nosed pliers, ratlining is just as easy one the model, and the results are better.
View attachment 364914
Ratlines are never perfect, but this is the very first ship model I made, and the first set of ratlines, and they aren't too bad. Some of the knots needed adjusting to make the rows horizontally straight, but the shrouds are not pulled out of position, and many of the ratlines have enough slack to form that slightly drooping downward hanging curve which is what real ratlines look like.
When you have moved to the other side of the ship to do ratlines, check the height location of the row you are working on using your machine rule, and compare the left and right ratlines rows to match their heights.
This seems like a great idea! I'm about to start rigging my Constitution, beginning with the main shrouds. I think this tip will help keep me on the straight and narrow.


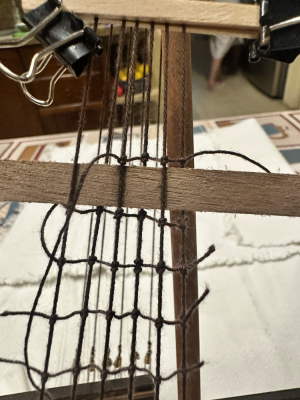
Don't bother. I naively bought something similar for my first model. Useless.Making ratlines is my least favorite task in building model ships. Has anyone used a loom-a-line? Is it worth the money? Do you complete the ratlines entirely using the jig or just partially build it and then attach it to the ship ?
View attachment 331755
There are lots of helpful methods dotted around the forum.
After reading the thread referenced above, I tend to agree with you. My post was related to the device DARIVS made to keep his ratlines straight. Other's use cardboard guides. This clamp on jig looks like it would be a better bet. I should know relatively soon, as I'm just starting to add shrouds to the main.
Last edited:

I was very close to buying one, but decided to try doing it directly on the ship using a similar approach to what Darivs suggested. In my case, I feel more comfortable doing it directly, as I can get more control over the results.
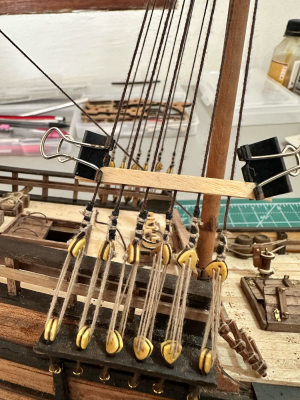
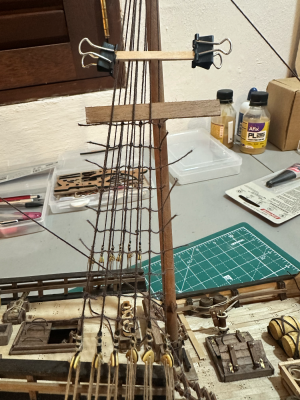

To make things easier and not have giant knots, keep in mind that the ratlines were about 1/2 inch in diameter. The shrouds varied with the size of the mast, era, etc. but in general about five times or more larger than the ratlines. If you use the correct size thread for the ratlines I think you will be very happy with the look of the ropes and the clove hitches.
Allan
Allan
- Joined
- Jun 29, 2024
- Messages
- 2,174
- Points
- 488

Never used, owned, or wanted a Loom-A-Line. Can’t understand why anyone would pay good money to buy one. If the idea appeals to you, nails in a piece of scrap wood would (or wouldn’t) work every bit as well.
Roger
Roger

I was notified of your reply by the forum. It's easy to think that shrouds are even spaced when they are viewed at a distance, but they certainly are not. They are spaced to allow space for the gunports. Each shroud should be placed individually, with chainplates aligned in parallel with the shroud line when viewed from the side of the hull. This geometry is so in order to make the tension forces of the shroud and the chainplates in alignment, with no force on the chainwale in the fore or aft direction, only in the inboard direction. Models often oversimplify such features.I think I've seen your profile name on posts here that I've visited over the course of the last year or so, So, maybe you'll yet see this reply.
This seems like a great idea! I'm about to start rigging my Constitution, beginning with the main shrouds. I think this tip will help keep me on the straight and narrow.

Another good idea is to use a sheet of paper with spacing lines printed on it to set the spacing. An example is below. The paper makes it easier to see the lines without a disturbing back ground and the spacing lines help a lot. I also ratline every 5th distance to help keep the shrouds from bunching up.