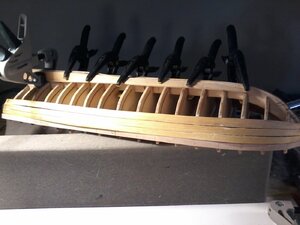
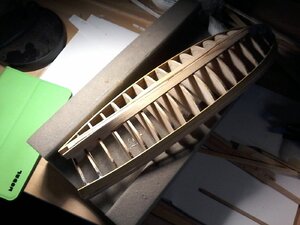
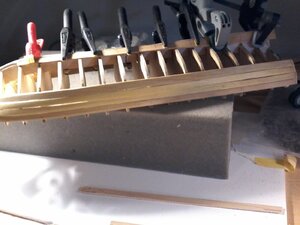
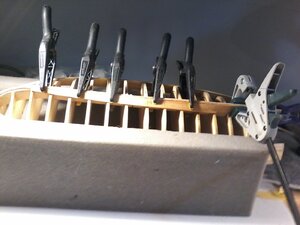
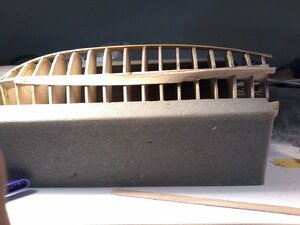
HI GILLES BOY I DO NOT EXPLAIN THINGS PROPERLY MAYBE MORE PICTURES WOULD HELP, THIS MODEL DOES NOT HAVE A GUNWALE TOP PLANK IS THE SHEER PLANK, THERE IS A TOTAL OF 12 PLANKS OF 1/4 INCH MIDSHIP, I HAVE THE GARBOARD, AND 2 BROAD STRAKES THAT LEAVES 8 PLANKS THE GOOD THING ABOUT THIS SHIP IS MOST OF THE PLANKS EXCEPT AT THE BOW AND A LITTLE AT THE STERN ARE ALL AT 1/4 INCH AND I MADE SPILEING CARDS SHOWN IN A EARLIER POST IT HAS BEEN A LONG TIME SINCE I SPILED A MODEL FOR PLANKING AND NO PLANKING BATTENS WERE NEEDED SO IT ALL WENT WELL UNTIL THE 5TH TOTAL FROM THE TOP INCUDING THE SHEER PLANK AT THE TURN OF THE BILGE, THEN TROUBLE, WHAT I SHOW NOW IS THE SOLUTION THAT I CAME UP WITH, AS I NRESPILLED THE 5TH PLANK A COUPLE OF TIMES, I WILL SHOW PICTURES OF WHERE I AM WILL POST TOMORROW, BOY I WOULD LOVE TO FINISH THE PLANKING BEFORE THE CANOE BUILD AND RESTART OF THE LE ROCHEFORT ( THE JIG SHOULD BE COMING IN AT ANY TIME ) AND WITH A LOT OF CONCERN WILL SEE HOW THE FRAMES FIT, I ONLY HAVE 4 TO GO AND IF I AM OK FROM THIS POINT I SHOULD BE ABLE TO FINISH THE PLANKING IN A COUPLE OF DAYS HOPEFULLY SO I WILL SHOW PICTURES AS TO WHERE I AM AND AWAIT YOUR COMMENTS. GOD BLESS STAY SAFE YOU AND YOURS DON
-

Win a Free Custom Engraved Brass Coin!!!
As a way to introduce our brass coins to the community, we will raffle off a free coin during the month of August. Follow link ABOVE for instructions for entering.
-

PRE-ORDER SHIPS IN SCALE TODAY!
The beloved Ships in Scale Magazine is back and charting a new course for 2026!
Discover new skills, new techniques, and new inspirations in every issue.
NOTE THAT OUR FIRST ISSUE WILL BE JAN/FEB 2026
You are using an out of date browser. It may not display this or other websites correctly.
You should upgrade or use an alternative browser.
You should upgrade or use an alternative browser.
- Joined
- Feb 18, 2019
- Messages
- 717
- Points
- 353

Something does not look right in this image:
- The taper cut looks like it is backward: on the wrong edge of the plank.
_ I would also say that your garboard may be a bit short.
And if it is the case, this may create issues for your subsequent planks as you are planking your hull upward from the garboard.
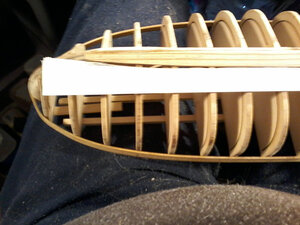
My previous post was in reference to the garboard and the planks to be installed up hull from it .
As you have done, planking normally takes place in the following manner, but not necessarily in that order (your first plank may be the sheer plank at the top or the garboard at the bottom):
- plank down from the sheer-plank
- plank up from the garboard.
- the last plank to be installed is somewhere in between.
The way the garboard and the sheer plank are installed is very important.
This is not a view of the garboard on the model you are building but in principle it would be the same.
The garboard plank's straight edge is located facing toward the top of the vessel all the way to the stem / bow
The curve (taper) at the bow is cut on the keel edge of the plank. This area is to be fitted in the rabbet.
G
- The taper cut looks like it is backward: on the wrong edge of the plank.
_ I would also say that your garboard may be a bit short.
And if it is the case, this may create issues for your subsequent planks as you are planking your hull upward from the garboard.

My previous post was in reference to the garboard and the planks to be installed up hull from it .
As you have done, planking normally takes place in the following manner, but not necessarily in that order (your first plank may be the sheer plank at the top or the garboard at the bottom):
- plank down from the sheer-plank
- plank up from the garboard.
- the last plank to be installed is somewhere in between.
The way the garboard and the sheer plank are installed is very important.
This is not a view of the garboard on the model you are building but in principle it would be the same.
The garboard plank's straight edge is located facing toward the top of the vessel all the way to the stem / bow
The curve (taper) at the bow is cut on the keel edge of the plank. This area is to be fitted in the rabbet.


G
OK GOT IT, MY BAD, AGAIN NOT THINKING, IT DID NOT LOOK RIGHT TO ME THAT IS WHY NO OTHER PLANKS INSTALLED NEXT TO GARBOARD, HOW STUPID OF ME, I HAVE TO THINK MORE AND NOT RUSH AND IF NOT SURE ASK ON SOS, YOU SAVED MY BUT AGAIN GILLES, WILL TAKE IT APART AND DO IT RIGHT. GOD BLESS STAY SAFE YOU AND YOURS DON
- Joined
- Feb 18, 2019
- Messages
- 717
- Points
- 353

Further to the post above:
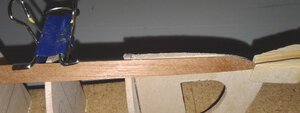
Edge of the plank that would be fitted into the keel rabbet all the way to the lower area of the bow.
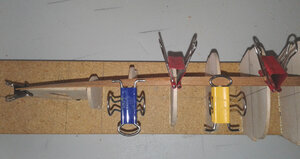
This is what it would look like without the plank being clamped at the base of the bow / stem: view from the outside.
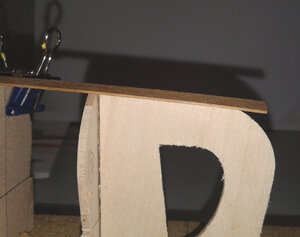
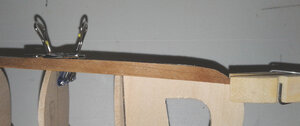
Viewed from the other side so you can see the back after it has been clamped.
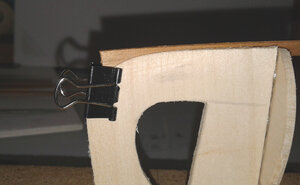
At this point, you would trace the contour of the stem area onto the plank. Then cut away the extra material, but be conservative, leave a little extra to fine tune as you need to account for the edge of the plank going into the rabbet. You can very slightly force it upward (towards the sheer, not up on the model as it is upside down) but not much: the plank should lay flat on the bulkheads, it should not buckle.
G
Edge of the plank that would be fitted into the keel rabbet all the way to the lower area of the bow.

This is what it would look like without the plank being clamped at the base of the bow / stem: view from the outside.

Viewed from the other side so you can see the back after it has been clamped.

At this point, you would trace the contour of the stem area onto the plank. Then cut away the extra material, but be conservative, leave a little extra to fine tune as you need to account for the edge of the plank going into the rabbet. You can very slightly force it upward (towards the sheer, not up on the model as it is upside down) but not much: the plank should lay flat on the bulkheads, it should not buckle.
G
THANKS AGAIN GILLES, GOT ONE SIDE RE-DONE USING WESTERN RED CEDAR FOR LOWER PLANKS, PROS AND CONS EASY TO SAND EASY TO BEND EASY TO DENT ORDERED BOTH IN WESTERN RED CEDAR AND CHERRY DO NOT KNOW WITCH ONE I WILL DO FIRST, MAYBE START BOTH AND SEE WITCH IS EASIER FOR FIRST GO AROUND, BACK TO THE LONG BOAT DO KNOW WHAT HAPPENED AS I SAID BEFORE I HAVE NOT DONE A SPILED PLANK BUILD IN A VERY LONG TIME, I USED A NEW TAPE A SURGICAL HEAVY DUTY TAPE CAN MARK AND WRITE ON IT, WHAT I DID WAS STRETCH IT OUT AND SIPLED FROM TOP DOWN INSTEAD OF FROM BOTTOM OF PLANK UP IT WOULD HAVE BEE FINE IF I TURNED THE PLANK OVER, DID NOT CHECK IT, ALSO REMOVING PLANKS THEY ARE NOT FOLLOWING THE SPILING CARDS SO GOT TO FIX IT, THE NEW ME NOT SATISFIED RE-DO THAT IS A LESSON FROM GILLES. GOD BLESS STAY SAFE YOU AND YOURS DON
- Joined
- Feb 18, 2019
- Messages
- 717
- Points
- 353

THANKS AGAIN GILLES, GOT ONE SIDE RE-DONE USING WESTERN RED CEDAR FOR LOWER PLANKS, PROS AND CONS EASY TO SAND EASY TO BEND EASY TO DENT ORDERED BOTH IN WESTERN RED CEDAR AND CHERRY DO NOT KNOW WITCH ONE I WILL DO FIRST,
If you are talking about the canoes...
The good thing is that on the canoes, you will not need to do any of this.
I only used one of my canoes as an illustration.
G
- Joined
- Feb 18, 2019
- Messages
- 717
- Points
- 353

Hi Don,
Why don't follow the instructions from the manual.
The taper of the garboard plank at the front should end as a sharp point.
From the manual, on line, it looks like most of the planks are installed at full width: I guess that is why their garboard is so short.
G
Why don't follow the instructions from the manual.
The taper of the garboard plank at the front should end as a sharp point.
From the manual, on line, it looks like most of the planks are installed at full width: I guess that is why their garboard is so short.
G
HI GILLES THE MANUEL *IS ALL WRONG THE PLANKING IS DONE IN VERY SHORT LENGTHS, JUST DOES NOT LOOK RIGHT, AND BESIDES I WANTED TO DO A SPILE PLANKING TO GET BACK TO THE RIGHT WAY TO PLANK I DO VERY LITTLE POB BUILDS NOW THOUGHT I WOULD TRY THIS ONE FOR THE EXPERIENCE SO TRYING TO DETERMINE WHAT I AM DOING WRONG IF ANYTHING IN MY SPILING, ONE OF THE THINGS THAT ALWAYS BOTHERED ME IS GETTING SOMETHING THAT I CAN STRETCH ACROSS AND WRITE ON IT AND USE THE COMPASS TO SPILE THE PLANK, WILL KEEP TRYING GOT THIS FAR MAY AS WELL FINISH IT THE RIGHT WAY I HAVE THE GARBOARD DONE CORRECTLY. GOD BLESS STAY SAFE YOU AND YOURS DON
GOT THE NEW GARBOARD PLANKS DONE, NOW TO FIGURE OT THE NEXT PLANK UP FROM GARBOARD AND HOW IT FITS INTO THE RABBIT, ALSO THE MANUEL AND SHEET 3 OF THE PLANS ARE TOTALY DIFFERENT, WILL SHOW PICTURE TOMORROW AS THE PLANS ARE HUGE SO I NEED TO CUT IT UP HAVE 3 SETS EXTRA, NOW TO FIGURE OUT THE CORRECT WAY TO SPILE THE REST OF THE PLANKS