
I had a mast shatter on me in the drill. It was ruined splinters.

-

SUBSCRIBE TO SHIPS IN SCALE TODAY!
The beloved Ships in Scale Magazine is back and charting a new course for 2026!
Discover new skills, new techniques, and new inspirations in every issue.
NOTE THAT OUR NEXT ISSUE WILL BE MARCH/APRIL 2026 -

Win a Free Custom Engraved Brass Coin!!!
As a way to introduce our brass coins to the community, we will raffle off a free coin during the month of August. Follow link ABOVE for instructions for entering.
You are using an out of date browser. It may not display this or other websites correctly.
You should upgrade or use an alternative browser.
You should upgrade or use an alternative browser.

perhaps it was too fast and too much pressure. Slow and easy are the tack needed. RichI had a mast shatter on me in the drill. It was ruined splinters.
Yes, and I put pressure on it while bringing the sandpaper to me.

Have a look on Youtube for John Aliprantis, he has several video full build logs, He uses the drill / sandpaper method. There's a Russian (Ukrainian?) guy , Garward who has a build log of Montañés, he uses two pieces of ply hinged one end with sandpaper stuck to each piece. I used the drill method on my first build 30+ yrs ago, holding a corded drill in my B&D workmate, then after a 30yr break I picked up from where I left off with building Mantua USS Constitution, but as now I'm suffering carpel tunnel & arthritis, keeping the trigger depressed is very tedious, so I switched to a Proxxon mini wood lathe. The Proxxon was fine, but when I was building Montañés, being a 'big' ship, the chuck on Proxxon did not have the capacity for her larger masts, so I then got a Record power mini wood lathe for the bigger masts. I leave the blanks over length to provide use of a live centre & protection from chuck jaw marking - just trim off excess from each end.
That’s what I do now too, Stuart. I think you’re Stuart Big when it comes to making ships.Have a look on Youtube for John Aliprantis, he has several video full build logs, He uses the drill / sandpaper method. There's a Russian (Ukrainian?) guy , Garward who has a build log of Montañés, he uses two pieces of ply hinged one end with sandpaper stuck to each piece. I used the drill method on my first build 30+ yrs ago, holding a corded drill in my B&D workmate, then after a 30yr break I picked up from where I left off with building Mantua USS Constitution, but as now I'm suffering carpel tunnel & arthritis, keeping the trigger depressed is very tedious, so I switched to a Proxxon mini wood lathe. The Proxxon was fine, but when I was building Montañés, being a 'big' ship, the chuck on Proxxon did not have the capacity for her larger masts, so I then got a Record power mini wood lathe for the bigger masts. I leave the blanks over length to provide use of a live centre & protection from chuck jaw marking - just trim off excess from each end.

Hi, I'm late to the party and can't add much new, but I've been using a drill to taper masts and spars for years and although I do break the odd one I've found it the easiest and best way to do the job. As mentioned above use a cordless drill that you can vary the speed with. The most important thing is to make sure the dowel is perfectly straight in the chuck--it's the wobble that will cause breakage. To prevent scratching the wood, I wrap the end in a strip of the thinnest cardboard I can find. This protects the wood an also helps you get the dowel straight. Start slow and the second you feel any vibration or wobbling, stop and realign the dowel.
If you do break the mast or spar, you can usually repair it and no one will ever know, so it's more of an irritation than a fiasco if you break one. Best of luck!
Using a hand drill seems to be problematic when making double-tapered yards. How do you avoid the notches created by the chuck?Hi, I'm late to the party and can't add much new, but I've been using a drill to taper masts and spars for years and although I do break the odd one I've found it the easiest and best way to do the job. As mentioned above use a cordless drill that you can vary the speed with. The most important thing is to make sure the dowel is perfectly straight in the chuck--it's the wobble that will cause breakage. To prevent scratching the wood, I wrap the end in a strip of the thinnest cardboard I can find. This protects the wood an also helps you get the dowel straight. Start slow and the second you feel any vibration or wobbling, stop and realign the dowel.
If you do break the mast or spar, you can usually repair it and no one will ever know, so it's more of an irritation than a fiasco if you break one. Best of luck!
I make the yard longer and leave room for the part that fits in the chuck. Then I cut the ends off when I am finished.Using a hand drill seems to be problematic when making double-tapered yards. How do you avoid the notches created by the chuck?

When I was making arrows which were tapered a both ends I used a block plane and a shooting board. I can see that working for the larger masts. Would making the smaller spars from Orange Sticks help with the breakage problem?

Wrapping cardboard around the end protects the wood, and I don't tighten the chuck to the max. The main issue I've had to be honest, other than the occasional break, is that if you start with heavy grit sandpaper the masts/spars can show spiral grooves, so you have to be careful you do some good hand sanding. I should point out too that I use about the slowest speed possible. More like polishing than grinding.Using a hand drill seems to be problematic when making double-tapered yards. How do you avoid the notches created by the chuck?

The drill & sandpaper method works but takes too long so I tried using a hobby knife. I run the blade up and down the dowel while running the drill. Once I get the barber pole affect I use the sandpaper. I repeat several times to get a nice even taper.
Attachments
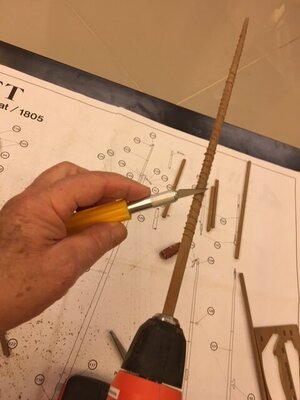
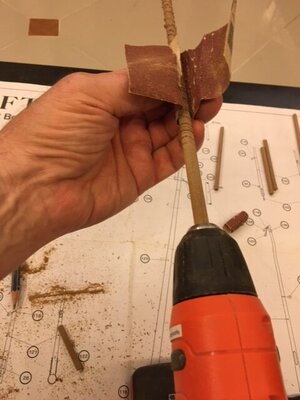
Another country heard from! I’ve tried each of the methods. IMHO, the lathe with sandpaper blocks worked best.The drill & sandpaper method works but takes too long so I tried using a hobby knife. I run the blade up and down the dowel while running the drill. Once I get the barber pole affect I use the sandpaper. I repeat several times to get a nice even taper.
Yard making fun continues! Tapering using a very small block plane (pictured), a lathe, and a cordless drill. The two yards (without nlocks yet installed), were both done totally by hand. They're a tiny bit assymetric but they'll do. Only a few more to go! Blue tape labels to keep me from getting confused....
Attachments
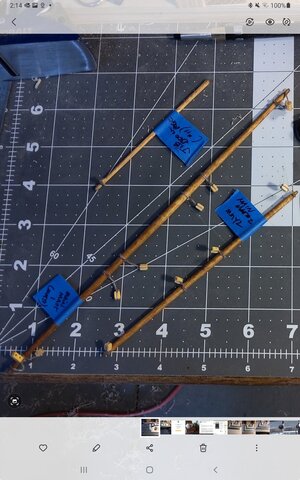

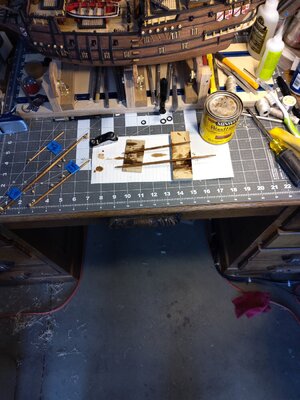
Good idea on the tape. I did find some stickum that I had to take off, though.Yard making fun continues! Tapering using a very small block plane (pictured), a lathe, and a cordless drill. The two yards (without nlocks yet installed), were both done totally by hand. They're a tiny bit assymetric but they'll do. Only a few more to go! Blue tape labels to keep me from getting confused....
I'll check them. Thanks!
That's good, but if no spare, rap the end in several turns of paper and the clamp grips without leaving a markI make the yard longer and leave room for the part that fits in the chuck. Then I cut the ends off when I am finished.
For larger masts I prefer the drill method. By larger I mean potentially either in diameter or in length. For shorter and smaller diameter masts and spars, I have been using a different method on my current Black Pearl build. I purchased a Amazon/eBay DIY Beading Lathe for about $34. It is shown in several of the pictures below. To use it, I removed the pointed end from the bearing. My method is good for dowel up to 6mm since this is the internal size of the bearing in the end piece. I have moved the motor back as far as I can get it to gain about 1 cm extra length. Since this is a very light application I have not had any problem with only having the motor being mounted by 2 screws instead of 4.
I start by cutting a dowel to the length I need plus 30 to 40 mm. I am showing a spar that needs to be tapered on both ends, but it will also work with short masts that are tapered evenly the entire length. I mark the middle and then measure the correct length for the spar and mark each end. That leaves 15-20 mm on each end for mounting in the chuck or end piece. I also mark where I want the tapering to start near the middle. I wrap masking tape around one end of the spar to increase the diameter where it will be held snuggly in the bearing.

Here's the beading lathe ready to go. Also the pointed part that was removed from the end piece.

The spar is slid into the bearing (from right to left in the setup) until it is snuggly held in the bearing by the masking tape. The other end is in the drill chuck and tightened down. This is when I use a pencil to mark the various lines on the dowel while the lathe is turning. I refresh the lines occasionally during the process if needed.

Next is just using sandpaper to taper the spar or mast according to plans. I use a micrometer often to check my diameters. You can quickly over sand if you are not somewhat careful. I have had to discard a piece now and then for over sanding. Where a smaller diameter end is called for, I use the flat of a triangular file to cut it in. I usually don't finish this until both ends of the spar are shaped as I have had these break if I apply too much pressure on the small diameter section.

Here's a picture of both ends tapered. This example is not very perfect and could still use a bit more sanding. I usually use a sandpaper of 100 grit for the course work and switch to 160 for finer wok. A final sanding in the lathe with 400 grit sandpaper finishes most of the job.


The ends are then cut off. I generally leave them on until the spars are painted as they make nice places to hold while staining or painting. I usually sand off the center pencil mark before removing the piece from the lathe.

For long spars of 6 mm or less in diameter, I tape the middle of the spar for insertion into the bearing and do one end at a time. You do have to be careful of the "free" end of the spar while working. One could find a way to put a shield over the spinning end to protect the piece and the operator. This method typically takes me around 15 minutes per spar, but I check the diameter very often during that time. I think this example spar shown took less than 10 minutes from start to finish, but I was not trying to reach any specific taper.
I start by cutting a dowel to the length I need plus 30 to 40 mm. I am showing a spar that needs to be tapered on both ends, but it will also work with short masts that are tapered evenly the entire length. I mark the middle and then measure the correct length for the spar and mark each end. That leaves 15-20 mm on each end for mounting in the chuck or end piece. I also mark where I want the tapering to start near the middle. I wrap masking tape around one end of the spar to increase the diameter where it will be held snuggly in the bearing.
Here's the beading lathe ready to go. Also the pointed part that was removed from the end piece.
The spar is slid into the bearing (from right to left in the setup) until it is snuggly held in the bearing by the masking tape. The other end is in the drill chuck and tightened down. This is when I use a pencil to mark the various lines on the dowel while the lathe is turning. I refresh the lines occasionally during the process if needed.
Next is just using sandpaper to taper the spar or mast according to plans. I use a micrometer often to check my diameters. You can quickly over sand if you are not somewhat careful. I have had to discard a piece now and then for over sanding. Where a smaller diameter end is called for, I use the flat of a triangular file to cut it in. I usually don't finish this until both ends of the spar are shaped as I have had these break if I apply too much pressure on the small diameter section.
Here's a picture of both ends tapered. This example is not very perfect and could still use a bit more sanding. I usually use a sandpaper of 100 grit for the course work and switch to 160 for finer wok. A final sanding in the lathe with 400 grit sandpaper finishes most of the job.
The ends are then cut off. I generally leave them on until the spars are painted as they make nice places to hold while staining or painting. I usually sand off the center pencil mark before removing the piece from the lathe.
For long spars of 6 mm or less in diameter, I tape the middle of the spar for insertion into the bearing and do one end at a time. You do have to be careful of the "free" end of the spar while working. One could find a way to put a shield over the spinning end to protect the piece and the operator. This method typically takes me around 15 minutes per spar, but I check the diameter very often during that time. I think this example spar shown took less than 10 minutes from start to finish, but I was not trying to reach any specific taper.
Nice tutorial, Jeff!For larger masts I prefer the drill method. By larger I mean potentially either in diameter or in length. For shorter and smaller diameter masts and spars, I have been using a different method on my current Black Pearl build. I purchased a Amazon/eBay DIY Beading Lathe for about $34. It is shown in several of the pictures below. To use it, I removed the pointed end from the bearing. My method is good for dowel up to 6mm since this is the internal size of the bearing in the end piece. I have moved the motor back as far as I can get it to gain about 1 cm extra length. Since this is a very light application I have not had any problem with only having the motor being mounted by 2 screws instead of 4.
I start by cutting a dowel to the length I need plus 30 to 40 mm. I am showing a spar that needs to be tapered on both ends, but it will also work with short masts that are tapered evenly the entire length. I mark the middle and then measure the correct length for the spar and mark each end. That leaves 15-20 mm on each end for mounting in the chuck or end piece. I also mark where I want the tapering to start near the middle. I wrap masking tape around one end of the spar to increase the diameter where it will be held snuggly in the bearing.
View attachment 253656
Here's the beading lathe ready to go. Also the pointed part that was removed from the end piece.
View attachment 253657
The spar is slid into the bearing (from right to left in the setup) until it is snuggly held in the bearing by the masking tape. The other end is in the drill chuck and tightened down. This is when I use a pencil to mark the various lines on the dowel while the lathe is turning. I refresh the lines occasionally during the process if needed.
View attachment 253658
Next is just using sandpaper to taper the spar or mast according to plans. I use a micrometer often to check my diameters. You can quickly over sand if you are not somewhat careful. I have had to discard a piece now and then for over sanding. Where a smaller diameter end is called for, I use the flat of a triangular file to cut it in. I usually don't finish this until both ends of the spar are shaped as I have had these break if I apply too much pressure on the small diameter section.
View attachment 253659
Here's a picture of both ends tapered. This example is not very perfect and could still use a bit more sanding. I usually use a sandpaper of 100 grit for the course work and switch to 160 for finer wok. A final sanding in the lathe with 400 grit sandpaper finishes most of the job.
View attachment 253660
View attachment 253661
The ends are then cut off. I generally leave them on until the spars are painted as they make nice places to hold while staining or painting. I usually sand off the center pencil mark before removing the piece from the lathe.
View attachment 253662
For long spars of 6 mm or less in diameter, I tape the middle of the spar for insertion into the bearing and do one end at a time. You do have to be careful of the "free" end of the spar while working. One could find a way to put a shield over the spinning end to protect the piece and the operator. This method typically takes me around 15 minutes per spar, but I check the diameter very often during that time. I think this example spar shown took less than 10 minutes from start to finish, but I was not trying to reach any specific taper.
Thanks. I didn't realize I was writing a tutorial, but I guess it was one.Nice tutorial, Jeff!
Hallo @Bud-JHi to all. I am currently building the ZHL Soleil Royal and could use a bit of help. I need to taper about 25 dowels for all of the masts but am unable to do this as I do not have the proper tools. I tried the drill method and snapped the mast. My last resort was to Dremel it…not a good idea.
I.E. - 8mm max to 4mm min……6mm max to 3mm min, etc.
I would be happy to pay someone to do this as I just am unable.
Thanks
John
we wish you all the BEST and a HAPPY BIRTHDAY

I used this method for many years.
Clamp ordinary household drill to table. Insert overlong dowel and as it rotates, move sandpaper (stick or strip held between thumb and forefinger) progressively forwards and back along the rotating dowel until size required.
Clamp ordinary household drill to table. Insert overlong dowel and as it rotates, move sandpaper (stick or strip held between thumb and forefinger) progressively forwards and back along the rotating dowel until size required.