
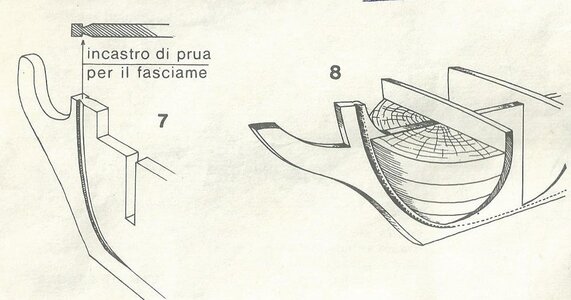
bow fillers. The planking Technic can be downloaded in a PDF format free of chargeHi Scottola, regarding the two aproaches of planking, I think the first one is the solution for modellers to plank with no much effort. This way doesn’t need the two ways of bending (plain and edge bending). The second approach is harder to achieve but the results are more realistic.
View attachment 209877View attachment 209878
And now imagine in real life how can be possible to fix those planks to the frame....
View attachment 209879

-

SUBSCRIBE TO SHIPS IN SCALE TODAY!
The beloved Ships in Scale Magazine is back and charting a new course for 2026!
Discover new skills, new techniques, and new inspirations in every issue.
NOTE THAT OUR NEXT ISSUE WILL BE July/August 2026 -

Win a Free Custom Engraved Brass Coin!!!
As a way to introduce our brass coins to the community, we will raffle off a free coin during the month of August. Follow link ABOVE for instructions for entering.
You are using an out of date browser. It may not display this or other websites correctly.
You should upgrade or use an alternative browser.
You should upgrade or use an alternative browser.
Montanes by OcCre 1:70
- Thread starter Scott Shilling
- Start date
- Watchers 27

This article has been my Bible for many. To me, IT IS THE article I have seen about planking. If you and others read it, you will find out that nearly all planks will have to be cut somewhat towards the bow
Attachments

Thanks for the comment El Capi. I am sure I'll get stuck over and over. So expect some questions. Hopefully I have enough glue on those false gun ports. Based on your comments I think I'll give them a bit more.
Below are some more pictures of my planking progression. I closed up the starboard top section. That final little sliver of a plank took me a full 30 mins to get it right. In the end it was worth it because it fit nicely.
I am primarily using a medium thick CA glue for the initial attachment to the boat. I was chatting with a Buddy of mine who told me to also apply some white glue on the back to add strength. I've been doing this but it seems redundant. I suppose if I was using thin CA it would make more sense. Anyone have opinions on this. Also - anytime I have a super skinny sliver type I use white glue as it gives me some extra time and, strange as it might sound, acts as a lubricant.
The comments from Jamie kind of through me a bit. but as I look at the results I think it will look ok in the end. So far so good.
Over the weekend I will close up the top section of the port side.
Planking continues. Sheesh -- what a ton of planks. I have most of it done but still need to get the bottom section done. Need to spend some time poking around on SOS so get a good feel on how to do the very bottom planks.
I stuck a flashlight in behind the planks to see how many gaps I have. I was pretty surprised to see that there are not too many, phew!. So it was off to the store for some wood putty. I ended up selecting cherry wood as it seems to match the best. I mushed in some into the a couple of gaps then did some sanding, I then finished off with a little varnish. I will sand all of this off later once I close out planking. Seems like if filled fine and my wife was not able to find it even when I showed her the area to look in. I am afraid I don't have a camera to get too close but I did my best to zoom in. As you can see it seems that the cherry colored putty matches pretty good. For my next test I plan on taking some of the saw dust from sanding then mixing that with some varnish and using that as a putty.
Hopefully I can get this part wrapped up the the weekend.
You are doing a fine work. Congratulations.
Have you consider to paint the ship?
The actual ships were that way, although I recon that the wood finishing is very nice.
Anyway you'll achieve good results!!
Greetings
Jaime
Have you consider to paint the ship?
The actual ships were that way, although I recon that the wood finishing is very nice.
Anyway you'll achieve good results!!
Greetings
Jaime

Hallo Scott, alias @ScottolaHello all,
Well, starting building out the skeleton of the Montanes and I am dealing with troubles already!! I glued the two main center sections and all was well until the next morning. The Aft center "board" decided to do two things, bend and twist. Out here in Colorado during the winter time things are incredibly dry so to say the least I was pretty surprised. I had a 1/3 inch bend, and more frustrating, a 1/3 inch twist.
After dry fitting the frames that twist really gets magnified. Sorry, I did not take a picture (should have).
After pondering the situation for a while I decided to go ahead and glue in the frames and see if I could get the bend out by adding the crossbeams. (the 2cm by 2cm reinforcements) Not really. So did the next best then and build a stand which took most of the bend out. That took the bend out of the bottom section but I still had an 1/8 inch at the top. Took that out with the deck.
Next challenge is to see if I can take out this crazy twist. The only way to accomplish was to twist it back by hand then glue and nail the deck. I prepped the decking by pre-drilling some 0.8mm holes for the nails. I added the glue then twisted it a little past straight and had my wife tap in the nails. IT WORKED!!! That also took out the last bit of bend (I'm left with 1/16 inch bend and can live with that).
Net result is I'll need to add the deck planking later. Ok fine I can do that.
Sunday morning I found more warping. I'll deal with these later.
Kind of a wobbly start.
View attachment 201801View attachment 201802View attachment 201804
we wish you all the BEST and a HAPPY BIRTHDAY

Happy Birthday, Scottola!
Happy birthday Scott
Kurt Konrath
Kurt Konrath
Using saw dust from sanding with glue as binder makes good filler, or apply thin coat of thick CA and add sawdust to top and work into glue quickly before it sets up works also.
Your planking is looking good, my first attempts didn't look as good.
Your planking is looking good, my first attempts didn't look as good.
Thanks for the advice. I am about to close out the planking exercise. From here I will start playing around with varnish and sawdust, CA with sawdust, and button. Thankfully my cracks and gaps are pretty thin so I am sure I'll get it to look ok. I never thought about CA and sawdust. Gotta go quickUsing saw dust from sanding with glue as binder makes good filler, or apply thin coat of thick CA and add sawdust to top and work into glue quickly before it sets up works also.
Your planking is looking good, my first attempts didn't look as good.
")
HI folks. During the week I spent plenty of time pecking away at planking and getting pretty close to closing. Tonight I plan on getting the bottom section completely closed then tomorrow, Saturday, I'll get the aft section closed out. Plenty of fiddly angle sliver strips that take forever to get to fit right.
ARG. I just re-read the above post. Varnish and sawdust, CA and sawdust, and PUTTY
Here are some pics

ARG. I just re-read the above post. Varnish and sawdust, CA and sawdust, and PUTTY
Here are some pics
Kurt Konrath
Kurt Konrath
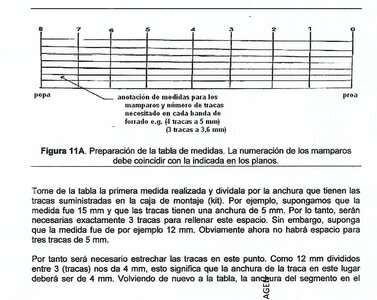
A bit late advise for this ship on the planking, but in the books it tells you can sand down and narrow the width of planks a little bit each, which helps get rid of sliver in end, it let last plank be a bit wider.
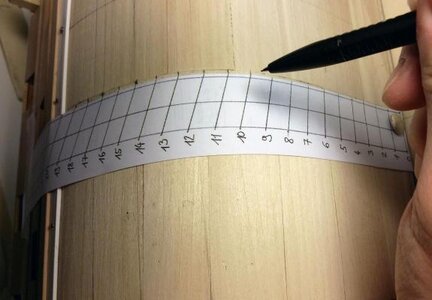
The planking book shows how to measure the side of ship and estimate number of planks, and then you can adjust to narrow as needed to get constant width on the planks.
Some need narrowed a bunch at bow to get to fit without crowding out others.
The planking book shows how to measure the side of ship and estimate number of planks, and then you can adjust to narrow as needed to get constant width on the planks.
Some need narrowed a bunch at bow to get to fit without crowding out others.
Kurt. thanks for the advice but I was already way down the path. Either way I have closed up and have moved to the sanding phase.Some need narrowed a bunch at bow to get to fit without crowding out others.
Got everything closed up and done. Nice to be done with all of this planking. Sheesh. I was surprised and how few gaps I actually had. So I just used a little bit of the Cherry putty here and there and it looks fine. The good news is that you actually have to know exactly where to look to see it. Once it's varnished you'll never know.
SANDING! Holy moly, lotta work for sure. I have to make sure to use my left hand once in a while otherwise my right arm are is going to end up looking like a 20 year old's arm that isn't getting any.
Got about an hour and a half invested so far and I am estimating at least another 2 to 3 more hours which includes the final effort using a 300 grit sand paper. My goal today is to complete the entire effort. Maybe tonight I'll start on the walnut rubbing strakes.
The kit calls for painting the walnut black. if that is the case then why even use walnut!! I am going to go get me some dark walnut stain and make these planks as black as possible. Then once mounted I'll step bank and decide whether or not to paint them black. I have poked around the internet trying to find another Montanes where the walnut was not painted and could not find one. Any opinions on this from anyone?
I just took a wet sponge to it to get a good feel for where I am at with this. So far so good. One thing for sure. Sapeli is certainly hard to work with but it has such a great character when completed.
I use sawdust also with sanding sealer.Using saw dust from sanding with glue as binder makes good filler, or apply thin coat of thick CA and add sawdust to top and work into glue quickly before it sets up works also.
Your planking is looking good, my first attempts didn't look as good.
Got everything closed up and done. Nice to be done with all of this planking. Sheesh. I was surprised and how few gaps I actually had. So I just used a little bit of the Cherry putty here and there and it looks fine. The good news is that you actually have to know exactly where to look to see it. Once it's varnished you'll never know.
SANDING! Holy moly, lotta work for sure. I have to make sure to use my left hand once in a while otherwise my right arm are is going to end up looking like a 20 year old's arm that isn't getting any.
Got about an hour and a half invested so far and I am estimating at least another 2 to 3 more hours which includes the final effort using a 300 grit sand paper. My goal today is to complete the entire effort. Maybe tonight I'll start on the walnut rubbing strakes.
The kit calls for painting the walnut black. if that is the case then why even use walnut!! I am going to go get me some dark walnut stain and make these planks as black as possible. Then once mounted I'll step bank and decide whether or not to paint them black. I have poked around the internet trying to find another Montanes where the walnut was not painted and could not find one. Any opinions on this from anyone?
I just took a wet sponge to it to get a good feel for where I am at with this. So far so good. One thing for sure. Sapeli is certainly hard to work with but it has such a great character when completed.
View attachment 213256View attachment 213257View attachment 213258View attachment 213259
Well done Scott. It looking good. Congrats.
Time for my experiment with staining the walnut rubbing strakes. Looks ok, so I'll press on knowing that at any time I can come back and paint them black. I won't do this until I see what these look like after being varnished. The top section it calls for two strips with the bottom calling for 4. I have so far done 3. Still need to wrap around the back.


Progress continues. Of course the bottom keel boards were not long enough!! Although its an easy fix. Stern went on nicely with no need for any sanding.
So far I am liking the finish of the walnut rubbing strakes. Give them two coats of dark walnut stain and two coats of satin varnish.


So far I am liking the finish of the walnut rubbing strakes. Give them two coats of dark walnut stain and two coats of satin varnish.

I have been following a Montanes build on YouTube. I don’t have the link but it should be easy to find. I am not too big on the gloss finish the builder uses, but it is interesting to watch his progress.
Last edited:
Jeff, The guy you are talking about on Youtube is John Aliprantis. Here is the link to his channel. https://www.youtube.com/channel/UCvNxDG6MgbFikbTM89Hod2g
I pay a lot of attention to his techniques. One thing about him is that he seems to really stick to the instructions.
For the last several days I have been focused on framing the gun ports. 58 gun ports that need to be framed so that a total of 232 little strips of wood. Each has to be carefully glued in etc etc... Sheesh. John Aliprantis spent 2 hours per side where it took me more like 5 or 6 hours per side.
Painted the bottom with some satin varnish.
Here's what she looks like this evening.