On my Victory I also combine wood and 3D plastic. I design and print it myself. By the way, a very good box with ventilation for the printer. I know how plastic stinks and this is a great solution!
-

Win a Free Custom Engraved Brass Coin!!!
As a way to introduce our brass coins to the community, we will raffle off a free coin during the month of August. Follow link ABOVE for instructions for entering.
-

PRE-ORDER SHIPS IN SCALE TODAY!
The beloved Ships in Scale Magazine is back and charting a new course for 2026!
Discover new skills, new techniques, and new inspirations in every issue.
NOTE THAT OUR FIRST ISSUE WILL BE JAN/FEB 2026
You are using an out of date browser. It may not display this or other websites correctly.
You should upgrade or use an alternative browser.
You should upgrade or use an alternative browser.
NORSKE LOVE - Billing Boats 1:75 scale
- Thread starter Dean62
- Start date
- Watchers 74
-
- Tags
- billing boats norske lowe
That’s my plan is to buy the enclosure with ventilation.On my Victory I also combine wood and 3D plastic. I design and print it myself. By the way, a very good box with ventilation for the printer. I know how plastic stinks and this is a great solution!
Very nice 3D models! Are you interested in selling or sharing your STL files? I got hold of a very old kit that is missing all of the fixings.That’s my plan is to buy the enclosure with ventilation.
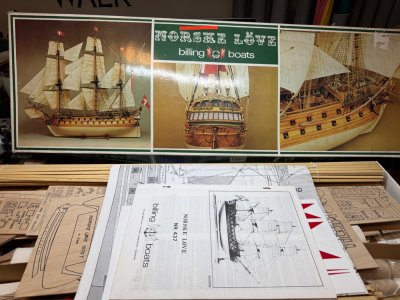
The glue that was in the box says "Made in West Germany" so it must have been sitting on a shelf for decades. Surprisingly the glue is still completely viscous.

Thank you, the only STL files I have thus far is; the cannon carriage, the upper galley wall, and the side galley walls. If you want these let me know.Very nice 3D models! Are you interested in selling or sharing your STL files? I got hold of a very old kit that is missing all of the fixings.
View attachment 515585
The glue that was in the box says "Made in West Germany" so it must have been sitting on a shelf for decades. Surprisingly the glue is still completely viscous.
View attachment 515586
I added the columns, oddly enough they were a little more difficult than I originally anticipated as far as installing them plumb. That’s due to the fact it’s hard to plumb them given the floor is on an arch. But I used a flexible ruler to go across corner to corner and made tic marks top and bottom.
For an idea of size, the base is .125” square.
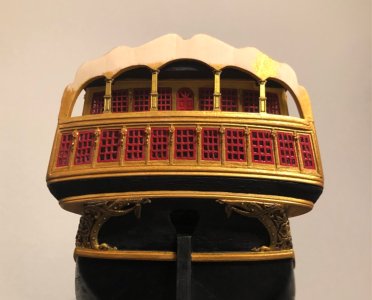
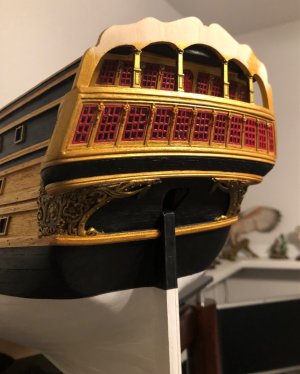
Well that’s it for now, probably going to finish the carvings on the port side upper gallery next.
Then I can think about doing the railings. I’m still kicking it around in my head, how I want to attempt them. I have some wood precut already.
For an idea of size, the base is .125” square.


Well that’s it for now, probably going to finish the carvings on the port side upper gallery next.
Then I can think about doing the railings. I’m still kicking it around in my head, how I want to attempt them. I have some wood precut already.
That's extraordinarily fine work on the columns, Dean. Not so easy at any scale...
Thanks Paul. I should add that if they were larger I could add detail to the corbels. Right now they are just the profile of a corbel. But it’s better than nothing!That's extraordinarily fine work on the columns, Dean. Not so easy at any scale...
Last edited:
- Joined
- Sep 3, 2021
- Messages
- 5,190
- Points
- 738

Your work on the stern looks good and balanced. When looking at the starboard carvings, I can't find sufficient reason to comment, but as long as you're not satisfied and playing around with ideas, I'll have to wait and see what you come up with.
Thanks Johan, at this point I’m going to leave it and see if it grows on me.Your work on the stern looks good and balanced. When looking at the starboard carvings, I can't find sufficient reason to comment, but as long as you're not satisfied and playing around with ideas, I'll have to wait and see what you come up with.
At 1:72 that will look like a guy losing his cookies.
Actually it would be a indiscernible blob!At 1:72 that will look like a guy losing his cookies.

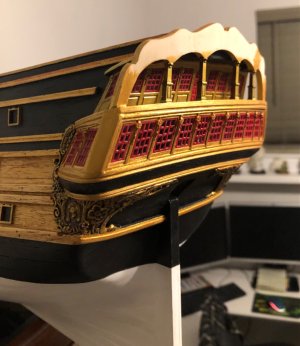
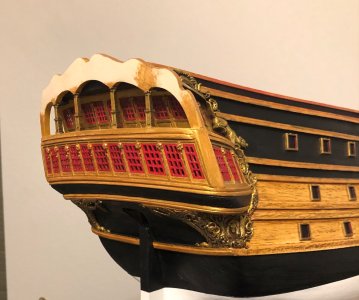
Update, I finished the carvings on the port side gallery…some differences from the starboard side, but that’s to be expected. 
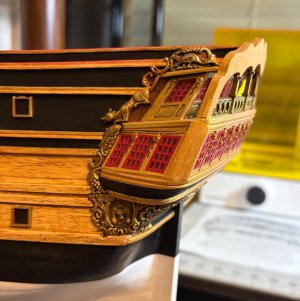
Yes, those who pay attention will notice the addition of the railings on the back between the columns.
First I looked at the size given the scale and they are 5/16” tall. After subtracting the upper and lower horizontal boards, that leaves about 1/4” left to carve the design. I used two ellipses that intersect and then I added a floral piece top and bottom and an ellipse where the pattern meets. This is very similar to the original drawings, but with my own artistic interpretation…or AL as we refer to it.
Here is the CAD model…
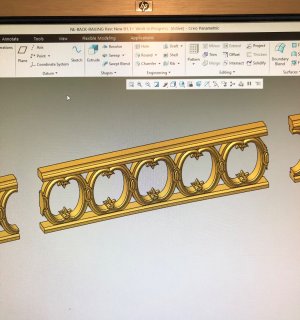
As you can see this would be very difficult to carve at this size. So…why not use my new resin printer you say? That’s a great idea!
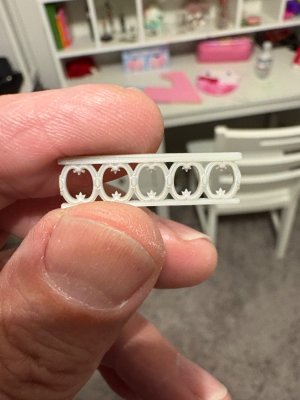
Image trying to carve this and not break anything!
So I painted them, first black base coat and then dry brushed gold on. This way the tiny detail stands out.
A few pics…

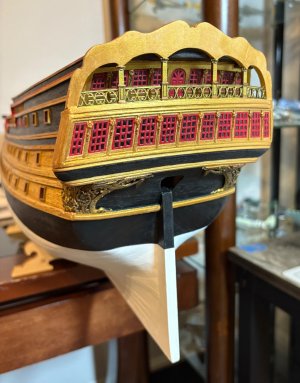
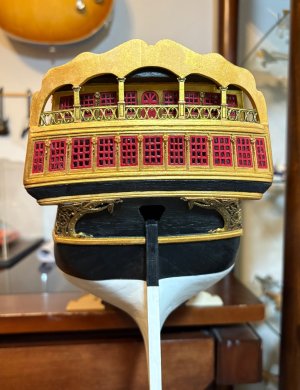
Next I will be working on the side railings that will start at the upright where the rear railings end and then end up under the foxes hind feet, after making a 90 degree turn. Can’t wait to get those on! Then I can start carving the figures that go on the corners, which will have scrolls under them.
Happy modeling…

Yes, those who pay attention will notice the addition of the railings on the back between the columns.
First I looked at the size given the scale and they are 5/16” tall. After subtracting the upper and lower horizontal boards, that leaves about 1/4” left to carve the design. I used two ellipses that intersect and then I added a floral piece top and bottom and an ellipse where the pattern meets. This is very similar to the original drawings, but with my own artistic interpretation…or AL as we refer to it.
Here is the CAD model…

As you can see this would be very difficult to carve at this size. So…why not use my new resin printer you say? That’s a great idea!


Image trying to carve this and not break anything!
So I painted them, first black base coat and then dry brushed gold on. This way the tiny detail stands out.
A few pics…


Next I will be working on the side railings that will start at the upright where the rear railings end and then end up under the foxes hind feet, after making a 90 degree turn. Can’t wait to get those on! Then I can start carving the figures that go on the corners, which will have scrolls under them.
Happy modeling…
Last edited:
Good morning Dean. Wow the quarter cabin and stern decorations are wonderful. I’m sure you could have carved those little decorative railings….Update, I finished the carvings on the port side gallery…some differences from the starboard side, but that’s to be expected.
View attachment 516670
Yes, those who pay attention will notice the addition of the railings on the back between the columns.
First I looked at the size given the scale and they are 5/16” tall. After subtracting the upper and lower horizontal boards, that leaves about 1/4” left to carve the design. I used two ellipses that intersect and then I added a floral piece top and bottom and an ellipse where the pattern meets. This is very similar to the original drawings, but with my own artistic interpretation…or AL as we refer to it.
Here is the CAD model…
View attachment 516671
As you can see this would be almost impossible to carve at this size. I had enough of a headache on the columns. So…why not use my new resin printer you say? That’s a great idea!
View attachment 516672
Image trying to carve this and not break anything!
So I painted them, first black base coat and then dry brushed gold on. This way the tiny detail stands out.
A few pics…
View attachment 516673View attachment 516674View attachment 516675
Next I will be working on the side railings that will start at the upright where the rear railings end and then end up under the foxes hind feet, after making a 90 degree turn. Can’t wait to get those on! Then I can start carving the figures that go on the corners, which will have scrolls under them.
Happy modeling…
 .
.Cheers Grant
- Joined
- Dec 5, 2022
- Messages
- 1,119
- Points
- 443

Hallo Dean,
Wow, was für eine tolle Arbeit! Ich beneide dich und deinen 3D-Drucker. Wirklich toll. Kurze Frage: Mit welchem Programm erstellst du deine Kunstobjekte?
Leider kenne ich mich mit 3D-Druckern überhaupt nicht aus. Wäre es schwierig, das zu lernen?
Beste grüße
Günter Schiff-1
Wow, was für eine tolle Arbeit! Ich beneide dich und deinen 3D-Drucker. Wirklich toll. Kurze Frage: Mit welchem Programm erstellst du deine Kunstobjekte?
Leider kenne ich mich mit 3D-Druckern überhaupt nicht aus. Wäre es schwierig, das zu lernen?
Beste grüße
Günter Schiff-1
Thanks Grant! I did carve all the coat of arms, so I think I could have carved the railings, not that perfect of course. But my new printer was calling me.Good morning Dean. Wow the quarter cabin and stern decorations are wonderful. I’m sure you could have carved those little decorative railings….- I think you just wanted to play with your new printer
.
Cheers Grant

Don’t worry, I will resume carving soon. In fact, there is still so much to carve, you’ll be calling me Carvin Marvin!

Wait. What was that sound? Oh, it was Dean getting sucked into the 3D printing abyss...
Hey, I could also get sucked into the power tool abyss...lol...and use a milling machine, lathe, table saw, scroll saw, drill press, belt sander, drum sander, etc., …it’s just another tool available for modeling!Wait. What was that sound? Oh, it was Dean getting sucked into the 3D printing abyss...
And it too increases accuracy and saves time. I would have spent an entire week carving those. I modeled the parts in an hour and printed them in 45 minutes! That's efficient.
If you remember, when building the Bluenose, I modeled a ships wheel and anchor to use on my ship. I also modeled a winch motor and steering mechanism for @Peter Voogt to use.
In conclusion, modeling and printing parts does not eliminate the craftsmanship of building a model, it’s just a different skill set.
Last edited:
Thank you!Hallo Dean,
Wow, was für eine tolle Arbeit! Ich beneide dich und deinen 3D-Drucker. Wirklich toll. Kurze Frage: Mit welchem Programm erstellst du deine Kunstobjekte?
Leider kenne ich mich mit 3D-Druckern überhaupt nicht aus. Wäre es schwierig, das zu lernen?
Beste grüße
Günter Schiff-1
I use Creo CAD software to create the model files. But any good 3D CAD software will work.
Then I export a STL file to be imported into the slicer software. I am using Chitubox slicer software. Then after orienting the part and adding supports in Chitubox, I create the slicer file in Chitubox. That file can be downloaded to the printer. Using the printer is not hard. In addition, the part has to be cured afterwards. I think you can learn it.
Also, if you don’t have the ability to create your own models, you can find STL files online. The problem is you are limited to only what someone else has modeled and is available.
Hope that sheds a little light on the subject of 3D printing.
Vielen Dank!
Ich verwende Creo CAD, um die Modelldateien zu erstellen. Jede gute 3D-CAD-Software ist jedoch geeignet.
Anschließend exportiere ich eine STL-Datei, die ich in die Slicer-Software importiere. Ich verwende die Slicer-Software Chitubox. Nachdem ich das Teil ausgerichtet und Stützstrukturen in Chitubox hinzugefügt habe, erstelle ich die Slicer-Datei in Chitubox. Diese Datei kann dann auf den Drucker heruntergeladen werden. Die Bedienung des Druckers ist nicht schwer. Außerdem muss das Teil anschließend ausgehärtet werden. Ich denke, das lässt sich lernen.
Wenn Sie keine eigenen Modelle erstellen können, finden Sie STL-Dateien online. Das Problem ist jedoch, dass Sie nur auf das zugreifen können, was andere modelliert haben und verfügbar ist.
Ich hoffe, das hat etwas Licht ins Dunkel des 3D-Drucks gebracht.
I was making a little joke. My apologies.Hey, I could also get sucked into the power tool abyss...lol...and use a milling machine, lathe, table saw, scroll saw, drill press, belt sander, drum sander, etc., …it’s just another tool available for modeling!
And it too increases accuracy and saves time. I would have spent an entire week carving those. I modeled the parts in an hour and printed them in 45 minutes! That's efficient.
I’m starting to think you undervalue the skill sets required to make those railings. You have to be proficient in CAD to model them, and proficient with the slicer software to create a file to print. And know how to use the printer. Then I had to paint them. So it’s not like I just pulled them out of thin air and they appeared at the touch of a print button.
If you remember, when building the Bluenose, I modeled a ships wheel and anchor to use on my ship. I also modeled a winch motor and steering mechanism for @Peter Voogt to use.
In conclusion, modeling and printing parts does not eliminate the craftsmanship of building a model, it’s just a different skill set.


