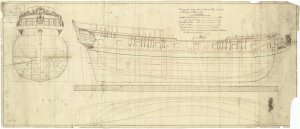
Oliver Cromwell, POF ,Scale 1:48 by Lawrence [COMPLETED BUILD]

I am at the same point and have to think about nails and treenails (size, material) ....... It is very important (I think) because the decision will have a big influence on the appearance of the final model.....
Related to the question of material - will you make the treenails with the steel you showed in one photo?
(Sorry, I do not know the correct english term.....in german it is Zieheisen - means pushing steel)
 
Zieheisen is drawplate* in English afaik... Lawrence there is a semi fake solution for treenailing I fell in love with immediately because of its simplicity. It looks 95% as good as the dowelled one but means only 25% of the effort. I drill the holes after glueing the frames / installing the planks and then I make a mixture of fine sawdust (ie. from a disk sender) and PVA and, if necessary, a few drops of black or brown paint. After mixing it well together I simply spread it on the surface and wipe off with a wet rag. Definitely not the perfect solution but it looks nearly the same and probably only 1 out of 50 (non expert) people would see the difference.
Janos

*edited
 
Last edited:
I am at the same point and have to think about nails and treenails (size, material) ....... It is very important (I think) because the decision will have a big influence on the appearance of the final model.....
Related to the question of material - will you make the treenails with the steel you showed in one photo?
(Sorry, I do not know the correct english term.....in german it is Zieheisen - means pushing steel)

Hello Uwe
I do thank you very much for your visit to my build log, and also for your very kind words and nice comments. I do believe that the picture that you are referring to on Post # 98, that picture was placed by Dave-didit showing me just how he approached the placement of the Bow Cants. I just may follow Daves picture in the placement of the treenails. ENJOY.

Regards Lawrence
 
Zieheisen is wrought iron in English afaik... Lawrence there is a semi fake solution for treenailing I fell in love with immediately because of its simplicity. It looks 95% as good as the dowelled one but means only 25% of the effort. I drill the holes after glueing the frames / installing the planks and then I make a mixture of fine sawdust (ie. from a disk sender) and PVA and, if necessary, a few drops of black or brown paint. After mixing it well together I simply spread it on the surface and wipe off with a wet rag. Definitely not the perfect solution but it looks nearly the same and probably only 1 out of 50 (non expert) people would see the difference.
Janos

Hello Janos
I thank you very much for your visit to my build log. Also for your very kind words and nice comments along with your great suggestions. Yes, I have heard of this type of tree nailing several times, but have not tried it as yet myself. I have however used my scribe to dent my planks and high lighted it with a sharp pencil. This is very easy and does a great job. It is just that I was thinking of making this Oliver Cromwell build just a bit special. But for sure I will give your method a fair try and then decide which way to go, ENJOY.

Regards Lawrence
 
Hello Ship Mates


Again I wish to thank you all very much for all of your visits to my build log on the little ship the Oliver Cromwell. Also for your very kind words and overly nice comments.
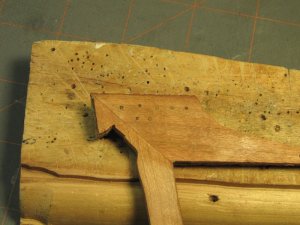
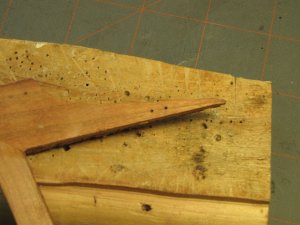
Back in the Old Ship Yard between preparing for a IMG_5140.JPGIMG_5139.JPGmuch-needed vacation of R & R up on the French River, Ontario. Between gathering things up for our trip, the little fellows and I have been getting acquainted with our Brynes Draw Plate. We have tried a number of different woods. Poplar, Red Oak and Maple. Since we want these treenails to appear like Iron Bolts on the real ship we have tried to dye them in a diluted bath of black Acrylic Paint. Thes do look not too bad at all until we cut them off and lightly sand the ends only to find that the paint did not go all that deep and gave an apprentice that did not at all please us. So it was off again to our little Brynes table saw to cut some Black Walnut. This wood was rather tricky to pull through the Draw Plate but once installed and a light coat of Tung N Teak Oil it gave us the results that we were after. I will attach a couple of pictures of a few of our experiments Picture # 5140 shows a varying degree of treenails out of Poplar, Red Oak and Hard Maple that has been died in a bath of black paint and with the ends lightly sanded, not very nice at all. Picture # 5139 has two Black Walnut treenails installed and lightly sanded and a light coat of Tung N Teak Oil applied. All through this wood Black Walnut is much harder to draw through the draw plate it does give us the results that we were after, ENJOY.
 
The result is looking very good - many thanks for sharing the trials
Hello Uwe
Thank you very much for your visit to my build log. Also for your very kind words and nice comments. Yes, I am rather pleased with the black walnut treenails, and with a thin coat of Tung N Teak Oil, they sure do look like black iron bolts. I do have a couple of days or a few hours here and there over the next couple of days before we head off on our fall vacation. I plan to build up my stock of these walnut treenails and just maybe I can start to pre-taper the framing ribs before I install these iron bolts, ENJOY
Regards Lawrence
 
G'day Lawrence and the little fellow
This part of the build is a loooooong slooooooow process, especially if you are cutting them out. I think I would rather go to the dentist and have a tooth pulled, than done what you both are doing.
I take my hat off to you my mate.
Soon the fun part will come.
Happymodeling
Greg
 
watching so far I love this
Hello Epicdoom
Welcome to my build log, I am always pleased to have a new crew member on board. Your words and comments are always welcome here. After our vacation and around the end of September I should be ready to start installing bib frames, so it should become very much more interesting, ENJOY.

Regards Lawrence
 
G'day Lawrence and the little fellow
This part of the build is a loooooong slooooooow process, especially if you are cutting them out. I think I would rather go to the dentist and have a tooth pulled, than done what you both are doing.
I take my hat off to you my mate.
Soon the fun part will come.
Happymodeling
Greg
Hello Greg
Thank you very much for your visit to my build log. Also for your very kind words and nice comments. Still, try ing to find a bit more time for the Old Ship Yard but so many household chores keep popping up. I did get around 250 of those Black Walnut treenails cut this AM before I cleaned our car inside and out, could have planted a garden in there for sure. Along with a trip to gas up the car, a trip to the grocery stoor to top up our supplies for our coming trip and to top that all up I ended up cutting the grass. I sometimes wonder just how I ever found time to go to work 5 days + a week when I am so busy most of the time, ENJOY.

Regards Lawrence
 
oops Lawrence, making something like that is far beyond my ability, but I am happy to follow your further building log
greetings dj56 (willy)

Hello dj56
Welcome to my build log on the little ship the Oliver Cromwell. I am always pleased to have a new crew member on board, your words and comments are always welcome here, please stop by very often.
Sorry for the slow comeback but my Admiral our dog and myself have been on vacation for the last two weeks now and have only returned home late yesterday. I have a tree to clean up in our backyard that blew down when we were gone, but not in any great hurry to get out my noisy chainsaw.
Yes this Oliver Cromwell is very challenging, that is for sure, but this kind of build is something that I have been thinking of for over a couple of years now. It is seeming to take forever to cut out and build the 40 sets of framing ribs. That part is far behind me now. Now I must pre-flare these rib frames, remove the paper patterns and apply my treenails to them to make it all look like the real ship.
Yes, the POF build is just a bit more complicated than the POB ship that I have built for many years now that it is also very rewarding. Very unlike my previous builds where in a few days or maybe a week or so of preparing to fit the bulkhead frames I would be ready to start flaring and start planking the hull. But this type of ship does have so much detail to contend with, along with so very much that the builder can add to his ship it sure does leave a huge amount of detail that can be added to one's own wishes.
Dj56, please do not put your self down, this is not at all your case in your skill department that is for sure. I have been looking over your Santisima Trinidad Occre build and it shows me that you do have all of the skills required to also build one of these POF builds. Really it is just a matter of just what you want to do. I find it much more rewarding to build my own parts rather than try to doctor up some of the parts supplied in the kits that somehow I feel that some of those cast metal parts are so crude and unlive like that I normally push them aside and build my own, but then again this is just my way of thinking, ENJOY.

Regards Lawrence
 
Just catching up on your excellent build log Lawrence, well done.

Hello Brian
I thank you very much for your visit to my build log on the little ship the Oliver Cromwell, also for your very kind words and nice comments. Yes.,the build is very slow. Just returned from a 2-week R & R vacation up on the French River. Time to get back into the old grove of model shipbuilding. Seams very slow up until now cutting out and building 40 sets of rib frames. Now I must start to pre-flare them and add a few treenails before I can glue and pin them to my keel. Almost 5 months now into this build and no rib frame erected as yet but then again that is about to change.

Sure do miss my old friend Geoff who was so kind and thoughtful with his very kind words and helpful comments and he also seemed to be such a bright spot here on the SOS Form, but then again we do have our great memories of Geoff, ENJOY.

Regards Lawrence
 
Hello Ship Mates
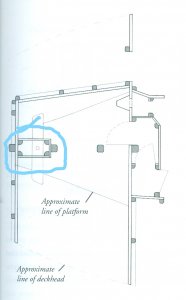
I am looking for a bit of helpful information as to an item that is shown in the TFFM book of the aft lower platform or the Magazine. As I am using Harold Hanan's plans for my ship build and Harold has given me no information at all in this area but he does show the aft platform. I want to try to add the lower housing into my build and am seeking help in doing so, that is if I ever get there.
In the Magazine In the picture below I have circles an item in the aft end of the magazine can any of my Ship Mates tell me just what this item is and what its purpose is,scan  Magazine on a Swan Ship0001_LI.jpg ENJOY.
Regards Lawrence
 
I guess this is simply a casing around the foot of the mizzen mast protecting it.

Peter
Just wondering, could it be just the covering around the shaft for the rudder?
That's all I got.
Greg
Peter and Greg
I thank you very much for your very helpful information. I was thinking that the aft platform started at the after side of the Mizzen Mast. But now this appears to be the bread room on my set of plans, thanks, ENJOY.

Regards Lawrence
 
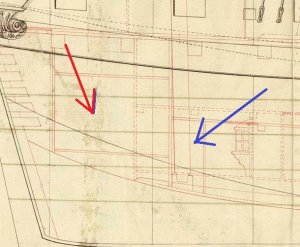
Are you sure, that it is the bread room - looks for me too small for a british / american designed ship
I guess around the mizzen mast would be the powder room and the bread room would be behind in an additional higher place behind the mizzen mast.
I marked my guess in the section plan
red arrow - bread room
blue arrow - powder room

bHWXQ9D11.jpgr

excerpt from this drawing
bHWXQ9D.jpg
 
Back
Top