-

Win a Free Custom Engraved Brass Coin!!!
As a way to introduce our brass coins to the community, we will raffle off a free coin during the month of August. Follow link ABOVE for instructions for entering.
-

PRE-ORDER SHIPS IN SCALE TODAY!
The beloved Ships in Scale Magazine is back and charting a new course for 2026!
Discover new skills, new techniques, and new inspirations in every issue.
NOTE THAT OUR FIRST ISSUE WILL BE JAN/FEB 2026
- Home
- Forums
- Ships of Scale Build Logs
- Super Detailing Static Models / Other Genres
- Super Detailing Static Models
You are using an out of date browser. It may not display this or other websites correctly.
You should upgrade or use an alternative browser.
You should upgrade or use an alternative browser.
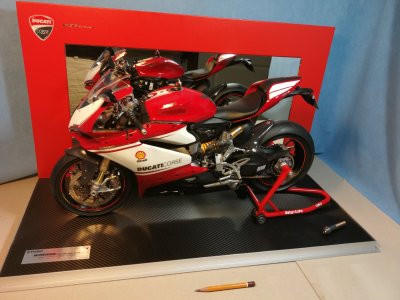
Pocher 1:4 Ducati Panigale S ‘Anniversario’ + ‘Final Edition
I agree and should have known better. I apologize and will start my own log tonight. I'm halfway thru the build and have a lot to show.
No problem at all, Mark. No apology necessary. See you in your own.No worries, you are doing great work. With your own build log you will have followers, comments and contributions.
Regards, Peter
No, please let it stay!!!! Than it’s for you a extra hint to you build-log.Can we delete any of my past posts and start fresh within my own thread?
Regards, Peter
- Joined
- Jul 5, 2023
- Messages
- 4
- Points
- 3
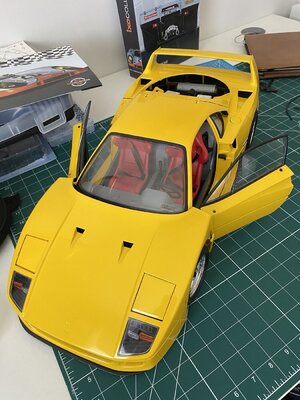
Late to the party on this but just started this amazing build and never done scratch build or modifications before so grateful for all the knowledge that has and is being shared via this thread, thanks Peter V…love your work on the exhaust so have started that and lots more to do…for now enjoy this pic of a pocher F40 I bought off eBay….quite old so some of the plastic pieces have become out of line due to storage

- Joined
- Jul 5, 2023
- Messages
- 4
- Points
- 3
Late news….they have one kit in stock as per earlier this week, drop them an email as they said a few more coming to marketAutograph has no more kits or sheets for the ducati.so now I need to figure out how to detail that very visible radiator .
Thanks for visiting and it’s never to late. The log will stay on the site so everyone can step in. Succes with your build and I like your F40.Late to the party on this but just started this amazing build and never done scratch build or modifications before so grateful for all the knowledge that has and is being shared via this thread, thanks Peter V…love your work on the exhaust so have started that and lots more to do…for now enjoy this pic of a pocher F40 I bought off eBay….quite old so some of the plastic pieces have become out of line due to storage
View attachment 383035
Regards, Peter
- Joined
- Jul 5, 2023
- Messages
- 4
- Points
- 3
This is in the queue, glad Hornsby have injected new blood into Pocher…catch the tv series if you canHi all,
Soon the build will go on.
Thanks to a tip of @Dean62 , perhaps interesting for some of you:
History comes alive again.
HK114 Lotus 72D - 1972 British GP, Emerson Fittipaldi - 1:8 Scale Kit
HK114, Lotus 72D - 1972 British GP - Emerson Fittipaldi - 1:8 Scale Kit, Pocher, 1:8 Model Car Kits, 1:8 Scaleuk.pocher.com
Regards, Peter
Wow!Unlike the first model in 2016, which had black mufflers with chrome covers, they are applied to this one of titanium with carbon: Akrapovic's.
I closed the screw holes in the exhaust pipes. The just don't quite have the right color. The pair you see now will soon be covered.
Paul Koo recommends that all holes and cracks be closed and then sanded, plastered and sprayed in its entirety. But that went too far for me now.
Chapter 8:
View attachment 191490
The exhaust system attached to the block. The engine is now complete.
Seen from the 4 angles:
View attachment 186005
View attachment 186006
View attachment 186007
View attachment 186008
And the 2 sides:
View attachment 186009
View attachment 186010
Regards, Peter
János
Thanks, János. Nice to see you have found this build-log. I am still impressed of the Ducati’s and looking weekly to them.Wow!
János
Regard, Peter
- Joined
- Sep 14, 2020
- Messages
- 152
- Points
- 88

Wow what a fantastic model! My wife's uncle raced Ducati's in the late 50's early 60's, the family had a lot of Trophies that he won! Mo Griffin!
Thanks for the post. Then you can imagine the sound when you look to the model …..Wow what a fantastic model! My wife's uncle raced Ducati's in the late 50's early 60's, the family had a lot of Trophies that he won! Mo Griffin!
Regards, Peter
- Joined
- Sep 14, 2020
- Messages
- 152
- Points
- 88

Yes
- Joined
- Sep 30, 2022
- Messages
- 8
- Points
- 53

Thanks for visiting, Atilla. You made a nice livery. I have just ordered some decals to update my red ( first) version.
Regards, Peter
During the build of the Anniversario, Pocher came up with the 3rd version: the Final Edition. At that time, my opinion was not to buy this one. However, it kept floating around in the back of my mind. And a few months ago I went looking for action. But it was no longer available in stores. It was on various buying sites, but for very expensive prices. I saw them come up to $2499.00 and € 1599,00 ......  No way!
Until I was looking again about a month ago and came across one for less than the new price. Scam? With a buyer's guarantee I bid anyway and ....... received. As show in "Purchased shortly ago ...':
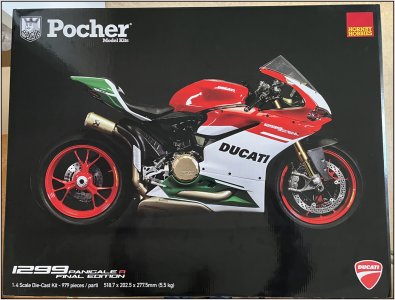
A limited series was made and mine has number 26-362. But the limited number ......... on one site is mentioned 555, but nowhere officially to find.
Last week, when some deck planks for the Balder had to dry, I started building. Here too I bought the hardware from Paul Koo. I also came across the manual for the Transkit from Autograph who released a very extensive hardware kit for the Ducati for €1550.00 ...... No way! But I'm going to take some things to detail from it to build on my Final Edition.
As an attentive reader could have seen, the title of this thread has been changed. I'm not going to open a whole new build log but will show the differences or extras of this Final Edition here.
The beginning and getting everything in order again and opening:
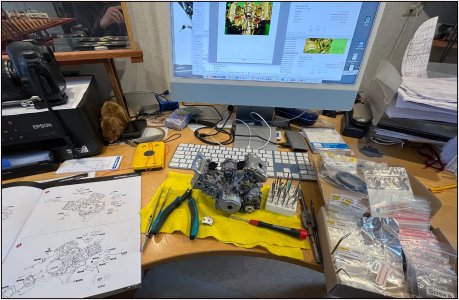
My old manual with notes, the manuals for the extras on the screen, all the tools ........ another nice chaos that needs to find its place.
The first thing I came across was making hose spring clamps.
Autograph will not approve of me posting from their manual here. I also make them slightly differently: from the same 0.4 mm flower binding wire. That is dark grey iron wire:

1: bend a piece of wire in half so that you get loop 'A' with the ends '1' and '2';
2: bend end '1' three-quarters of a way around to over loop 'A';
3: do the same for end '2', but the other way around;
4: grab it at loop 'A' and bend both loops 'B' and 'C' upwards towards each other. The ends of '1' and '2' will fall within the loop 'A';
5: slide loops 'B' and 'C' over the end of a drill bit of the desired thickness and pull both ends 'A' and '1'+'2' tightly around the drill bit;
6: squeeze loop 'A' and loops 'B'+'C' towards each other.
Then you get this result:
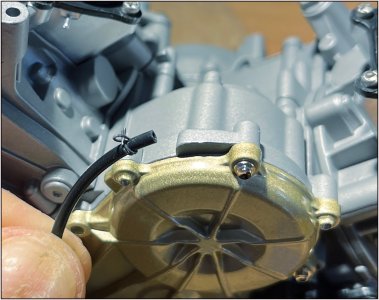
And is functional as a spring clamp indeed .....
Also seen here, together with the 'banjo plug' that I already described in post #4:
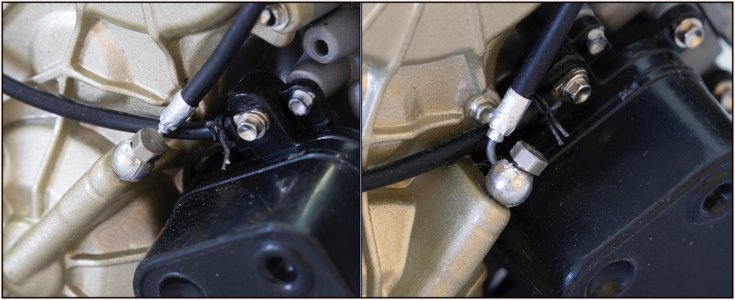
Only now I used 0.85 mm solder wire and heat shrink tubing.
I think I allow myself one day part of building of the Duc. So, not often a up-date here. The Blader is priority.
PS: I now see that I have forgotten to flatten the ball a bit. It’s now out of scale. Will do ……..
Regards, Peter
Until I was looking again about a month ago and came across one for less than the new price.

A limited series was made and mine has number 26-362. But the limited number ......... on one site is mentioned 555, but nowhere officially to find.
Last week, when some deck planks for the Balder had to dry, I started building. Here too I bought the hardware from Paul Koo. I also came across the manual for the Transkit from Autograph who released a very extensive hardware kit for the Ducati for €1550.00 ......
As an attentive reader could have seen, the title of this thread has been changed.
The beginning and getting everything in order again and opening:

My old manual with notes, the manuals for the extras on the screen, all the tools ........ another nice chaos that needs to find its place.
The first thing I came across was making hose spring clamps.
Autograph will not approve of me posting from their manual here. I also make them slightly differently: from the same 0.4 mm flower binding wire. That is dark grey iron wire:

1: bend a piece of wire in half so that you get loop 'A' with the ends '1' and '2';
2: bend end '1' three-quarters of a way around to over loop 'A';
3: do the same for end '2', but the other way around;
4: grab it at loop 'A' and bend both loops 'B' and 'C' upwards towards each other. The ends of '1' and '2' will fall within the loop 'A';
5: slide loops 'B' and 'C' over the end of a drill bit of the desired thickness and pull both ends 'A' and '1'+'2' tightly around the drill bit;
6: squeeze loop 'A' and loops 'B'+'C' towards each other.
Then you get this result:

And is functional as a spring clamp indeed .....
Also seen here, together with the 'banjo plug' that I already described in post #4:

Only now I used 0.85 mm solder wire and heat shrink tubing.
I think I allow myself one day part of building of the Duc. So, not often a up-date here. The Blader is priority.
PS: I now see that I have forgotten to flatten the ball a bit. It’s now out of scale. Will do ……..
Regards, Peter
Last edited:
Nice details Peter. I see you gave into temptation…but I can relate!During the build of the Anniversario, Pocher came up with the 3rd version: the Final Edition. At that time, my opinion was not to buy this one. However, it kept floating around in the back of my mind. And a few months ago I went looking for action. But it was no longer available in stores. It was on various buying sites, but for very expensive prices. I saw them come up to $2499.00 and € 1599,00 ......No way!
Until I was looking again about a month ago and came across one for less than the new price.Scam? With a buyer's guarantee I bid anyway and ....... received. As show in "Purchased shortly ago ...':
View attachment 515717
A limited series was made and mine has number 26-362. But the limited number ......... on one site is mentioned 555, but nowhere officially to find.
Last week, when some deck planks for the Balder had to dry, I started building. Here too I bought the hardware from Paul Koo. I also came across the manual for the Transkit from Autograph who released a very extensive hardware kit for the Ducati for €1550.00 ......No way! But I'm going to take some things to detail from it to build on my Final Edition.
As an attentive reader could have seen, the title of this thread has been changed.I'm not going to open a whole new build log but will show the differences or extras of this Final Edition here.
The beginning and getting everything in order again and opening:
View attachment 515718
My old manual with notes, the manuals for the extras on the screen, all the tools ........ another nice chaos that needs to find its place.
The first thing I came across was making hose spring clamps.
Autograph will not approve of me posting from their manual here. I also make them slightly differently: from the same 0.4 mm flower binding wire. That is dark grey iron wire:
View attachment 515719
1: bend a piece of wire in half so that you get loop 'A' with the ends '1' and '2';
2: bend end '1' three-quarters of a way around to over loop 'A';
3: do the same for end '2', but the other way around;
4: grab it at loop 'A' and bend both loops 'B' and 'C' upwards towards each other. The ends of '1' and '2' will fall within the loop 'A';
5: slide loops 'B' and 'C' over the end of a drill bit of the desired thickness and pull both ends 'A' and '1'+'2' tightly around the drill bit;
6: squeeze loop 'A' and loops 'B'+'C' towards each other.
Then you get this result:
View attachment 515720
And is functional as a spring clamp indeed .....
Also seen here, together with the 'banjo plug' that I already described in post #4:
View attachment 515721
Only now I used 0.85 mm solder wire and heat shrink tubing.
I think I allow myself one day part of building of the Duc. So, not often a up-date here. The Blader is priority.
Regards, Peter

You are right, Dean.Nice details Peter. I see you gave into temptation…but I can relate!
Regards, Peter
That’s when I buy! Never paid retail yet!You are right, Dean.It's never too late ....... if you find one ........ for a reasonable price.
Regards, Peter
Made some time to work on the Duc as well.
The block is mostly finished:
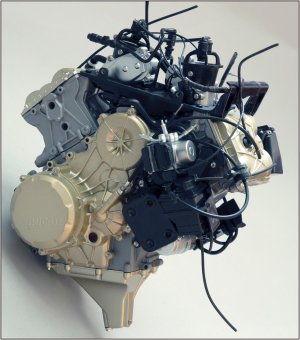
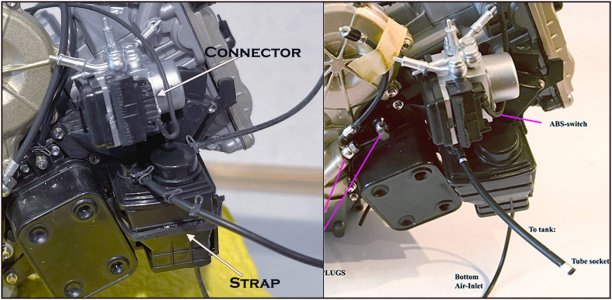
Compared to the Anniversario model with the extra added items, I added some extra-extra tubes and wires. I found the manual from Autograph that released a very detailed set for the Duc. Only that set is quite expensive ......... about 2x the price of the Pocher kit.
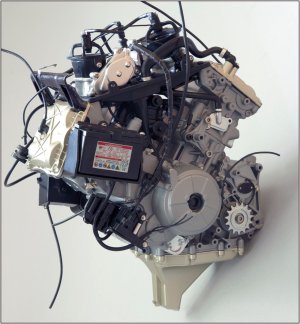
Then I'm going to scratch build some things from that manual.
I'm going to apply it to the exhaust system:
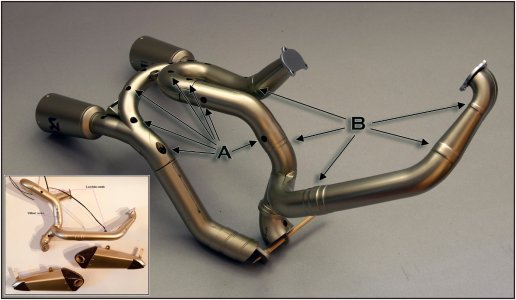
Just like with the previous model (see insert), all screw holes (A) will be closed.
Then I take the part apart again and all thickenings (B) are sanded away, all seams will be filled and the entire exhaust is sanded, with the exception of both end-muffers.
As an idea of what I'm going to do:
-various flanges and welds,
-clamps,
-flat control with wiring,
-2 Lambda sensors,
And what I'm going to pay most attention to: the weathering of all this so that it looks like it's had to work hard. With a heavy discoloration of the exhaust.
I will try to make pictures of the several steps.
Regards, Peter
The block is mostly finished:

Compared to the Anniversario model with the extra added items, I added some extra-extra tubes and wires. I found the manual from Autograph that released a very detailed set for the Duc. Only that set is quite expensive ......... about 2x the price of the Pocher kit.

Then I'm going to scratch build some things from that manual.
I'm going to apply it to the exhaust system:

Just like with the previous model (see insert), all screw holes (A) will be closed.
Then I take the part apart again and all thickenings (B) are sanded away, all seams will be filled and the entire exhaust is sanded, with the exception of both end-muffers.
As an idea of what I'm going to do:
-various flanges and welds,
-clamps,
-flat control with wiring,
-2 Lambda sensors,
And what I'm going to pay most attention to: the weathering of all this so that it looks like it's had to work hard. With a heavy discoloration of the exhaust.
I will try to make pictures of the several steps.
Regards, Peter


