-

Win a Free Custom Engraved Brass Coin!!!
As a way to introduce our brass coins to the community, we will raffle off a free coin during the month of August. Follow link ABOVE for instructions for entering.
-

PRE-ORDER SHIPS IN SCALE TODAY!
The beloved Ships in Scale Magazine is back and charting a new course for 2026!
Discover new skills, new techniques, and new inspirations in every issue.
NOTE THAT OUR FIRST ISSUE WILL BE JAN/FEB 2026
You are using an out of date browser. It may not display this or other websites correctly.
You should upgrade or use an alternative browser.
You should upgrade or use an alternative browser.
Quanzhou Ship - Chinese Junk 13th Century 1:54 by Schrader
- Thread starter Schrader
- Start date
- Watchers 11
-
- Tags
- chinese junk
- Joined
- Jul 22, 2017
- Messages
- 331
- Points
- 268

Hello Hellmuht,
I was thinking of your sails and the material used for them. In the photo on your post #21, it seems to be some sort of palm material. The only thing that crosses my mind that would be somewhat similar is carbon fiber cloth. You would have to do a little bit of research to see if it comes in the color needed for your sails. Here is a picture of what I found. I hope this helps.
Raymond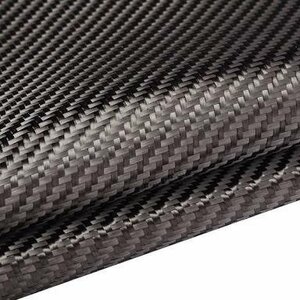

- Joined
- Jul 22, 2017
- Messages
- 331
- Points
- 268

Here is another sample and the site you can find it at.
https://www.jamestowndistributors.com/product/product-detail/4264
Raymond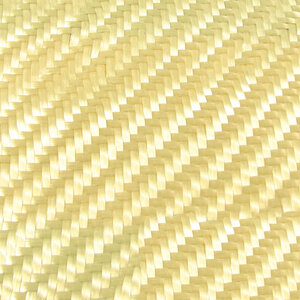
https://www.jamestowndistributors.com/product/product-detail/4264
Raymond

Good ideas
i was thinking paper. I’ll bring my idea once I have it already on the paper
i was thinking paper. I’ll bring my idea once I have it already on the paper
It looks quite good!!
Last edited:
With a slight weathering to get some irragularities in the color this material is looking like the original organic sail materialHere is another sample and the site you can find it at.
https://www.jamestowndistributors.com/product/product-detail/4264
Raymond View attachment 210762
I'll be keeping an eye on this thread! Super interesting!
- Joined
- Jul 22, 2017
- Messages
- 331
- Points
- 268

This material looks better and I can also imagine that it is much cheaper.This is paper made in a museum piece View attachment 210932
It is not mine of course. I haven’t come that far. It is Nick’s. I’ll try to do something similar
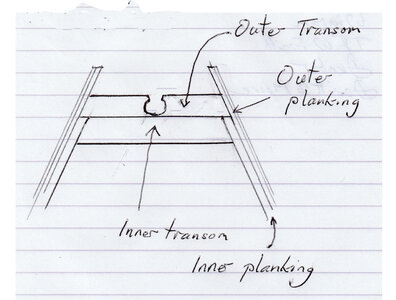
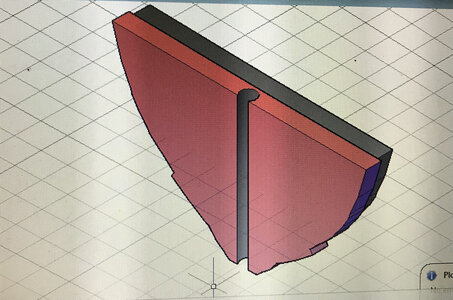
As you probably notice, these ships had transom either in bow as in stern. The stern one we already described, was used not just to increase capacity, also to received the back piece that was used as a “mechanism” to operate the rudder..... The internal layer, received also the first planks layer and the second (rudder mechanism) received the second planks layer.....
Well.... here some pictures in the “real life”....

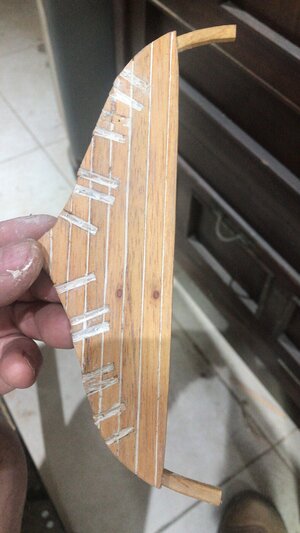
YESSS !!!! I have started the planking with all its difficulties.....
FIRST..... let’s remember that it need to build PLANKING FIRST FRAMES AFTER. This is pretty much the same that Vikings and Egyptians. Also let’s remember it has 2-3 planking layers

It is a “kind” of clinker with e very specific distribution. The first layer, is rabbeted as you can see. And let me tell you.... I did it.
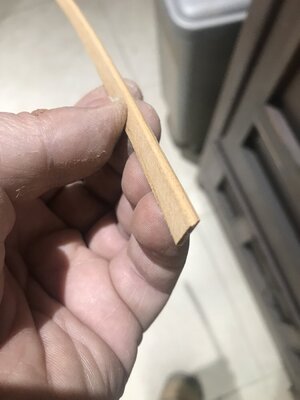
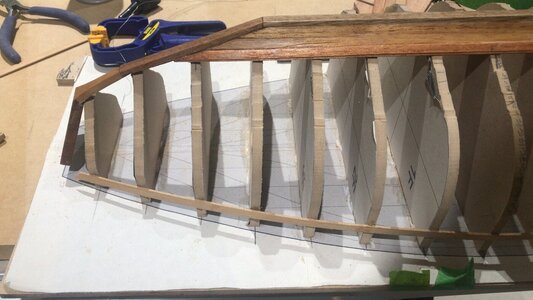
It really helps a lot to fix the planks.
Let’s try a little harder to see how the clinker looks like....
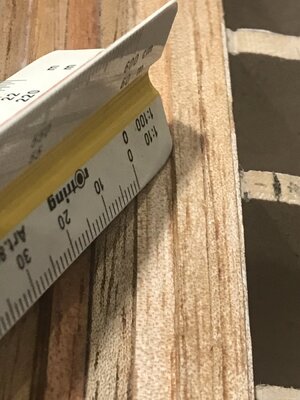
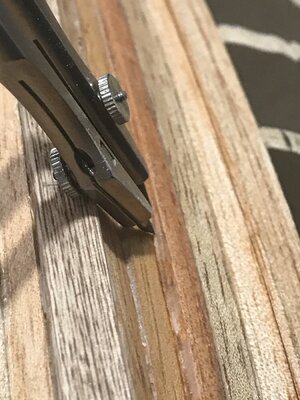
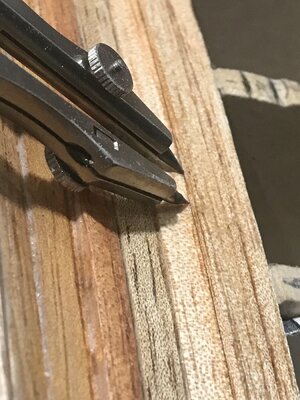
We will continue with the planking up to the bulkheads level.... Then we will install the “team” bulkhead-Frame” to complete afterward the planking. Do not forget this is just the first planking layer.
Before going to the second layer we will need to figure out how to proceed with the brackets....


Well.... here some pictures in the “real life”....

YESSS !!!! I have started the planking with all its difficulties.....
FIRST..... let’s remember that it need to build PLANKING FIRST FRAMES AFTER. This is pretty much the same that Vikings and Egyptians. Also let’s remember it has 2-3 planking layers

It is a “kind” of clinker with e very specific distribution. The first layer, is rabbeted as you can see. And let me tell you.... I did it.


It really helps a lot to fix the planks.
Let’s try a little harder to see how the clinker looks like....


We will continue with the planking up to the bulkheads level.... Then we will install the “team” bulkhead-Frame” to complete afterward the planking. Do not forget this is just the first planking layer.
Before going to the second layer we will need to figure out how to proceed with the brackets....
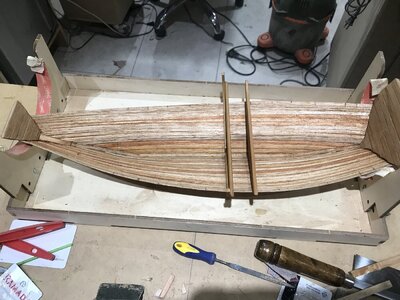
Here we go again. Plank # 14 in place
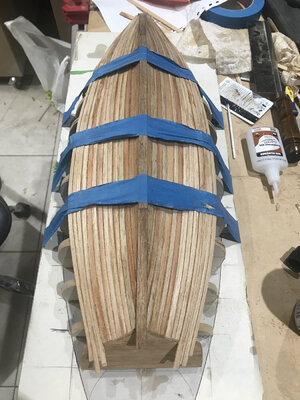
I’m going to take the hull out of the mold.......
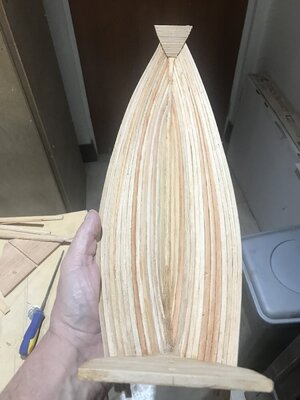
looks OK!!!!! The planks definitely were trying to come back.... but I think it is good enough to sand it and moving on....
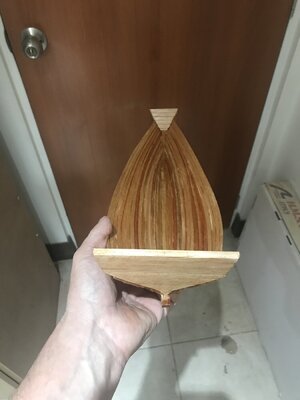
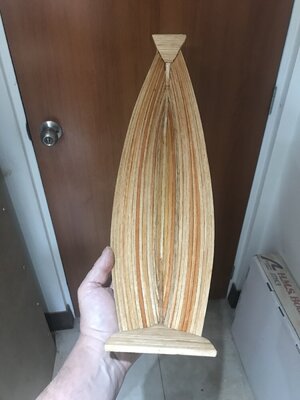
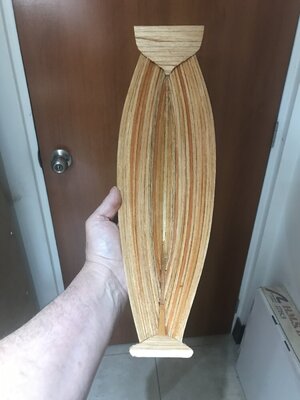
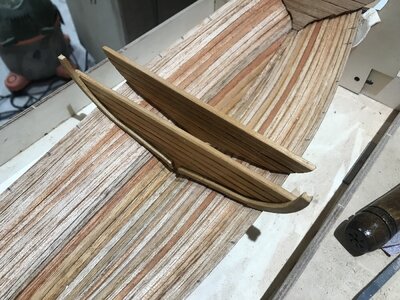
It is time to try one plank-bulkhead......
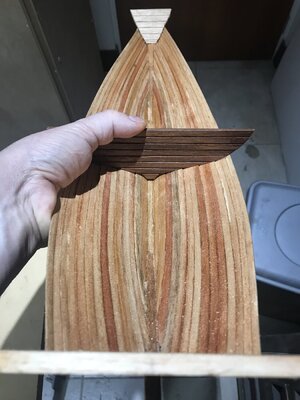
here we go!!! It looks good for me..... Next step..... 11 more bulkheads with their frames and brackets

I’m going to take the hull out of the mold.......

looks OK!!!!! The planks definitely were trying to come back.... but I think it is good enough to sand it and moving on....


It is time to try one plank-bulkhead......

here we go!!! It looks good for me..... Next step..... 11 more bulkheads with their frames and brackets

Attachments
Attachments
Now it is time to start to deal with the brackets
Let’s read what Nick says in his document.....
“Ju-nails or Gua-ju (iron cramps)
The main planking is fastened to the bulkheads by L-shaped metal brackets gua-ju or ju-nails (Xu Yingfan, 1985 and Li Guo-Qing, 1989). The brackets are recessed into the bulkheads, and the feet of the brackets are recessed into the outer face of the main planking according to Museum of Overseas Communication History, (1987: 20). The brackets vary in length from about 400 mm to 550 mm and they are all about 60 mm wide. They seem to have been not more than about 7 mm thickness, but given the entirely oxidised condition of the remains of the brackets this can only be determined from the width of the slits where they passed through the planking. Most brackets are aligned within about 7–8 ̊ of normal (90 ̊) to the plank that they fasten, when viewed in transverse section; but a few are as much as 10 ̊ from normal. This suggests that the ends were bent over in situ, since if they were pre-bent all brackets could be expected to be bent at the same angle (about 90 ̊) and to lie more or less precisely normal. Like the pattern of plank butts, the positioning of the brackets is symmetrical port and starboard (except for an extra bracket in strake ten at bulkhead eight on the starboard side). The positioning of the brackets is tabulated in figure Y. The strakes immediately below the clinker steps (strakes 5, 8 & 11) have only one or two brackets connecting them to the bulkheads throughout their length. Whereas the strakes immediately above the steps (strakes 6 & 9: too little remains of strake 12 and the bulkheads at the height of strake 12 to constitute a useful sample) have the greatest number of brackets—thus these strakes clamp in place those immediately below them.
The slits where the brackets pass through the planking show that the brackets were only about 5–7 mm in thickness, but in a few cases they were recessed as much as 12 mm into the bulkhead because the slits were not always perfectly positioned in relation to the face of the bulkhead with which they were required to align. This suggests possibilities about the construction sequence. The slits could have been cut before the bulkheads were fitted since the bulkhead positions were predetermined to align with the plank butts.”
Regarding their distribution, there is mentioned above the figure Y
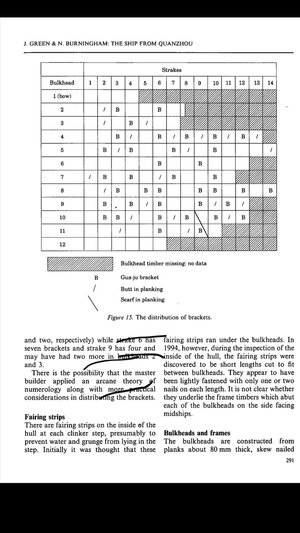
And this is the way I decided to move forward.
First decision was going with metal brackets and the second was trying to the bulkheads with no glue, just using the “real” method the Chinese people suppose to build it.
The Bulkhead number 6 has 4 Brackets in strakes 6 and 9 in each side
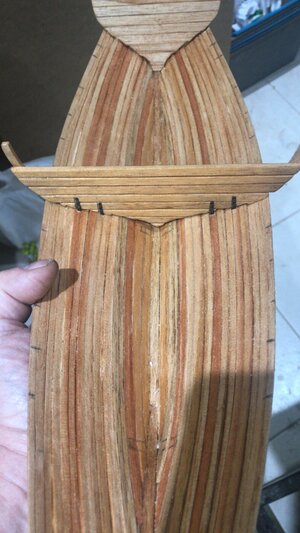
The bulkhead number 7 has 4 brackets in strakes 2, 4 , 7 and 10 in each side
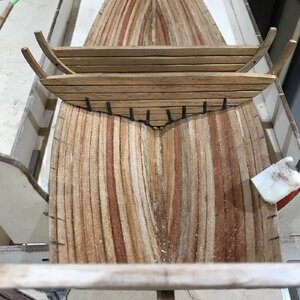
They have no glue!!!!!
Let see a couple of pictures......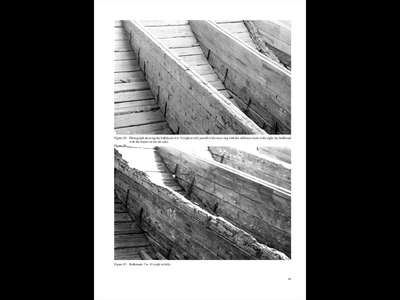
Note the little hole in the bulkhead above the keel...... this is to allow the water flow. We will see also that this particular ship had a
Lime putty, wash or plaster
Everywhere on the hull, inside and out, there is the remains of a layer of lime. The use of this lime is discussed in some detail by Li Guo-Qing (1989). It is in all the seams, behind the brackets, between the layers of planking, and it plugs the tops of holes for fastenings. It is only the lime plugs that show the position of nails used to fasten timbers such as the half frames and the knees at the scarfs in the keel; and it is possible to trace the original outline of the degraded half frames because of the thick line of lime that collected between the upper face of the frame and the face of the bulkhead. Probably the lime in the seams and in the fastening holes, and perhaps that between the layers of planking, was applied as a lime putty, as it is today in the traditional boat and shipbuilding of the region. The oil used to make the putty is tung (t’ung) oil extracted from the nut of the t’ung oil tree (Aleurites fordii [Li Guo-Qing 1989: 279]) In the Song Dynasty, Quanzhou was known as Ci Tong or ‘Tung Harbour’ because of the many tung oil trees in the region (Pers, com. Wu Chunming)
So.... it is time to think about it....
Let’s read what Nick says in his document.....
“Ju-nails or Gua-ju (iron cramps)
The main planking is fastened to the bulkheads by L-shaped metal brackets gua-ju or ju-nails (Xu Yingfan, 1985 and Li Guo-Qing, 1989). The brackets are recessed into the bulkheads, and the feet of the brackets are recessed into the outer face of the main planking according to Museum of Overseas Communication History, (1987: 20). The brackets vary in length from about 400 mm to 550 mm and they are all about 60 mm wide. They seem to have been not more than about 7 mm thickness, but given the entirely oxidised condition of the remains of the brackets this can only be determined from the width of the slits where they passed through the planking. Most brackets are aligned within about 7–8 ̊ of normal (90 ̊) to the plank that they fasten, when viewed in transverse section; but a few are as much as 10 ̊ from normal. This suggests that the ends were bent over in situ, since if they were pre-bent all brackets could be expected to be bent at the same angle (about 90 ̊) and to lie more or less precisely normal. Like the pattern of plank butts, the positioning of the brackets is symmetrical port and starboard (except for an extra bracket in strake ten at bulkhead eight on the starboard side). The positioning of the brackets is tabulated in figure Y. The strakes immediately below the clinker steps (strakes 5, 8 & 11) have only one or two brackets connecting them to the bulkheads throughout their length. Whereas the strakes immediately above the steps (strakes 6 & 9: too little remains of strake 12 and the bulkheads at the height of strake 12 to constitute a useful sample) have the greatest number of brackets—thus these strakes clamp in place those immediately below them.
The slits where the brackets pass through the planking show that the brackets were only about 5–7 mm in thickness, but in a few cases they were recessed as much as 12 mm into the bulkhead because the slits were not always perfectly positioned in relation to the face of the bulkhead with which they were required to align. This suggests possibilities about the construction sequence. The slits could have been cut before the bulkheads were fitted since the bulkhead positions were predetermined to align with the plank butts.”
Regarding their distribution, there is mentioned above the figure Y

And this is the way I decided to move forward.
First decision was going with metal brackets and the second was trying to the bulkheads with no glue, just using the “real” method the Chinese people suppose to build it.
The Bulkhead number 6 has 4 Brackets in strakes 6 and 9 in each side

The bulkhead number 7 has 4 brackets in strakes 2, 4 , 7 and 10 in each side

They have no glue!!!!!
Let see a couple of pictures......

Note the little hole in the bulkhead above the keel...... this is to allow the water flow. We will see also that this particular ship had a
Lime putty, wash or plaster
Everywhere on the hull, inside and out, there is the remains of a layer of lime. The use of this lime is discussed in some detail by Li Guo-Qing (1989). It is in all the seams, behind the brackets, between the layers of planking, and it plugs the tops of holes for fastenings. It is only the lime plugs that show the position of nails used to fasten timbers such as the half frames and the knees at the scarfs in the keel; and it is possible to trace the original outline of the degraded half frames because of the thick line of lime that collected between the upper face of the frame and the face of the bulkhead. Probably the lime in the seams and in the fastening holes, and perhaps that between the layers of planking, was applied as a lime putty, as it is today in the traditional boat and shipbuilding of the region. The oil used to make the putty is tung (t’ung) oil extracted from the nut of the t’ung oil tree (Aleurites fordii [Li Guo-Qing 1989: 279]) In the Song Dynasty, Quanzhou was known as Ci Tong or ‘Tung Harbour’ because of the many tung oil trees in the region (Pers, com. Wu Chunming)
So.... it is time to think about it....
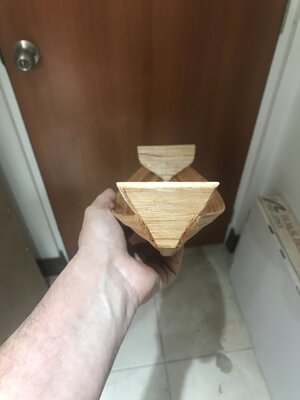
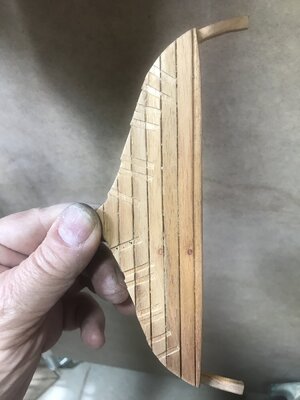
Ok...... I was not happy at all. First..... The brackets should be 90 degrees to the planks.... second.... the bulkheads were not fitting well to the hull..... the half frames were not accurate ....So... as I am custom to...... I started again
Before....
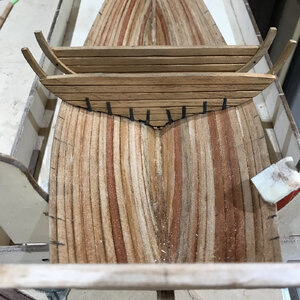
After.....
The lime putty......
I made “some” analysis....... according with the document above, the lime putty was everywhere and in abundance. The organic material present in the putty was so low.... so the main raw material was lime. In some books talk about sea shells crashed.
Conclusion..... the lime putty must be white mostly.....
I decided to use POLYMER CLAY!!!! and let’s see the result...
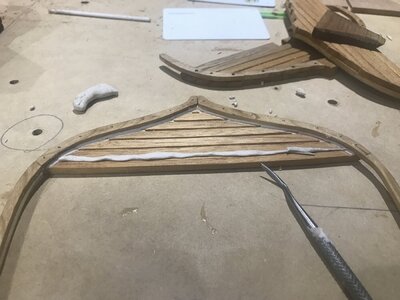
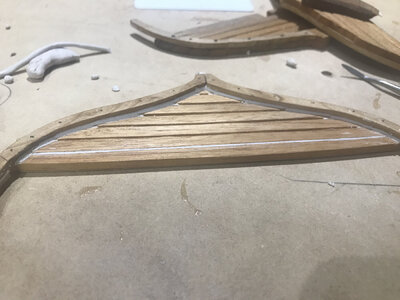
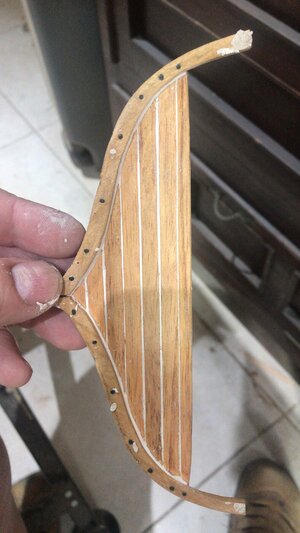
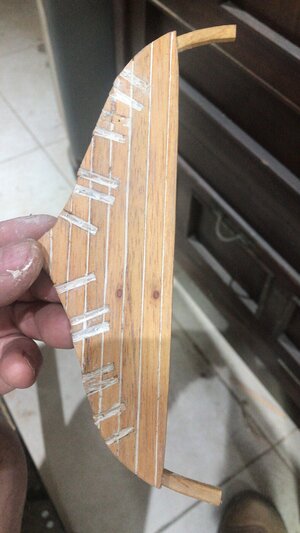
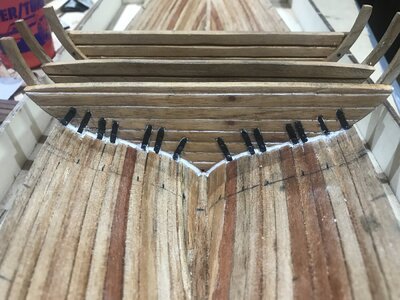
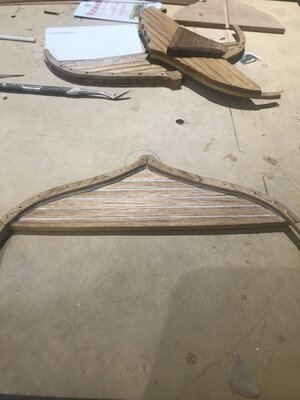
According with the findings, the brackets should be blended in the first planking layer.....
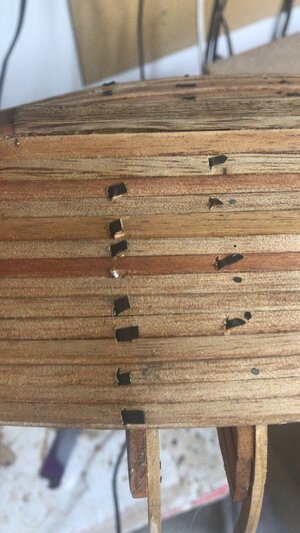
And the nails that fix them to the bulkheads should be bended as well
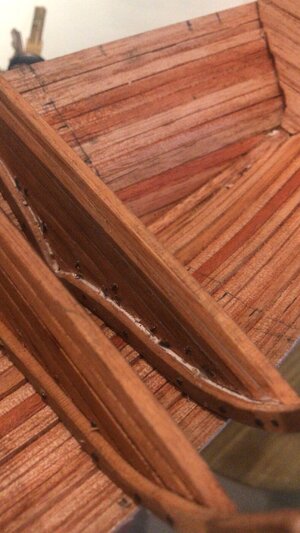
It is interesting to say that to fix the bulkheads to the hull not glue so far. just brackets and nails to the half frames
Before....

After.....

The lime putty......
I made “some” analysis....... according with the document above, the lime putty was everywhere and in abundance. The organic material present in the putty was so low.... so the main raw material was lime. In some books talk about sea shells crashed.
Conclusion..... the lime putty must be white mostly.....
I decided to use POLYMER CLAY!!!! and let’s see the result...


According with the findings, the brackets should be blended in the first planking layer.....

And the nails that fix them to the bulkheads should be bended as well

It is interesting to say that to fix the bulkheads to the hull not glue so far. just brackets and nails to the half frames
Attachments
Next step.... the mast footstep.....
Fists I had to replace the bulkhead number 6.... this is the equivalent to the master frame. And start to investigate how the masts system were by then.
Definitely the system was a TABERNACLE which means that they were able to lower it with a pivot-pin.... like this
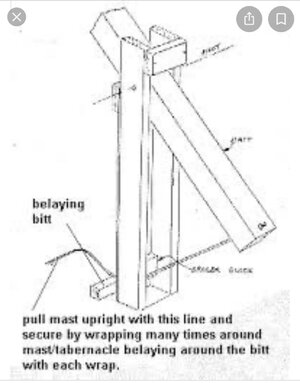
but according with the findings the Quanzhou did not have neither the belaying bit nor the pull rope so..... should be like this...

Let’s see one picture....
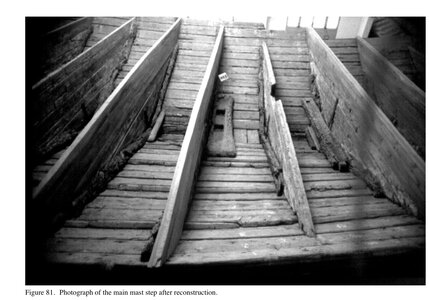
In this one, we can see the main mast step and the “hole” in the last timber in bulkhead 5. This allowed the mast to rotate... and with this information I went to a very simple system in the bulkhead 6
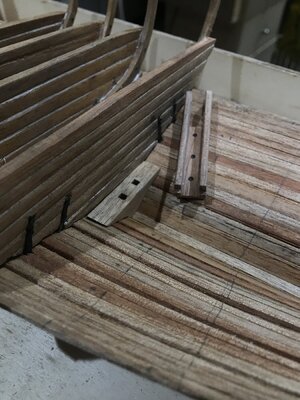
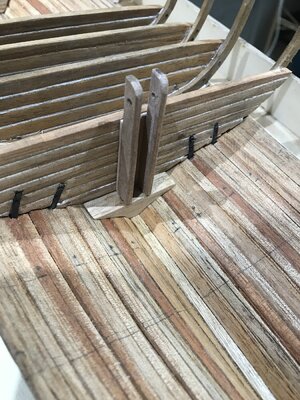
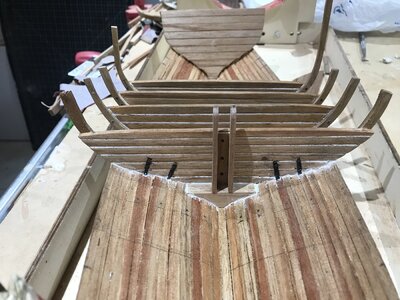
Ready to go with bulkhead 5......
Fists I had to replace the bulkhead number 6.... this is the equivalent to the master frame. And start to investigate how the masts system were by then.
Definitely the system was a TABERNACLE which means that they were able to lower it with a pivot-pin.... like this

but according with the findings the Quanzhou did not have neither the belaying bit nor the pull rope so..... should be like this...

Let’s see one picture....

In this one, we can see the main mast step and the “hole” in the last timber in bulkhead 5. This allowed the mast to rotate... and with this information I went to a very simple system in the bulkhead 6


Ready to go with bulkhead 5......
Don’ even think I abandoned my project!!!!!.... Thanks to you all for “pushing me” to the excellence. Since you are following this project, I’ll always do my best to fulfill your expectations and of course mines too.
It is been a real challenge moving forward with the bulkheads...... so far 9..
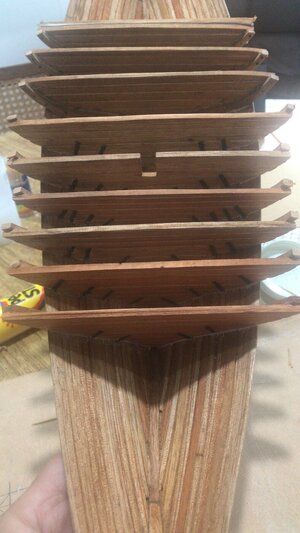
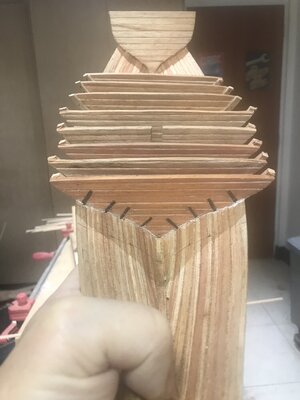
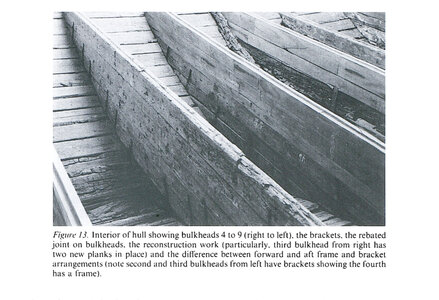
Here you can see the brackets distribution..... as any western ship, the frames are “looking” to the main frame. In this case, bulkhead # 6 that is the same one that is carrying the main mast step.
It is been a real challenge moving forward with the bulkheads...... so far 9..


Here you can see the brackets distribution..... as any western ship, the frames are “looking” to the main frame. In this case, bulkhead # 6 that is the same one that is carrying the main mast step.
At the same time, I’ve been doing my research about some fittings........
Sails......
The junks sailing is as most of you already know, something that make a junk a real junk . You can see a lot of different styles..... some examples
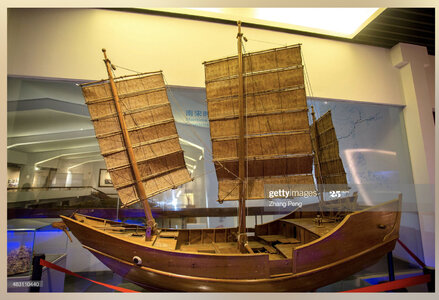
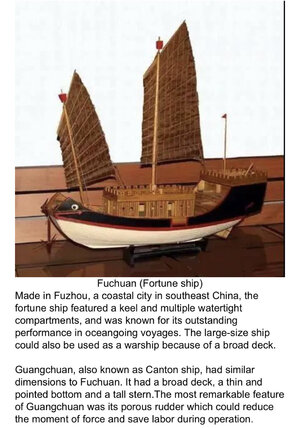
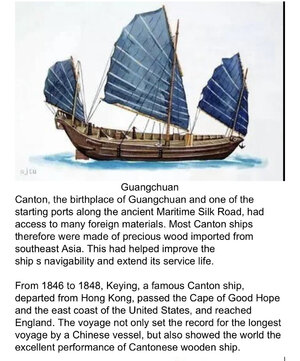
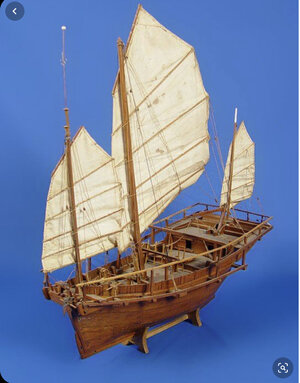
Most of you. (Included me) would think that there will be no difference about whatever I choose......
BAD NEWS !!!!
NONE OF THESE ARE CORRECT!!!
Let’s try to explain it.....
Sails......
The junks sailing is as most of you already know, something that make a junk a real junk . You can see a lot of different styles..... some examples


Most of you. (Included me) would think that there will be no difference about whatever I choose......
BAD NEWS !!!!
NONE OF THESE ARE CORRECT!!!
Let’s try to explain it.....
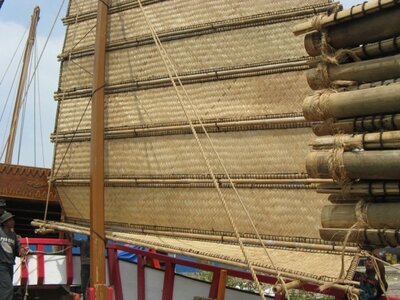
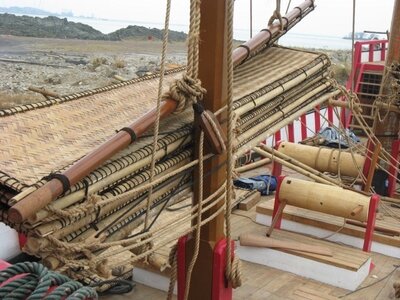
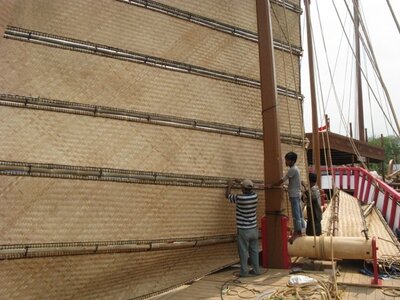
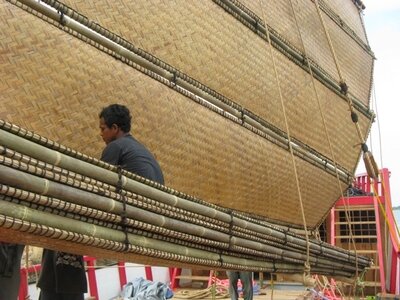
- The sails by this era according with the archeologists suppose to be built in “ panels.... like this
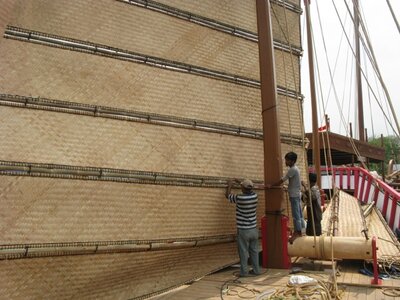
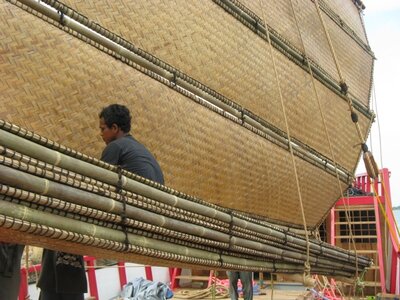
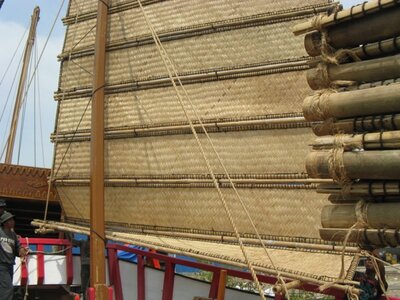 This one is a replica that Nick made. The wicker looks really good, the bamboo “hinges” really interesting
 - This particular wicker does not represents the region where the Quanzhou is from. No one can be sure about how the sails were done, however a piece of triaxial bamboo laths was found at the Quanzhou site..... this picture shows what I’m talking about....
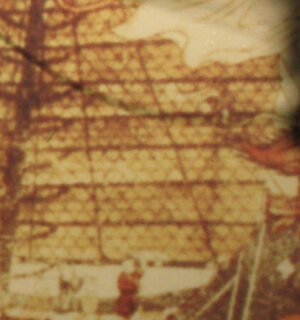
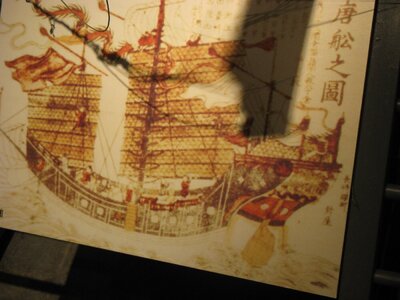 And this one from a model
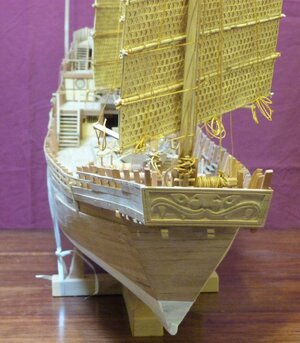
- SQUARE SAILS...... When I first heard about this term..... I thought about “form”. What a surprise!!!! Nothing more far from the real definition... Nick sent me some pictures to explain what this “term” is all about
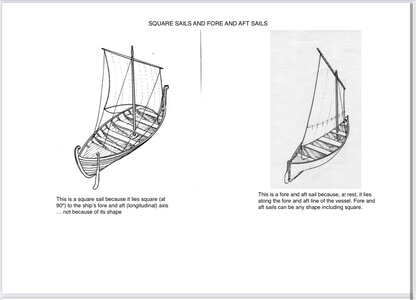
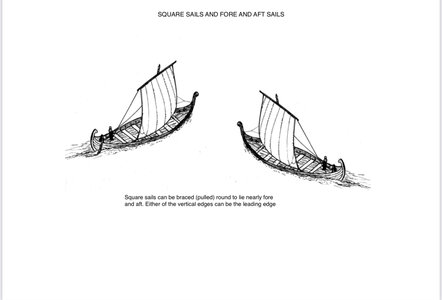
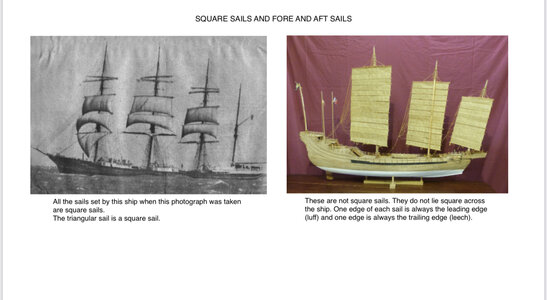
Something new at least for me!!!!
With these three considerations I decided to attack this task..... so many attempts
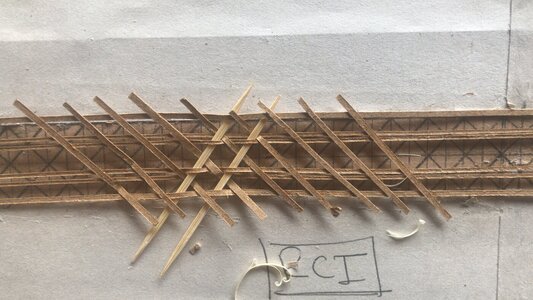
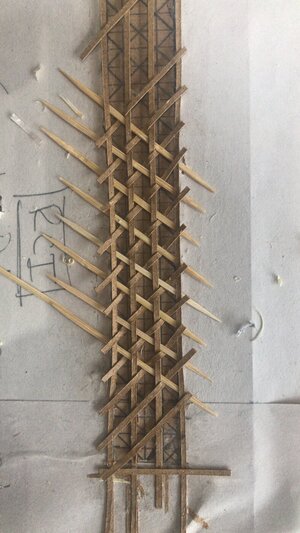
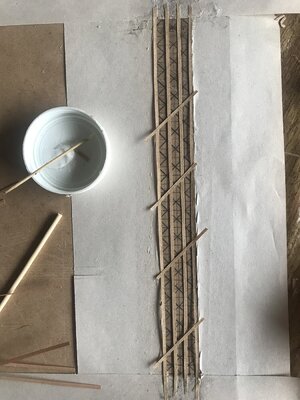
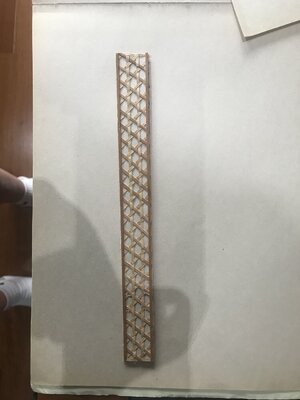
Not happy at all. There were like 6 different attempts.
According with the different documentation the real thing should be done with thin laths of split bamboo just 1 or 2 mm thickness and perhaps 20 mm wide. In this scale that would be really difficult to get. So I decided to go just with thick paper and 1 mm wide.... and this is the result....
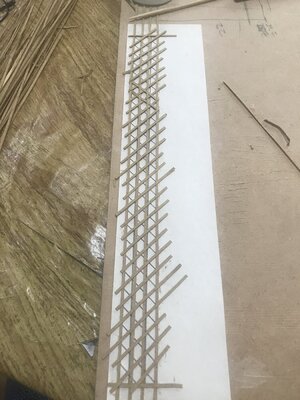
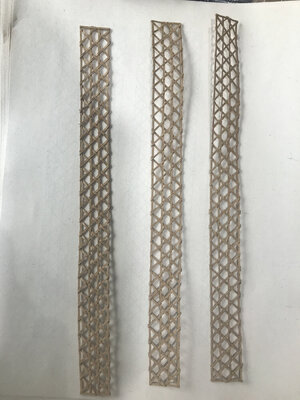
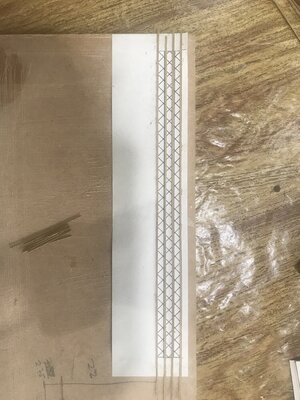
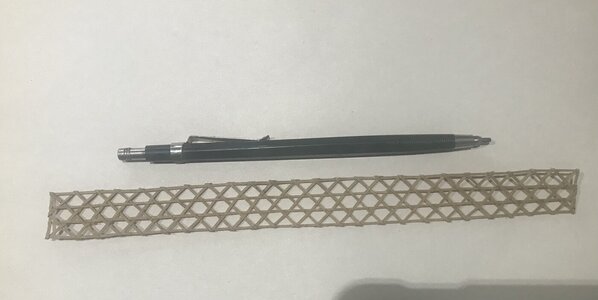
We have to make probably 50+ of these elements. The come double as a sandwich and in the middle..... probably bamboo sheaths!!!! Those sails were really heavy. Not practical and tough to handle. There are stories where the Malay junks had to partly lower the sails when there was hard rain because the rainwater added to the wight of the sails.
MORE INVESTIGATION IS COMING!!!
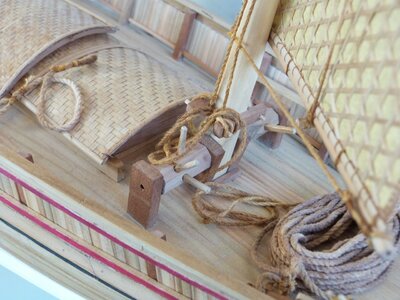
Some other fittings I am working on are the “tents” that I’ll put on the deck. According with some photos.....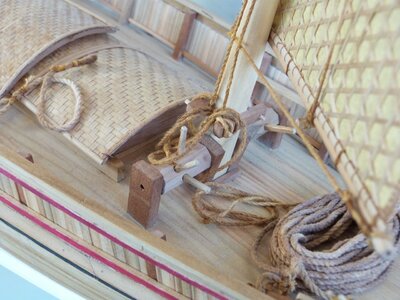
Looks that these elements are built with some kind of wicker..... also according with Nick in this particularly zone of China this wicker has the pattern that the picture has.
Instead of “plane weave”....
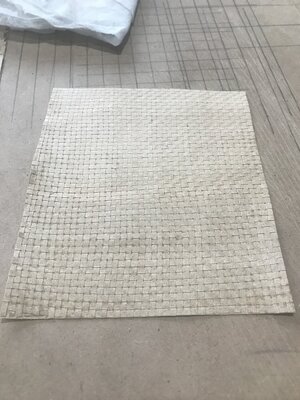
Should be “twill wave”......
I just found some “old style” envelopes cut the 2 mm strips and ...... this is the result.......
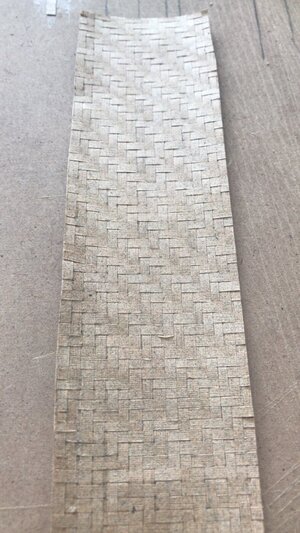
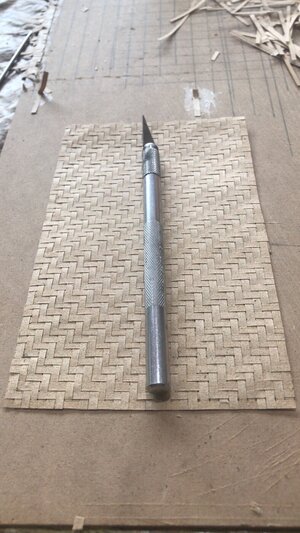
Making progress!!!!

Looks that these elements are built with some kind of wicker..... also according with Nick in this particularly zone of China this wicker has the pattern that the picture has.
Instead of “plane weave”....

Should be “twill wave”......
I just found some “old style” envelopes cut the 2 mm strips and ...... this is the result.......


Making progress!!!!
Looking very good and realistical - and I guess it was a lot of work to make this "canvas"

