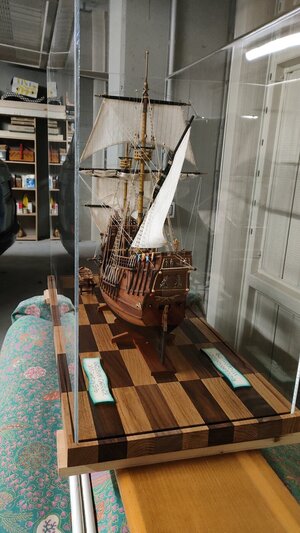
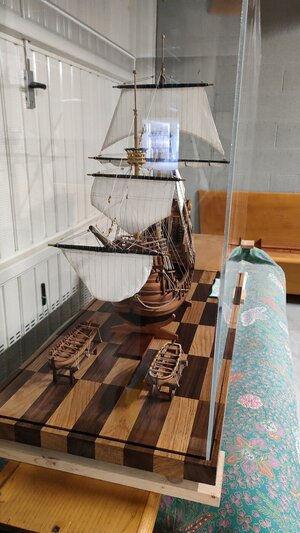
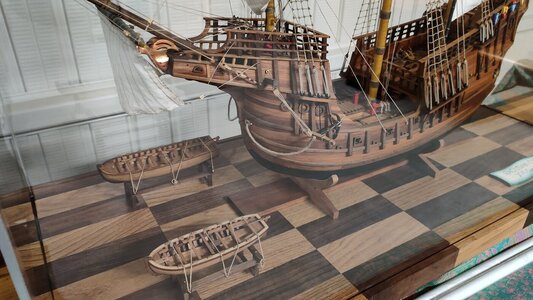
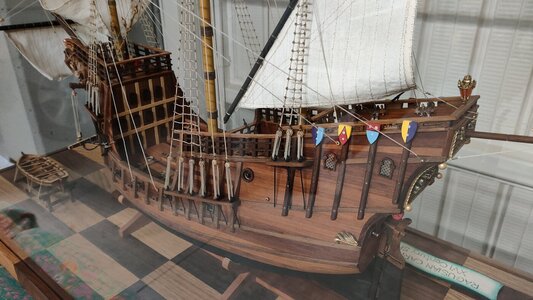
Ragusian Carrack by jack.aubrey - Marisstella - 1:59 scale [COMPLETED BUILD]

Friday, August 12, 2022

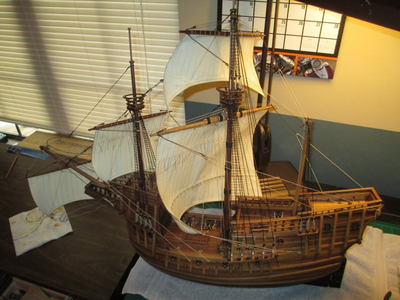
Yesterday I practically finished to install the yards, the sails and their running rigging.
At this point the model is very close to be finished.
In fact I'm missing few (however important) details to be able to officially declare that I have finished this model:

1) install the flags,
2) four falconets (pivoting cannons) still missing at poop and midship,
3) on the pinrailss I need to place some curls of rope to complete the aesthetic part of the rigggings,
4) the plexiglass cover; this detail will be performed by a specialist and I will almost certainly have to wait until the end of the vacation period to get it done.

01 Ragusian Carrack/12082022/IMG20220811184452.jpg
y4mT9i4AXSLp8lQ13AW2jHw13kNCcOkmFTX4SQ1YQoizpO4Sg7IXnbOorRyWEZTu1-y9iY_oLr1LuMJOPCXKCxhRAlgZ_wZjUukq6CtYC40rnqAK1rhTy2CLbhAnqEIv9WLRd5Ay5xCa_kkmDpv3O1buM1WG_OZ5cEB2PtGF58oAbudRfhtjqA8gTaTdCY8M2at


02 Ragusian Carrack/12082022/IMG20220811184527.jpg
y4mGZoWn9lnh7eOBX-Wgu60GzwvKjC0c11ow8JZhADFhlxORVwinjcQM7BCkJfWQjJQCfCxlE-NGLuCVGqqI3vGBsvV0wFeuPaFK56MnINTyHpOuhFRHeF6WjlyaAcP8J5KnQEqlE0GzJ04Ws--UhLCA-wiUzRUWZYV7httqCbiobtEwGwH3OA9wz8ED7DmtWLM


03 Ragusian Carrack/12082022/IMG20220811184534.jpg
y4msZsNuW92U31qapG_SCttQ8pM46faL3wOepxld62uw0svuWiGbmnzHGmJ7P97NvS_Lu7OOxypDQm-qvfZacSe3-y4H9MHoPTcye3gkxfTLqxofGX5JsF2MgHm5Bj2duxaY6fCK5_90xgHEf0YN5SoJEfM_10HhIF-tm0aUy9Mj-Bxzm7bS9O5O0CcVejxgFAr


That's all for today
Cheers . . . see you soon
Jack Aubrey
 
Great work Jack. I love the sails, and having the mainsail furled is a great way of including the detail yet allowing additional detail to be seen.

<jealous>Your work area is SO much neater than mine.</jealous>
 
Martedì 16 Agosto 2022

A review of details that I have been working on the whole today afternoon . . .

01 Ragusian Carrack/16082022/XX.jpg
y4meyunwDe6DHK9QIBcfh0mRUcDIqBVNo4T0phj8x32zsG-CGfi2SgCiMXx6V-4kuXBxE5NnO5Wi6A709ckpNJfmysjFfJVW2KisCkbl3TMwzzuBUehoL6tTRw5f1SGpnyBn7r7KqvoxOi5CBHAmHcDxXr-LT3_AokuquuMu2y2ougxugnAZUf6A5UFuUj5vQL7


02 Ragusian Carrack/16082022/XX.jpg
y4moCyPPRMEjxdesYTSevLfjUwOmvh-DaJVgQG3h4Vrf7XC97-AimbmJxtvO9J7Hu2HTwvlmD8ymKhyqsqbcTd3XAbyjtc_9B9YuJGy3gMGHwJR_JdESg22CeMxqan7d0vyNEZUt6q2kQE4_K8_C5Xm3AGc3PMRS4AYxEX3k24jiUgvm9AcJVXpImql3WWIkXxv


03 Ragusian Carrack/16082022/XX.jpg
y4mp0Wy62qJ6-urs_97NlKGiFZZAwbMsWSLK4igPqD1EZGxe4zBOwSjaiLQfdHdGt-2jYX283N3750iOvAJuSAqxVYE7oCuqlG9ozOMAxEpPwPZZ5kM2AhtQyyjx5WMeCA_IlEeLmGzkj26vQadco0fuO8MO5ed6_JxZBsXGck1EctNGfE2DOfRyusB3TZ3Jkqd


04 Ragusian Carrack/16082022/XX.jpg
y4mC16VeWP3xKDVj0Vb1XTxakVvsh9a3PC972LCXT8D7igjx5rlJzaRv2SdPIi4XWXnVv8wiP3Ds3gK7EzYSR8CEiWVa7znMQtTAnaHiKKJoUG8W-n4tqczwp3-DfWPK19osWl3n6GKYbvUgJvBg5DOWP-3tDABNG2kf1SsOj2cxxK2IjoJsAsKp3kAml6kx68I


05 Ragusian Carrack/16082022/XX.jpg
y4mfabbosGhn4CwkxpDd-8PGi4wKYemP159OBWbRDSdqRtMVsQe9eo7A8BwP4sphsCeZF2hg9UMxMM0s5ZWP-WDhiMhXIXpOfAJIIRINWoGtu7_rLlDbOMSr38HpSM9-K6JTvMxwyJdwJxMfDXT-RLs22Y67AwZR0YWbEmP6qF5C-VIoFacOjMci2a56uNBxQB9


06 Ragusian Carrack/16082022/XX.jpg
y4mV0B9ykIjyg9zAoiPvD8sozrsnWXW5kCEfFQ1vSZKYQl_z_kWjAnDaZ9IOPhqYmqpR7c1S5i10zFYDAPPXipEdfRKv_3c1v9aWw2nOTdZFs1xmpfxf56PLE1xg7GgYBF0_ByWDIOXOroOEwH6LiHlusvQPZnm1PaDET_DKG7jFaOUiquC_GUhSLtRyZFHhWs3


07 Ragusian Carrack/16082022/XX.jpg
y4mpfH0HjySOEBhIYrgmTif7oB2mqwbLUw8x5-LkHJMqJNQX58nVJdo-CogAaFxellNP4ea0M8Q2BZLg5iDoheHwTJv52hkUWnlwBtq5qxXbSiiw7GEu2EQ9fNgKhN_P-OHCImshCxbvKJQR59z-wg7HNx3GdA4AzpSFLbbjOfIVdnpbFWP8QhvZ4PYJg3TB9Xu


08 Ragusian Carrack/16082022/XX.jpg
y4mJ7FxgkbYhFUqL3n6sWa3wvZsoEf-i_4FACCnvdejDd2AMNFO_Xn6ehzRQ14LfHXJ84_L2OcwnHHI3z2OabgOaCm5nLsNuXKm9efNBhkqEMps5VGZ2eKU-eoL_kInx7q2a4asD6ojwD5x04XDALQyxxlV0uq3o5QMSOyPlWX8098rkLsvkOqxFD_DkCpFzI1D


09 Ragusian Carrack/16082022/XX.jpg
y4mpaVYIorzK6N2kaRUy_lSPalTOHwifqnUS8eEpVNFMjXBxGlN_JPPk3JcR8IABMESiRUK1TCn26s_HZypL4bCZ7WKvcPBnI7BbKXQF97M5pfkHqZNpoLh1TE2_P_BCYHeGhfLseaMNNHue8Hg0KDtCr1D6eeARsJZ3xq7tFZJhUWgm0hTRyMwwG4uAABXZVaF


See you soon, even if it's very close now, as far as I am concerned, to finish.
Jack Aubrey
 
Great work, Jack! Say, it doesn't show on your model because the mainsail is furled, but can you or anyone tell me why the mainsail is made in two pieces like shown on this model by greatgalleons at MSW:
1660843401486.png
1660843524802.png
This is not a seam, but rather a lower sail extension roped to the upper part of the mainsail. Shown very clearly on the kit drawings.

I was just curious about this feature, because it would obviously be easier to just make the sail larger in the first place, so maybe this is removable/replaceable?
 
Wednesday, October 25, 2017

The day was promising since the early hours of the morning. . maybe a little cold at the beginning but then it's so fine that . .

01 Ragusian Carrack/25102017/20171025_073245_HDR-PANO.jpg
y4mBTuWKxYN-8CIjtd6_jm6RgaPqPZLxG39J8VFc


In the afternoon I decided to start building the mounting slip for this model. May seem strange but making these things is for me a great fun, and even this time I felt the same feelings.

My feline assistant also agreed with me that it seems very good and that should do his job properly.

02 Ragusian Carrack/25102017/20171025_172802.jpg
y4mu4zOGJmV31UrizT5FcZ863uegCHexHh2zAu8k

03 Ragusian Carrack/25102017/20171025_172856.jpg
y4mEEuKMIXjjtrFHEF4T2lxFcS7xYwAV4m6Effq3

04 Ragusian Carrack/25102017/20171025_172811.jpg
y4m-OLAupdiXhpcsCx8Fk9rK539gNrTnsdU6wZ6y

05 Ragusian Carrack/25102017/20171025_172835.jpg
y4msJ2AsBwrdWPnUF44wgJCE0kx6ffBGaFkTFwOI


Finally, the keel I assembled a few days ago is in the proper position to install the other hull elements.

06 Ragusian Carrack/25102017/20171025_173014.jpg
y4mnIocMz3EAhWM8JxHZnuOL1kDJIWfJIkRLFeZs


Cheers, Jack.Aubrey
Very nice keel jig. It looks like the one I made for my Maristella Cog.
 
Great work, Jack! Say, it doesn't show on your model because the mainsail is furled, but can you or anyone tell me why the mainsail is made in two pieces like shown on this model by greatgalleons at MSW:
View attachment 324195
View attachment 324196
This is not a seam, but rather a lower sail extension roped to the upper part of the mainsail. Shown very clearly on the kit drawings.

I was just curious about this feature, because it would obviously be easier to just make the sail larger in the first place, so maybe this is removable/replaceable?
I think I found the answer (which those here probably already know): the instructions call this a bonnet, and a web search indicates that indeed this is a piece of sail that can be added to increase pulling power. Looks like it can add a lot of detail to the sail (not all shown, I think, in the pictures above).
 
I've found these definitions on some contemporary publications (falconer, etc) about this sail extension.

Bonnet: an additional part laced to the bottom of the main sail and foresail for some small vessels, in moderate winds.

Bonnet. (1) A strip of extra canvas laced to the foot of a fore-and-aft sail when it is desired to present a greater area of sail to
the wind. (2) The name of a cap fixed to the opening on deck, down which the anchor cable disappears, its purpose being to prevent as much water as possible from entering the ship.

Bonnet: An additional part laced to the foot of the jibs, or other fore-and-aft sails, in small vessels in moderate wheater, to gather more wind..
They are commonly one-third of the depth of the sails they belong to. Thus they say, "lace on the bonnet", or "shake off the bonnet".
Bonnet have lately been introduced to secure the foot of an upper-topsail to a lower-topsail yard. The unbonneted sail is for storm service.
 
Tuesday 7 November 2017

I've terminated the assembly of the hull frames !!


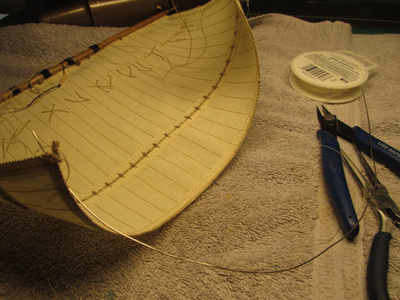
Aside from the time it took to fit everything in accordance with the written instructions, I had, for my choice, to do additional tasks to reinforce the whole assembly.
Infact, in spite of the presence of some 14mm walnut rods that strengthen the lower part of the frames, I felt more appropriate to add further reinforcements to the upper part of the bulkheads.

This area was too fragile for my thinking . . . then I worked out with "ad hoc" plywood pieces and wood strips to strenghten it.
After this activity I feel more confident about the rigidity of this "building". .

I want now add that I have not yet finished with this task, for example I still have to reinforce the top of the fourth, fifth and sixth bulkheads starting from the stern.
Before anyone notices me, I inform you that the seventh bulkhead from the stern is not perfectly vertically mounted . . I must inadvertently shift it while it was not yet perfectly dry without I noticed it.
However, there are no visible negative effects, so this is an error without any significant consequence.

And now I attach here below the first five images of the work done.

01 Ragusian Carrack/07112017/20171107_132728.jpg
y4mRH5hE2RRZZogksONRXeCqQyafJ0fa2_TeIpPF

02 Ragusian Carrack/07112017/20171107_132806.jpg
y4mHyJnX2Xf8t_Vmr-EuwAixR5uMdeUfNBns3r_y

03 Ragusian Carrack/07112017/20171107_132836.jpg
y4ma-Kr_xTdBY1gW-DgKq7Dw1NO-wB4JYqvpbpc7

04 Ragusian Carrack/07112017/20171107_132849.jpg
y4mH_4I0hz3w1eO-k4pkgKPrIJV2zz_kOMFcbq-5

05 Ragusian Carrack/07112017/20171107_132857.jpg
y4mkoWVK-NyFH7VxHFkeuLJIxgbqMXautMjPjhIH


To be continued . . see you soon, Jack.
Good day could you tell me what lines drawn on the bulk heads are for and where the dimensions for them come from. I am just starting to build this ship. Thank you
 
Good day could you tell me what lines drawn on the bulk heads are for and where the dimensions for them come from. I am just starting to build this ship. Thank you
Not to answer for Jack, but I've started this build too, and it looks to me like lines oriented with each bulkhead, to which Jack made a jig to hold each bulkhead square and vertical while positioning and gluing. My build is posted here. Have you begun a build log? If not, it would be helpful to us all if you did.
 
Good day could you tell me what lines drawn on the bulk heads are for and where the dimensions for them come from. I am just starting to build this ship. Thank you
My answer was anticipated by Signet . . .
He refers to the post I published on Monday 30 October 2017 where I introduce the Jig and I explain its usage.
Regards, Jack.
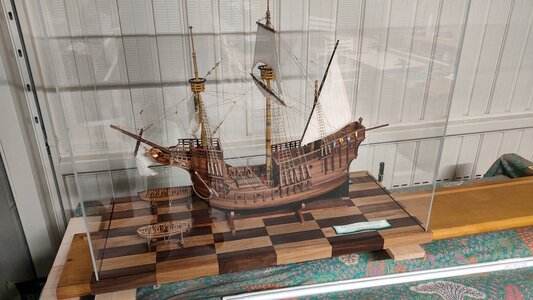
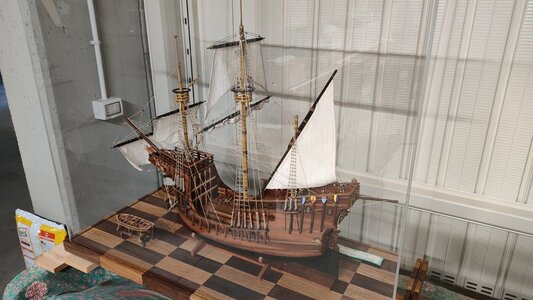
I take the occasion to show the whole model under its display case . . .
IMG20230114125033.jpgIMG20230114125045.jpgIMG20230114125103.jpgIMG20230114125113.jpg

IMG20230114125125.jpgIMG20230114125254.jpg
 
Thursday 19 October 2017

A warm welcome to all users of this forum.


A few days ago, I received from Zoran Pavlovic, the kit manufacturer, the material I ordered for my next model, a project I want to manage in the period of time I will spend in Tuscany.
The kit is produced by a Croatian company, MARISSTELLA of Split, founded in 2008. I found it on the Modelshipworld forum where Marisstella is present with a advertisement banner. The company has a remarkably interesting product catalog, with typical boats of the Adriatic Sea. He is the same producer of the kit of my latest model, finished a few months ago: Gajeta Falkusa.

The first impression is that the materials supplied with the kit are definitely valid, the timbers are of good quality and the two sheets containing the plans are very well done. Many pieces are laser pre-cut both on plywood and solid wood. Concerning the wood used, the walnut is used for each element: planking, masts and spars, detail of the decks. As I wrote the wood is of high quality but personally I would have preferred a mix of wood with different colors to make the model less monotonous. I do not exclude that during this project I do not invent something using different woods to obtain a more lively and chromatic results. We'll see.

Again the biggest flaw in this kit is the assembling instructions: they are written in Croatian and English language. No comment on the Croatian, I do not know it, but for English it could be better. But Zoran Pavlovic has available a new version of them : he has reviewed the part in English and has also added instructions in Italian language. Zoran sent me them via email a couple of days after I received the kit and I have to say that they are very, very well translated.

Unlike the instructions of the Gajeta Falkusa, my last model, in this case there are virtually no images showing the various stages of construction and this is a small problem because this model is also quite complex and the written instructions become critical. They must be read carefully and understood perfectly to avoid mistakes that could have heavy consequences. And here's a further thank to Zoran for the magnificent Italian instructions: I hope will make the job easier and more methodical.

At the moment I'm going to read, understand, interpret and comment them with some personal notes that should help me at the right time.

Here I would like to propose some images of the kit and the material contained inside.

First, a little bit of data:
Scale 1:59
Total Length 775 mm
Size of the packaging cm 65 x 21.5
Let's start by looking at our kit before opening it:

01 Ragusian Carrack/13.jpg
y4mGq-Cdb8hflS0SarbZDovuGcklRLt0VlMuRK-x


But let's describe what model is.

This model represents a Ragusian Carrack, a sailing ship of the maritime republics of the period from the 14th to the middle of the 17th century, designed for freight transport.


The Carrack appears in Venice at the beginning of the 14th century, but at the same time it begins to be built in the city of Dubrovnik (Ragusa), another maritime republic, less famous of the four Italian towns but not less important, as the largest type of Adriatic shipping vessel.

In the fifteenth century, the Carrack spread from the Adriatic to the Mediterranean Sea and in the late 15th century to the Atlantic Ocean. Here they were built by the Spaniards, Portuguese, French and Dutch
.
It is therefore a vessel almost contemporary to the famous caravels and naos from the Iberian peninsula but still before the galleon, characterized by the high fore and aft castles. In the sixteenth century the Dubrovnik Carrack was one of the largest ships in the world and sailed to England.

The large and spacious Carrack was called Argosia, a name derived from ragusia, the adjective of Ragusa. The level of popularity of Dubrovnik's carracks is demonstrated by the fact that the English created the literal expression Argosy ship.

But let's post some pictures of this gorgeous finished model, pictures sent by Zoran, which worth more than a thousand words.

02 Ragusian Carrack/Images/4CB_4522 DUBROVAČKA KARAKA 16. ST.jpg
y4mCrhL9ct1ZHtjyTl5dBjLPI_LszWZUCF6oghFT

03 Ragusian Carrack/Images/4CB_4527 DUBROVAČKA KARAKA 16. ST.jpg
y4mbtLHXf2KComRYgJCwYljrdRT6sJitIaLLgpDF

04 Ragusian Carrack/Images/4CB_4532 DUBROVAČKA KARAKA 16. ST.jpg
y4mLl8PJP8lfHyxsGAMXe1dHZ-DUIC46SVMwLlvA

05 Ragusian Carrack/Images/4CB_4537 DUBROVAČKA KARAKA 16. ST.jpg
y4m6SKVguFJT2z5Z3S-NZV5zXlTV_HpVLLQPxjVP


See you next time with additional images of the Ragusian Carrack !!
Cheers, Jack.Aubrey.
Hallo @jack.aubrey
we wish you all the BEST and a HAPPY BIRTHDAY
Birthday-Cake
Enjoy your special day
 
Back
Top