• Ships of Scale has incorportated an extra level of security when you log In. Please follow on-screen prompts to acknowledge that you are not a robot via a "Check Box" or a "Pictorial Check Box Puzzle". This is needed due to higher level of AI Activity Security.
  • SUBSCRIBE TO SHIPS IN SCALE TODAY!

    The beloved Ships in Scale Magazine is back and charting a new course for 2026!
    Discover new skills, new techniques, and new inspirations in every issue.

    NOTE THAT OUR NEXT ISSUE WILL BE July/August 2026
  • Win a Free Custom Engraved Brass Coin!!!
    As a way to introduce our brass coins to the community, we will raffle off a free coin during the month of August. Follow link ABOVE for instructions for entering.

Rat lines first time

Joined
Jul 15, 2026
Messages
24
Points
48

Hey all.
Ship: Harvey
Scale: 1:96
Ive been researching about my ratlines and stays as i work on them for the first time. I decided to go with the clove hitch method and really learned the benefit of the beeswax here. But as you can see im getting some variance in my knots and width which i assume will come in practice. The instructions for the harvey im using show using the rigging tool and just gluing them across and my question for that would be, is that more preferable for smaller scales and the clove hicht for larger scales?
Curious yalls opinion. Thanks!
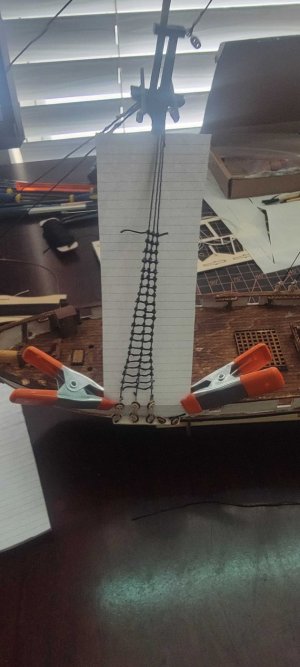
1000019693.jpg
 
Last edited:
"is that (gluing) more preferable for smaller scales and the clove hicht for larger scales?"
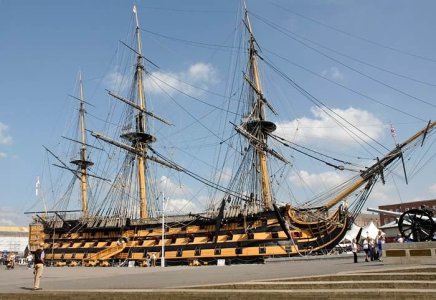
Yes, that may be the case. There are two main factors in model rigging: 1) to maintain scale, i.e. cordage should be as close to the scale diameter as practical, and 2) to aim for scale appearance, i.e. the model should appear as the prototype appears at a scale viewing distance. Unfortunately, your ratlines seem to fail both objectives. They are of much too large a diameter. They appear to be of similar size to the shrouds, which should not be the case. As for appearance, the attached photo of HMS Victory shows her ratlines to be almost invisible at a reasonable scale viewing distance. Fair winds!

hms victory.jpg
 
They appear to be of similar size to the shrouds, which should not be the case.
Fair, I am most definitely using the same line for both and hadn't even considered that as part of my problem.
But thank you! you've given me some more to think of and research into so I'll see about getting some new line as well and do some tinkering.
 
Fair, I am most definitely using the same line for both and hadn't even considered that as part of my problem.
But thank you! you've given me some more to think of and research into so I'll see about getting some new line as well and do some tinkering.

To select the correct line size, consider the scale you are working at. Typical ratlines of the period were roughly 1/2" (12.7mm) in diameter. If you are building the 1/96 scale Harvey, then the thread you use should be around 0.005" (0.13mm) and if you are building the 1/130, then they should be about 0.004" (.10mm).

That said, no one is going to take a micrometer to your model, however many may note the excessively thick ratlines. In your case, since this is a learning model, I would just suggest some very fine sewing thread, black or very dark brown. There needs to be a very obvious visual contrast between the size of the shrouds and the ratlines. It will also give you practice handling the fine thread.

As for the method of attachment, that also depends on scale. Some, working at extremely fine scale will glue the lines on. Others, working in larger scales will go to the extreme of forming eye-splices in the ends and clove hitches in the intermediary shrouds. Use whichever method is most comfortable, but I would suggest pushing yourself just a little lest your skills will not improve.
 
Last edited:
but I would suggest pushing yourself just a little lest your skills will not improve.
Thats kinda what my goal is with this one, push and test things before I start my next. I do have some spare sewing thread I can use, I'm doing the 1/96 scale so I'll see what I have, worst case a trip to walmart! ha. Much appreciated! I'll report back with the updates when I get a chance to do more. The info's very much appreciated!
 
Hi. Some thoughts -

1. Don't use cotton thread, I know from experience that it goes furry very quickly after you pull it through a couple of times no matter if you wax it. Polyester is better, but still not ideal. Try looking on Amazon for waxed thread, 0.5mm seems to be the finest I can find, unless you can get actual rigging thread..

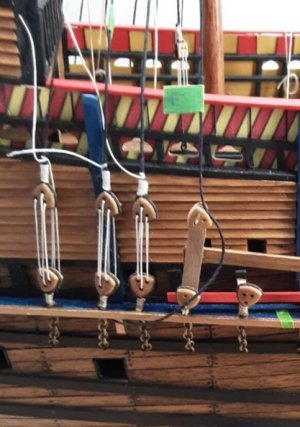
2. The deadeyes seem close together which does not give you much leeway when tightening them prior to tying the ratlines. I use a little tool I make to set the distance, just a couple of straps of scrap and a couple of brass pins as below. Seems a bit of a faff, but it works for me -

Screenshot_20260902_123022_Chrome.jpg

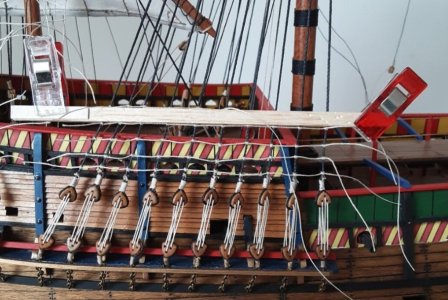
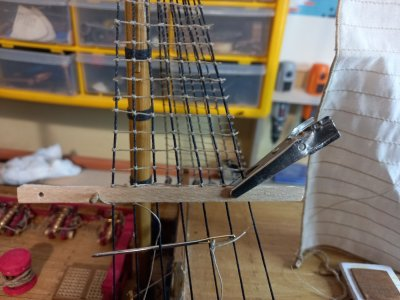
I think the shrouds are pulling in because of the thick thread you are using and possible over-tightening. I use a couple of strips and clamp them at both ends. The clips are sewing clips (Amazon), very strong and prevent the shroud pulling inwards -

Screenshot_20260902_122737_Chrome.jpg

I hope these simple ideas work for you as you move forward.
 
There are two main factors in model rigging: 1) to maintain scale, i.e. cordage should be as close to the scale diameter as practical

​

Hi Jiopio
What ship/scale are you building? The shrouds vary in circumference for each mast and are related to the size and era of the ship, but the ratlines are always the same regardless of the size of the shrouds, about 3/8" to 1/2" diameter.
Allan
 
Hi. Some thoughts -

1. Don't use cotton thread, I know from experience that it goes furry very quickly after you pull it through a couple of times no matter if you wax it. Polyester is better, but still not ideal. Try looking on Amazon for waxed thread, 0.5mm seems to be the finest I can find, unless you can get actual rigging thread..

2. The deadeyes seem close together which does not give you much leeway when tightening them prior to tying the ratlines. I use a little tool I make to set the distance, just a couple of straps of scrap and a couple of brass pins as below. Seems a bit of a faff, but it works for me -

I think the shrouds are pulling in because of the thick thread you are using and possible over-tightening. I use a couple of strips and clamp them at both ends. The clips are sewing clips (Amazon), very strong and prevent the shroud pulling inwards -
These are wonderful suggestions!

My deadeyes are very likely ugly looking as I was learning on them too and those were the first ones I did. I made a simple little jig with some spare wire to help with spacing but yeah, working/learning how to make those stay straighter,and tensioned correctly lol.
Butyeah I believe these are poly threads, I havent' ordered any rigging thread specifically but I'll have to see about some pre-waxed to try also. Definitely a lot of options and a lot to absorb lol


What ship/scale are you building?
I should have listed that in my original, so I'll update it if I can but to answer your question, 1:96 Harvey!
 
scale of ropes on models has always been a problem. its not easy finding threads thin enough for 1:96 but im sure easier in larger scales. that becomes a problem too... what to do with a 6' ship in my house?

my workaround is use different sized single strand sewing threads instead of making ropes. i know made ropes do look great but im, like you, limited by scale.

it just has to look good at a normal viewing distance.
 
For the scale you are working on you should use the thinnest thread you can find preferably in a light brown to beige colour.
Also, forget about the clove hitch, it's way too big even for larger scales. Instead use a simple single overhand knot with a touch of glue. Don't pull too tight as you work your way across as it will deform the shrouds.
 
Graham,
The use of the wood strips is a great, I am just starting the rat lines for the Harriet Lane and will be using your wood strip design, looks simple enough and will sure take care of the slacking lines. Thanks for the pictures.
 
For the scale you are working on you should use the thinnest thread you can find preferably in a light brown to beige colour.

There has been some debate on SoS regarding the color of ratlines and whether they were or were not tarred and if so, with what. I suggested dark brown to black earlier, but unless you can find specific information regarding the Harvey, it often just depended on the captain's choice and/or what they had on hand. Use the color you like.
 
The knots aren’t working. Was just rereading Brian King’s ship modeling solutions, he never uses clove hitches, just a half hitch at any scale - it looks good enough. With a dab of glue on the knot both appear the same. Found on rigging the Armed Virginia Sloop, with clove hitches, the shrouds were pulled in like yours. Found it difficult to get the clove hitches tight equally spaced. Shroud tension has a lot to do with it, tight thread today, is not tight tomorrow.

Here is an example of strips of thread laid across the shrouds. The work goes fast. Tieing shroud knots can be a tremendous time suck. Any opportunity to save time is worth a look.

There are many common suggestions in instructions and elsewhere about how to do things. And many of them are not practical - they can’t be executed at scale.

Good luck.

IMG_2072.jpeg
 
The knots aren’t working
I agree which kinda lead me to asking the question. I don't personally mind the time sink but as I'm getting higher up I started realizing that maybe this wasn't the best decision. I am going to try some smaller rope and honestly I have 4 shrouds to work with, I might do it differently on each one and try out some different technics.
I do suspect I am getting the clamping/twisting because I was probably pulling too hard when sinching them down unfortuantely. But its good, this is a learner anyways lol
 
Use the color you like.

If one is interested in accuracy, shrouds, deadeye lanyards, and ratlines should be black (or, in larger scales, very dark brown.) For some reason, many modelers use ecru or even white thread, especially to portray deadeye lanyards. This is never seen in "real life." These parts are tarred, which turns them black very quickly. Perhaps the confusion arises by incorrect kit instructions which create the mistaken belief that deadeye lanyards are "running rigging," which they are not. While "adjustable" to a certain extent, deadeyes and lanyards are a device for connecting the thick, stiff shrouds and stays to the chain plates or other connection fittings because the thick standing rigging is way too big and stiff to tie into knots but can be bent around a deadeye. The lanyards "divide" the thick standing rigging into separate parts which, in combination, match the strength of the thick standing rigging, but, individually, are thin and flexible enough to be tightened and tied off conveniently.
 
Graham,
The use of the wood strips is a great, I am just starting the rat lines for the Harriet Lane and will be using your wood strip design, looks simple enough and will sure take care of the slacking lines. Thanks for the pictures.
You are most welcome, passing on ideas is what this forum is all about. I can't recommend those small sewing clips too highly (bulldog clips are too heavy) and they are very handy for a range of rigging jobs. Let us know how you get on. Cheers.
 
just a half hitch at any scale - it looks good enough.
Maybe not to everyone:):) I agree they do look OK, but not as good as clove hitches. They are easier to tie though!

For 1:96 the ratlines should be about 0.0052" diameter or less. Gutermann U-121 Skala 240 Polyester is about right, being 0,0048" if you can go with Poly.

As to the clove hitches being too large, some may find the clove hitches on the models below to be worth a look.

Allan

1788373729830.jpeg

1788373749860.jpeg
 
Prior to the invention of synthetic materials, much of which was spurred on by a shortage of natural raw materials during WWII, rope was subject to wear and tear from the weather.
Ratlines were primary to crew and ship safety. They also didn’t require adjustment. There is, therefore a reason why care would have been taken to preserve them with pine tar and no reason not to. In no case would either they or lanyards be bright white. Hemp rope in its natural state is grey/tan.

Roger
 
I use a technique similar to that proposed by Graham but have made the spacer strips into single units that can be slipped on and off easily and generally don't need the addition of a retaining clip. Two strips of robust hull planking sandwich a short piece of thin planking that acts as a spacer. Different lengths have been made to accommodate varying numbers of shrouds. The starting end of the ratline is secured with a belaying pin. I find it easier to add ratlines from the top down.
I usually leave a spacer in place and use another for the next ratline to avoid disturbing the previous one.
1788375415461.png spacers[1].jpg
 
Back
Top