Rebuilding Bluenose I, BB576. [COMPLETED BUILD]

Johan I think that some nervousness when starting a new model - especially a new type of build such as POF - is completely normal. In fact, it may actually be a good thing as that will keep you fully focused until you get into the swing of things. Once you have reached that sweet spot, it will be business as usual.
 
Great job Johan! She is beautiful! Looking forward to your POF build of the BN. :)
Thank you so much Dean!
With the beautiful lines of the Bluenose, it's almost impossible to end up with failure.
Though, I'm still very anxious about the POF build...
 
Johan I think that some nervousness when starting a new model - especially a new type of build such as POF - is completely normal. In fact, it may actually be a good thing as that will keep you fully focused until you get into the swing of things. Once you have reached that sweet spot, it will be business as usual.
Thanks for your uplifting words. As I said before, I consider myself to be a rookie, since the last complete model I finished, dates from some forty years ago, so I have to re-educate myself on the fine art of modeling.
Luckily, there are a number of great, experienced modelers around here, so I'm reading myself silly... :cool:
 
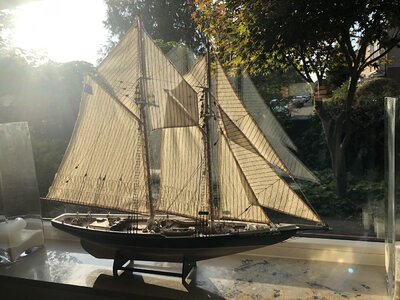
Sorry, I know my build is complete, but I could not resist taking this picture. The Bluenose, sitting proudly in the window sill and the setting autumn sun painting a beautiful picture.

View attachment 260292
Johan, I have just caught up on your completed build now, and as others have mentioned earlier you have done a sterling job with it. The picture in the window frame looks magnificent!
 
I love the last picture too! Don't apologize for posting such beautiful pictures - Thank You!
 
Johan, I have just caught up on your completed build now, and as others have mentioned earlier you have done a sterling job with it. The picture in the window frame looks magnificent!
Thank you for your kind words.
 
I love the last picture too! Don't apologize for posting such beautiful pictures - Thank You!
You're welcome.
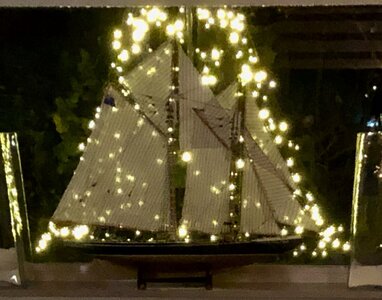
Now I know it's rather early, but we've already put up some Christmas lights in the front yard. When the lights are on, they frame the Bluenose and, since the sails are translucent, one can see the lights shining thru the sails...
11EDD002-AF07-4BFF-926B-CC30A2B2DB24.jpeg
 
Oké, this was a beautiful Sunday. First we (the Admiral and I) started the day with a bike ride, 42km/26 miles, on e-bikes, to be frank.
In the afternoon the Admiral saw Hamilton crash into Verstappen (or the other way around, I wouldn't know, LOL) and I continued adding rope hanks and coils to the deck and no, I'm not going to share any pictures yet, first the earlier parts of my journey.

So I had the masts united with the hull again. I drilled the holes for the masts in the decks in accordance with the imprinted diameters on the decks. These holes were slightly larger than the diameters of the masts. This meant I had to fiddle with the shrouds and stays to get the orientation of the masts right. Combine that with the difficulties in getting the shrouds having some tension ánd the desire to get the pitch between the lower- upper deadeyes more or less the same, you're bound to run into trouble.
And that's what I did. It took endless tweaking, doing and redoing the lanyards of the deadeyes, starting again on some of the shrouds and, I must admit, the use of some colorful language. I'm glad no one was around...

Detail of main mast shrouds, deadeyes and lanyards,after changing to Mantua ropes​
Detail of foremast shrouds, deadeyes and lanyards, after changing to Mantua ropes​

In the end I was quite happy with the results; it looks indefinitely better than the original installation with plastic deadeyes. So all shrouds, top and bottom done, up to the next topic... Nope, not gonna happen yet. It was at this point that I definitely got dissatisfied with the BB supplied ropes; they were simply to fluffy, even after using bees wax. So I ordered, after some looking around, some Mantua ropes, in diameters as close as possible to the BB specified rope diameters.
Since I already had some experience with installing the lanyards through te deadeyes, this was fairly easily accomplished. Too bad I couldn't get rid of some remnants of the old ropes, out of fear for damaging the shrouds. I completed the standing rigging by adding the ratlines on the lower shrouds, the upper hrouds were already provided with those lines.
Everyone, who has ever gone through this process, knows how elaborate this task is, yet you have to stay focused. I simplified the knots I used, at least I didn't dare go to the knots as advocated and used by, amongst others, Dean62 on his POF Bluenose build log.
The installation of the stays was pretty straightforward, at least no surprises there, other than, again, it required a lot of tweaking and fiddling to get the tension right, simultaneously making sure the orientations of the masts were correct. Strategy of the day; measure once, measure twice, check and check again!
After completing the installation of the standing rigging, it was time to proceed with the installation of the two jibs and the forward stay sail and the installation of the running rigging.
Fantastic rebuild of this beautiful schooner- from a complete F1 nut I think your Admiral must be getting pumped up with 3 races to go and so close- rooting for Max big time.
 
Fantastic rebuild of this beautiful schooner- from a complete F1 nut I think your Admiral must be getting pumped up with 3 races to go and so close- rooting for Max big time.
Thanks!

Oh, you don't know half of it. My daughter ánd my son in law are also F1 fanatics ánd we have a group app. Probably don't have to tell you that quiet Sunday afternoons are a thing of the past on F1 days...:cool:
 
Hi Johan. Sorry for my late reaction on your completed BN. It looks great. And I know how difficult a rebuilt is. I have done a Statenjacht for a friend. You often have to choose what to do or not to do. From what I see, you had a nice balance.
And the nice pictures in the ‘gallery’ gives also a good impression of you rebuild. Hat off!
Regards, Peter
No harm done whatsoever.
The rebuild was a renewed encounter with modeling ánd with a steep learning curve, I might add.
It was fun nonetheless, especially with so many gifted people around, willing to share their knowledge and opinions.
Thanks for your compliments, it's appreciated.

Now waiting for Christmas to arrive: the unpacking ánd build of the YQ Bluenose...
 
Hello,
building same model, but have lots of problems due to very short manual :(
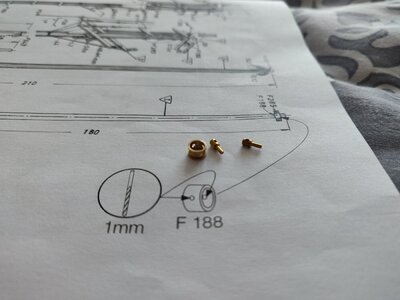
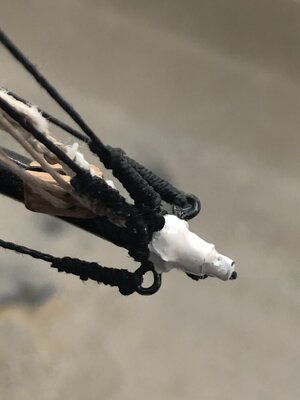
can you please make photo of bowsprit end - I do not find correct parts to make the ring :( it says F 188, but do not find anything in pile of parts what is provided :(

f188.jpg
 
Hello,
building same model, but have lots of problems due to very short manual :(
can you please make photo of bowsprit end - I do not find correct parts to make the ring :( it says F 188, but do not find anything in pile of parts what is provided :(

View attachment 307568
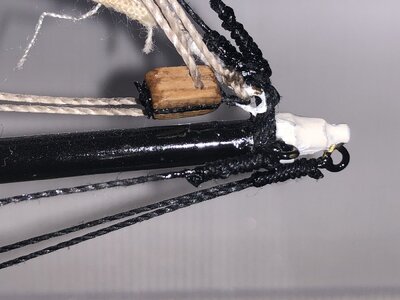
I took some pictures of the bowsprit of my Billing Boats Bluenose I. Sure hope they help you, but I went AL-FI on it just a little bit.
At the extreme tip I had this cylindrical pin (as per your picture) with a hole through and through. This was already part of the build. I used that pin to attach an eye to it, using CA. (@Heinrich: don’t like, don’t read!)
That eye was used to attach the two stays to the bowsprit, coming from the keel. To avoid too much clutter, I went for a simple solution, coming from one eye on the keel, through the eye on the bowsprit and back to the other eye on the keel.
52DD9E8A-4479-44AF-94A3-4A6538D46E7B.jpeg

There was a ring attached to the bowsprit, just aft of the cylindrical pin with that hole through and through.
That ring wasn't of the configuration you show in your picture, but it also had a hole going from left to right, through the bowsprit. Here I attached two eyes, facing port and starboard and used those eyes to attach the stays, attaching to a frame of the hull.
45F82B07-BBB1-4361-83D3-0AADFB7D2CAA.jpeg

What you could do with the ring, you show in your picture, is to either solder, if you're a daredevil, or bond (with CA) four eyes to the ring, clean up the inner surface to have a smooth interface with the bowsprit and use those eyes to epattach all stays, etc to the bowsprit.
I stayed away from this cylindrical pins, too much risk of chafing, IMHO.
 
Last edited:
Back
Top