• LUCZORAMA SHIPWRECK SCAVENGER HUNT GIVEAWAY. 4 Weeks of Fun • 1 Legendary Prize ((OcCre’s Fram Ship)) • Global Crew Welcome!
    **VIEW THREAD HERE**

RMS TITANIC - 1:200 by Trumpeter, KA Models, Woodies, Andrew 3D, YZM & more

Joined
Apr 2, 2025
Messages
5
Points
8

Hello everybody.

I want to share my first project here with you. I planned it when the huge RMS Titanic was first time mentioned from Trumpeter as 1:200 scale model, started to collect lot of add on parts since that and finally started to work on it a few weeks ago. What am I planning here.... or what upgrade stuff will be used ... ?

  • KA Models DX Detail set with wooden deck
  • Several 3D printed parts from Andews 3D and Artie 3D models
  • Several photo etched sets from Woodies Model Works
  • Under hull plating from Woodies Model Works
  • Stern plating from Minibrass
  • Hull support set, lighted masts, super structure from Andews 3D
  • light and sound kit from MSM
  • 3D printed parts from YZM
  • different further stuff ... more details later ....

I started with the stern plating ...


spacer.png


spacer.png


spacer.png


And continued with the under hull plating made of lot of plastic parts ...


spacer.png


spacer.png


spacer.png


The new rudder and the propeller hoses made of 3D print:


spacer.png


spacer.png


I corrected the hull plating at the center of the propellers at the stern as well ...


spacer.png


... and applied first photo etched parts on the hull ...


spacer.png


spacer.png


spacer.png


... corrected the complete hawse pipe at the bow ...


spacer.png


spacer.png


spacer.png


spacer.png


... so far for the moment. That's the actual situation on my built.... some further work necessary on the hull ....

Next step - finishing the hawse pipe, stern plating and the hull plating, which still need some further sanding and corrections / works ... then the hull support with the first electric issues ...

I hope you like it so far ...

Cheers

Michael
 
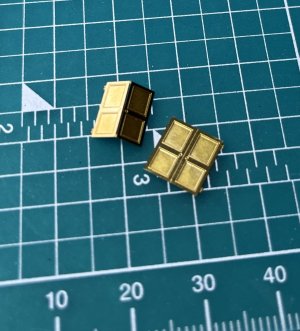
Hi everyone, I have a question how to use photo edged doors from the KA-kit for my 1/200 Titanic. As a beginner on working with PE I have not been able yet to figure out how to use the doors. Most of them are printed double and it seems very easy to bend them. The door gets a little thicker, but I am confused because why would they do that and bending all the doors gives the risk of falling short of enough PE-doors. I have not found any instruction online, and the YouTube movies I have seen do not cover this. I included a picture as example.

IMG_4120 2.jpg
 
separate the two half’s and use only the side of the door you need to fit. Mask around the molded doors and file or sand until the molded door is completely removed then glue the brass door in place allow space if using the wooden decks the doors should not touch the decks. Check the door handles are on the rear edge of the doors so when opening they open from the rear. Hope this helps.
 
Last edited:
separate the two half’s and use only the side of the door you need to fit. Mask around the molded doors and file or sand until the molded door is completely removed then glue the brass door in place allow space if using the wooden decks the doors should not touch the decks. Check the door handles are on the read edge of the doors so when opening they open from the rear. Hope this helps.
Agree with Beau; however, the design of the PE door(s) also lends itself to folding in half for use as an open doorway/hatch if the fancy strikes you to display any open doorways. :)
 
separate the two half’s and use only the side of the door you need to fit. Mask around the molded doors and file or sand until the molded door is completely removed then glue the brass door in place allow space if using the wooden decks the doors should not touch the decks. Check the door handles are on the read edge of the doors so when opening they open from the rear. Hope this helps.
thank you very much, very helpful!
 
After having painted 100s of figures - passengers, crew, musicians in different colors, weathered and drybrushed I have finished this step at an earlier stage of the kit already... luckily ... :)


spacer.png


spacer.png


spacer.png


spacer.png


spacer.png


spacer.png


spacer.png


spacer.png


spacer.png


spacer.png


spacer.png


spacer.png


A first lightning test .... later I will add fibre optics in the portholes and keep some dark as it was at the real ship .... at least close to it ...


spacer.png


spacer.png


spacer.png
 
After priming the hull outside, silver painting inside .... I started with the main colors of the hull. Off-White from Vallejo is used for the top white area at the bow and stern and will be used also for all the super structures ....


spacer.png


spacer.png


spacer.png


spacer.png


The new - 3D-printed side walls of the super structure... still need sanding and further cleaning and primering... but a first dry fit shows the wonderful details already ....


spacer.png


spacer.png


spacer.png


spacer.png


spacer.png


Masking the white area and painting the yellow stripe - using German yellow from Vallejo .....


spacer.png


spacer.png


spacer.png


And after removing the masks .... luckily the masks were good as it seems :)


spacer.png


spacer.png


Next step.... masking the yellow stripe and painting the hull in black .... then hull red below ...
 
Looking good! I'm just finishing another kit, then making a jig and building a workbench so that I can airbrush the larger sections of hull... I have the same hull-blocks as you, and need to make a display board for it as well.
 
Back
Top