Very well built, Paul !! The build must require lot's of coffee to drink (I saw boxes in the background) LOL

-

SUBSCRIBE TO SHIPS IN SCALE TODAY!
The beloved Ships in Scale Magazine is back and charting a new course for 2026!
Discover new skills, new techniques, and new inspirations in every issue.
NOTE THAT OUR NEXT ISSUE WILL BE MARCH/APRIL 2026 -

Win a Free Custom Engraved Brass Coin!!!
As a way to introduce our brass coins to the community, we will raffle off a free coin during the month of August. Follow link ABOVE for instructions for entering.
You are using an out of date browser. It may not display this or other websites correctly.
You should upgrade or use an alternative browser.
You should upgrade or use an alternative browser.


Great job on a rare topic!

Tks all for comments & likes yep lots & lots & lots of  . ( The boxes are for the admiral as she like em). I go the instant stuff. The biggest hurdle was convincing myself to do the the next bit. It was a eye numbing effort ( have two sets glasses and a head magnifier( and tying with a set of tweezers in each hand was a challenge) Its summer here and the glasses don't stay in place on my nose when sweating.
Still in the end it was worth it.
Looking fwd to a break and a change of pace with an RC Tug kit before the Victory.
. ( The boxes are for the admiral as she like em). I go the instant stuff. The biggest hurdle was convincing myself to do the the next bit. It was a eye numbing effort ( have two sets glasses and a head magnifier( and tying with a set of tweezers in each hand was a challenge) Its summer here and the glasses don't stay in place on my nose when sweating.Still in the end it was worth it.
Looking fwd to a break and a change of pace with an RC Tug kit before the Victory.

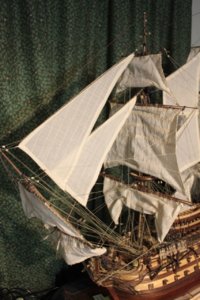
Paul I know you mentioned in my build you had reservations about the sails but I have to say that do add a great deal to the model.I look forward to more grey hair and lots more coffee when I get to the rigging stage on my Santa Ana
Your tug project sounds interesting,I too have some nautical RC projects on the go.Are you going to start a log?
Kind Regards
Nigel
Your tug project sounds interesting,I too have some nautical RC projects on the go.Are you going to start a log?
Kind Regards
Nigel

Hey Paul, its looking fantastic buddy.
Hi Nigel Yep.
I ve got both a plan coming for a scratch fr0m an old 1976 modellers magazine and the occre Ulises. I hope to do both. just have to find a good wood supplier in AUS. Hope to do the deck parts( bollards, funnels etc with the 3d printer). should be a lot of fun. I looked at a steam plant option but the cost is scary ( Especially for a noob.) Logs will be done!
Hi Brian , Many Tks.
Hi all, well 80 cannon port lids ( not 76 as per the manual ), 168 hinges ( 8 for the closed ports), 160 rope bits , 320 drill holes & two very glued fingers and the cannon ports are now completed. Be warned there is only enough hinges ( looks like a lot on the pe but its not) so if you drop them look very hard.
The port lid wood is also just enough.
Lids cut with the Proxon Mini Table saw. ( and caught deftly as they flew off)
 s , spare stun sail booms & Small oats to go!
Still have to fabricate a stand from perspex on the CNC as well as a case.( and somewhere to put it).
The Tug kit arrived today so an unboxing & review will be soon!


The port lid wood is also just enough.
Lids cut with the Proxon Mini Table saw. ( and caught deftly as they flew off)
s , spare stun sail booms & Small oats to go! Still have to fabricate a stand from perspex on the CNC as well as a case.( and somewhere to put it).
The Tug kit arrived today so an unboxing & review will be soon!
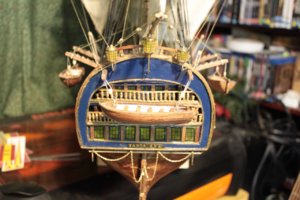
Well after 2 1/2 years at 3 hours a day ( 1 in the morning & 2 at night) she is finally done. ( not sure If I'll add the flags).
She has been a fight all the way to the finish.
What looked like an awesome manaul with 120 pages and 6 sheets of A0 images, turned out to be a manual designed by a psychopathic masochist who obviously delighted in miss-information , miss-measurement and miss-direction.
The final model is superb, but the journey a adventure in the absurd. They stated it was a kit for the experienced builder, but I'm not sure what experience they were talking about.
Anyway enough said
Here are the final build images, with the anchors added, small ships boats and lifting davits .


I will post some final images to add to the gallery if you wish.
To anyone building this , good luck & good health. Its builds into a great kit ship, its just a pity that the journey is flawed.
The next entry form me will be the review and unboxing of the Occre Ulises, followed by the build log fit it and a scratch build the Australian Tug Wattle from plans to be obtained from Float A Boat.
She has been a fight all the way to the finish.
What looked like an awesome manaul with 120 pages and 6 sheets of A0 images, turned out to be a manual designed by a psychopathic masochist who obviously delighted in miss-information , miss-measurement and miss-direction.
The final model is superb, but the journey a adventure in the absurd. They stated it was a kit for the experienced builder, but I'm not sure what experience they were talking about.
Anyway enough said
Here are the final build images, with the anchors added, small ships boats and lifting davits .
I will post some final images to add to the gallery if you wish.
To anyone building this , good luck & good health. Its builds into a great kit ship, its just a pity that the journey is flawed.
The next entry form me will be the review and unboxing of the Occre Ulises, followed by the build log fit it and a scratch build the Australian Tug Wattle from plans to be obtained from Float A Boat.
Attachments
- Joined
- Jan 9, 2020
- Messages
- 10,696
- Points
- 938

Hi Paul. The Santa Ana looks absolutely awesome! I have a quick question for you, if you don't mind. You mention in the log that you use diluted PVA glue (30% glue; 70% - water I presume) to brush into the joints.
Now for the newcomer questions - so please bear with me ...
1. Do you find that this makes a marked improvement in rigidity?
2. Does the water not loosen the already-applied (non- water resistant PVA glue)?
I am thinking of using this on my cannon-port boxes on the Batavia as they are only 1mm thick and there is not much surface for the glue to stick to?
Thanking you in advance.
Kind regards - Heinrich
Hi Heinrick, The dilution was used to do the roping. It allowed the loops to stay in formation but then give enough flexibility to bend them to shape. I also bee waxed all the lines first.
All wood parts were done with full strength white PVA.
All wood parts were done with full strength white PVA.

Congratulations that you finished the project and made a very good model out of the kit 
Hello Paul, Finished model paid off all of your straggle. She looks gorgeous, and sure enough, will shine your house. Congrats on a really great model! 

You gave me a good laugh with your opening statement.  Great build, congratulations
Great build, congratulationsHi Henrick , Sorry yes f on the diluted PVA to all the bulkheads where they touched the keel, this was because the kit req you to have them loose when fitting the thin decking so that it could be maneuvered into place.I painted on the PVA afterwards to ensure that everything locked into place. The false keel is nearly 1m in length and this would help with it not bending pre planking.
No the water did not loosen the PVA( wood PVA not paper PVA) just brushed so that it permeated any area not glued.
As to the question did it improve regidity. I honestly do not know. this is the first kit that suggested it due ot the loosed bulkhead method.
All thanks. for the comments. This is the last AL i will ever do. They are mostly ok kits but this one was a test!
Beautiful model Paul! Congratulations on a job well done.
Congratulations Paul on the completion of a great model
With the modifications I am including on my build,I am only following the manual very loosely,judging by what you say,this is probably a blessing.
Kind Regards
Nigel
With the modifications I am including on my build,I am only following the manual very loosely,judging by what you say,this is probably a blessing.
Kind Regards
Nigel
Thank you all.