Santa Maria by Amati [COMPLETED BUILD]

Joined
Aug 26, 2020
Messages
375
Points
278

Location
UK Dorset
Unboxing
Having just completed the Amati Nina there were no surprises here: a box of good quality materials and fittings. Many of these looked very familiar from my previous build: the windlass, ship's boat, door frames etc. It appears that Columbus bought a job lot when kitting out his fleet. I wonder if he got a discount? Following some shortfalls with the Nina build I took the precaution (while over the free postage threshold!) of appending the kit order with some extra walnut strips with a variety of profiles.
There is a booklet of instructions - unfortunately in Italian - with a condensed English translation. The full scale drawings will probably be sufficient for the build.
The false keel and bulkheads are laser cut from 5mm birch five ply. This will provide a very firm structure on which to build with plenty of contact area for glue between planks and bulkhead and a fair probability of any pins going firmly into their target.
There are thirteen bulkeads which, apart from a few near the ends, are evenly spaced with a mere 30mm pitch. This will define and secure the shape of the hull very well. This is a marked contrast to a similar kit from another manufacturer which uses flimsy 3mm 3 ply. A dry fit of bulkheads and keel was a bit loose so that, after applying glue and squaring up, care was needed to avoid disturbing them before the glue set. I think I must have nudged bulkhead 6 but not so badly that it could not be aligned when planking.
First plank.
If the edges of the bukheads at deck level in a model ship are more-or-less vertical then a starting plank laid here will follow a flat deck. This seems to be a common situation. If the top edges of the bulkheads flare out towards the bow then a plank will tend to curve upwards as it is bent toweards the stem. If the deck also curves upwards then (by luck or design) a starting plank may still follow the deck line. This was the case with Nina.
Santa Maria is perverse! A marked tumble home of the bulwalks means that planks laid here turn down as they are bent towards the stem. The deck curves upwards. No way can a starting plank follow the deck line. Experimenting with a fairly stiff test strip I found that laid 50mm above the bottom of the keel it maintained the same height from stem to stern. This is about the level of the lowest point of the deck midships. I opted to position the starting plank at this height. What will happen above and below I have yet to find out.
The first picture below is a montage of the box, the illustrated instruction book, a plywood sheet (keel and a bulkhead removed) and one of the plan sheets.
Picture 2 isa helpful 1:1 scale plan. Picture 3 is the line chosen for the first plank.
Box3.jpg plans1.jpg first plank.jpg
 
If you'd like to convert the more detailed Italian instructions into English, I've done this before and it's not too painful. Four steps. Scan the pages, convert the scanned text using OCR, and then use Google Translate to convert from Italian to English. Last step is to paste the converted text into a word processing file for subsequent reading or printing. The key point is that none of this process is going to cost you anything other than a bit of your time.

Step 1.
You'll want to scan (preferable), or take pictures (very clear pictures), of the individual pages. Save as .jpg files.
Step 2.
Then, you can use this online free tool for the first step. https://www.onlineocr.net/
This site will ask you to set up a profile account which gives you more access to the tools available, but the free version allows you to convert 15 images (pages) per hour. It will ask you what format you want the output in (I'd recommend the "plain text" option).
Step 3.
Open Google Translate in your browser: https://translate.google.com/
Copy the text from the output file into the left panel and ensure it's shown as "Italian". The right panel should show as "English", and the translation will occur immediately
Step 4.
Open your preferred document creation app (Word, etc.), and copy and paste your translated text into a new Word doc.

Repeat the steps until you're done the conversion of the entire Italian instructions your kit provides, and you're done.

Caveat: As with any language conversion tool, it's not going to be perfect, but it will be good enough that you can work with it.

Hope this helps...
 
Привет! Этот совет очень полезен! Я говорю по-русски, знаю английский. Грамматика. Я понимаю, что написано по-английски, но не могу точно перевести, мне помогает Google Translate. А бесплатные версии программ сканирования и офисных приложений очень выручают! Теперь даже Google Lens может найти текст на фотографии, создать его электронную версию, а затем перевести… эти приложения бесплатны и доступны каждому. Все, что вам нужно, это Интернет! и не только Гугл... Есть и другие. Удачи.
 
If you'd like to convert the more detailed Italian instructions into English, I've done this before and it's not too painful. Four steps. Scan the pages, convert the scanned text using OCR, and then use Google Translate to convert from Italian to English. Last step is to paste the converted text into a word processing file for subsequent reading or printing. The key point is that none of this process is going to cost you anything other than a bit of your time.

Step 1.
You'll want to scan (preferable), or take pictures (very clear pictures), of the individual pages. Save as .jpg files.
Step 2.
Then, you can use this online free tool for the first step. https://www.onlineocr.net/
This site will ask you to set up a profile account which gives you more access to the tools available, but the free version allows you to convert 15 images (pages) per hour. It will ask you what format you want the output in (I'd recommend the "plain text" option).
Step 3.
Open Google Translate in your browser: https://translate.google.com/
Copy the text from the output file into the left panel and ensure it's shown as "Italian". The right panel should show as "English", and the translation will occur immediately
Step 4.
Open your preferred document creation app (Word, etc.), and copy and paste your translated text into a new Word doc.

Repeat the steps until you're done the conversion of the entire Italian instructions your kit provides, and you're done.

Caveat: As with any language conversion tool, it's not going to be perfect, but it will be good enough that you can work with it.

Hope this helps...
Hallo @seadeep
we wish you all the BEST and a HAPPY BIRTHDAY
Birthday-Cake
 
С Днем рожденья тебя! Обнимаю вас и желаю здоровья и успехов!
 
Привет! Этот совет очень полезен! Я говорю по-русски, знаю английский. Грамматика. Я понимаю, что написано по-английски, но не могу точно перевести, мне помогает Google Translate. А бесплатные версии программ сканирования и офисных приложений очень выручают! Теперь даже Google Lens может найти текст на фотографии, создать его электронную версию, а затем перевести… эти приложения бесплатны и доступны каждому. Все, что вам нужно, это Интернет! и не только Гугл... Есть и другие. Удачи.
Yes, Google Lens is a really useful tool. I use it for shopping in supermarkets that specialize in Asian, Latin American, Greek, Arabic, etc. Even better, they now allow you to download the language conversion dataset, so you don't need an active Internet connection to use it (for some, not all, languages). For those of you not familiar with Google Lens, check out this link: https://lens.google/

I run it on Android OS, but am unsure if it's offered on Apple's OS or not. Where it can come in handy for modellers is for reading info on kit and supply boxes when they don't have your native language displayed, or you're concerned about the accuracy of what the manufacturer listed on the box. It's also handy for checking instruction details.

In essence, it uses your smartphone camera and does a real time translation of what you're looking at. You position your phone's camera so it's looking at a block or text, and it translates the text and replaces it with your native language in the actual camera preview window as you're looking at it. Come to think of it, it could also come in handy at restaurants!
 
First stage planking
I think this is the most difficult hull shape I have yet planked. I chose to put the starting plank 50mm above the keel; it maintains this height (more-or-less) from stem to stern. Above it the tumble home turns the planks down as they are bent towards the bow; those below it turn upwards. The situation at the stem is akin to terminating a six-lane highway into a single track road. Amidships the edge of a bulkhead from keel to first plank is about 110mm (=20 x 6mm planks). At the second bulkhead from the bow the edge is about 43mm which would require 20 planks to be tapered to about 2mm. By the time these reached the stem they would virtually end in points. The solution I have adopted is to fit bow blocks forward of the second bulhead and terminate the the first stage planks there. By including dtrop planks the number of planks reaching the second bulhead is reduced so that they not tapered below a half width.
My rough sketch below shows my understanding of the approved process for inserting drop planks. Fig 1 shows two tapered planks brought together at the bow with a space of one plank width further aft. Fig 2 shows a drop plank tapered to a blunt end. One or both of its neighbours must be shaped to accomodate this. Additional complication is introduced by the curving of the planks and the recommendation that a drop plank should end on a bulkhead. As this is the first stage planking, later covered, I resorted to tapering the drop plank to a point and leaving the neighbours with their existing edges.
Midships, the upper parts of the bulkheads are roughly vertical; at the bilge they are fairly flat. These two sections are linked by a fairly tight curve. The first stage planks are 6mm wide so, on the tight curve, neighbouring planks mmeet at a distinct angle. (pictures 2 and 3) As the planks are only 1mm thick there is a limit to how well these joints can be rounded off. Some plank edges ended up so thin that I resorted to smearing epoxy resin inside the hull to provide a bit of support. When I planked the second side I rummaged in my bundle of leftovers and found some 4 x 1 mm planks that I used on the curved section. This helped. Picture 4 shows the planking in progress with the roughed out bow blocks. Picture 5 showst the complete planking faired into the bow blocks. The first bulkhead meets the false keel fairly high up. Most planks pass under it and go directly from the second bulkhead to the stem
Drop plank.jpg Xsection1.jpg
plankmeet.jpg first planking.jpg
bowblocks1.jpg
 
Second stage planking
The hull profile for this ship morphs from that of a pregnant whale amidships to an anorexic sardine at the bow. Bow blocks were used in the first stage to terminate planking at the second bulkhead but are not an option for the second stage: the planking must run from stem to stern. The solution I have adopted is to include drop planks as virtually every other plank. This reduces the number of planks reaching stem and stern and restricts the amount of tapering to an acceptable level at their ends. The ‘approved’ form of drop plank (picture 1) has a blunt end and its neighbouring planks are shaped to receive it. The planking strips in this kit are 4mm wide, 0.5mm thick walnut. These are brittle and the grain is often a bit wild. Cutting away part of the width to receive the end of a drop plank was not appealing. Instead, I simply left the edges of the neighbour planks straight and cut lune shaped drop planks. I.e. with pointed ends.
A common alternative to planking this form of hull is to lay a sequence of planks down from the gunwales until the curve at the bow becomes too severe. Planking resumes upward from the garboard strake and the ends trimmed at an angle where they meet the upper planks. Two of the pictures below illustrate this effect. The slightly fuzzy one is a still from an Amati planking video that shows both a horizontal discontinuity and a diagonal one. Yuk!
I don’t like this option because it leads to a discontinuity in the direction of the grain where the two groups meet. It’s OK if the lower hull is painted white but (personal opinion) I find the result unconvincing. I’m not sure whether this option is used on real ships; if so it is possibly confined to an area very close to the keel. My chosen option has full width planks along most of the length of the hull and the long, pointed taper on the drop planks merges with the continuous planks gradually with no blatant change of grain direction.
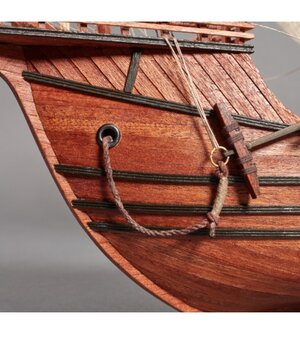
The final picture is my completed hull. It is not quite as I would like because of the restrictions encountered when trying to smooth out the joints between first stage planks. I hope the wales and fenders will distract the eye from some blemishes and the rest will disappear under the hull when to is mounted. I must remember to minimize the height of the supports on the display base.
drop planks.jpg upturn.jpg utube.jpg 2nd planking.jpg
 
Decks and Bulwarks
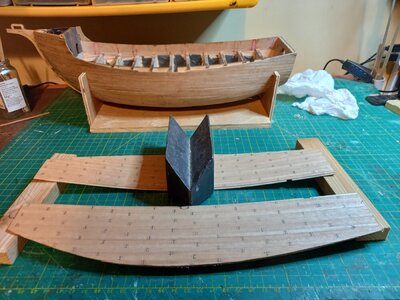
Dilemma: it is easier to plank and trim a deck insert before installing it.; it is easier to bend and secure a curved deck onto the bulkhead tops before planking it. To resolve this I planked the deck pieces on the bench and bent them before the glue had set. After the glue set it more-or-less retained the required curve. Photo 1.
The Nina (previous build) had many eyebolts and rings on the decks to which to tie the rigging. Securing these when the eyebolts are pushed into holes through a thin deck involved some messy application of CN glue. Wiser now, I fitted the equivalent eyebolts on the Santa Maria before installing the decks so that the protruding ends of the eyebolts could be bent flat to the underside of the deck. No glue needed! Photo 2

Laying a temporary strip at the midships gunwale and bending it around the other bulkheads produced a marked downturn towards stern and stem whereas the line of the gunwale turned up. (photo 3) The instructions say the bulwarks are built up from several first stage planks (6 x 1mm) glued edge to edge but not fixed to the bulkhead extensions. Trying to maintain the necessary vertical and horizontal curves with such flimsy fixing did not appeal. I cut appropriately shaped pieces of 1 mm plywood which were flexible enough to bend around the bulkheads and accommodate the vertical curve of the tumble home. Photo 4.
The bulwarks are capped with a strip of 4 x 1 mm walnut that needs to be curved edgeways. After a good soaking (the plank, not me) I managed to achieve this with lots of constraints and clamps to keep it flat. I used the sheet of plywood from which the deck was cut to form the outer edge of the curve. Photo 5. It dried with the required shape.
deck1.jpg Decks2.jpg
Bulwarktop.jpg Bulwarks.jpg
Gunwale.jpg
 
Congratulations - looking good - have fun with your Pinta
 
And the Pinta.
Deja Vu big time! The keel, bulkheads, decks and fittings are identical to those of the previouly built Nina. The laser cut plywood sheets even have the same serial numbers. This recycling of parts by Amati is carried a step too far. After planking the decks and drilling through the mast and hawse holes (predrilled in the false deck) I discovered that the plans showed them to be in different positions on the Pinta. Consequently there are some extra holes in the main deck. Still, I suppose it means the crew won't have so far to walk to the heads. The first picture below shows the plans for the Nina (top) and Pinta (bottom) with the deck superimposed.
I ended up referring to my own build log for the Nina to assist with the Pinta. This was rather disappointing: thinking I was starting a new build but merely repeating one I had only recently completed. I even encountered the same error in one of the bulkhead profiles whereby the planks failed to make contact on a natural bend. In the choice between shaving the edges of neighbouring bulkheads or packing out the gap I chose the latter. The only vovelty seemed to be a change in the quarter deck rails and the addition of a bowsprit. I completed the model with little enthusiam. It has now joined the rest of the fleet.
Columbus is now looking for a route to the Indies on the top of the dining room cabinet.
Deck.jpg Bad bulkhead1.jpg Bad bulkhead2.jpg
pinta6.jpg pinta7.jpg pinta8.jpg Fleet.jpg
 
Last edited:
Back
Top