Saucy Jack - Barking Well Smack - Vanguard Models

If I might offer a way through your current challenge...I would sister a strip of wood on the side of the bulkheads that you think are over-shaped...and then just fair the hull normally. If the bulkheads are in the wrong place it won't matter as long as you keep the corrected bits below the level of the deck (the bulkheads extend above the deck on this model - though I have a simple solution for that as well if needed).

Let's give it a new go! In my limited experience I've learned that ship modeling is just as much about trouble shooting as it is about putting the pieces together according to the instructions. You've got this F/S!
Hi Paul
I think you might have something here, it's certainly given me a new direction of thinking. Appreciate the friendly pep talk .
F/S
 
Rough work is done with a benchtop belt sander to get the large corners rounded off, then using mouse sander with 60 grit paper to get close to the final shape. The final passes are done with sanding blocks, both flat and curved. Rough sanding takes about 2 hours. Using a rough grit really moves material fast, so watch what you're doing, and don't sand flat spots in the edges of the frames.

View attachment 393746
Hi again Kurt
I really appreciate your time here. But unfortunately I can't do any of that because at a guess my model is a third to a quarter smaller than yours. Additionally the bow has a negative curve, a lot trickier. I thank you for your thoughts.
F/S
 
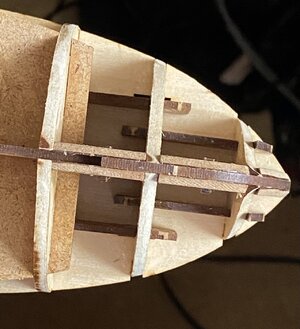
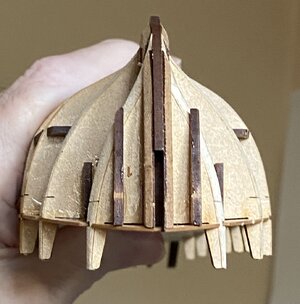
I may be creating problems for myself here, but having looked at the bow more closely yesterday I was extremely disappointed to find that was a gap between the sub deck and the forward bulkheads. I can only assume that the clamp slipped without me noticing - not happy. I've ordered some plastic wood with which I intend to fill in the gaps. This is just another problem my head is having with this bow. I've looked at three different completed models, and in none of them can I detect the negative curve that the first bulkhead indicates there should be, in the hull at lower front end? All seem to show a standard positive curve. I'm probably making a mountain out of a molehill here, and should just thrash on with it?
IMG_3627.jpegIMG_3631.jpeg
 
I may be creating problems for myself here, but having looked at the bow more closely yesterday I was extremely disappointed to find that was a gap between the sub deck and the forward bulkheads. I can only assume that the clamp slipped without me noticing - not happy. I've ordered some plastic wood with which I intend to fill in the gaps. This is just another problem my head is having with this bow. I've looked at three different completed models, and in none of them can I detect the negative curve that the first bulkhead indicates there should be, in the hull at lower front end? All seem to show a standard positive curve. I'm probably making a mountain out of a molehill here, and should just thrash on with it?
View attachment 394651View attachment 394652
I guess I don't see the negative curve (I can see how the decking is wider than the first and second bulkheads however). Can you show a picture with a flexible strake (plank) in place following the bulkheads...
 
The reversing curvature resulting in concavity in the edge of the first bulkhead appears correct. The hull form at the bow will be sharp, not bluff (full and round). The edges of the frames still need to be faired out your model so the edges are parallel to the inside surfaces of the planks.

To help planks stay in proper place and have some more surface to for the glue to hold them to the frames, put some balsa blocks in the spaces between the stem and the first bulkhead, and the first and second bulkheads, then sand them to the desired hull shape. The edges of adjacent planks will then be easier to keep flush with one another, and the glue will grab and hold the planks and make planking easier.

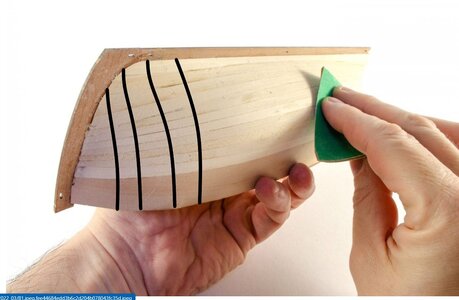
Below you can see how the hull curvature should appear near the bow after planking. See the inverted curvature than forms near the stem? Sometimes the shape of the bulkhead edges can seem extreme, but it looks okay once the planks are on the frame. This hull shape is designed to cut through the water with less resistance.
Smack.jpg
 
I guess I don't see the negative curve (I can see how the decking is wider than the first and second bulkheads however). Can you show a picture with a flexible strake (plank) in place following the bulkheads...
Hi Paul
Yes, the bulkhead/decking gap was another issue I was trying to understand. I'm a bit restricted as to what I can do at the moment as I've just had a compression bandage fitted over my left elbow (bursitis). Thanks for your input, watch this space.
F/S
 
The reversing curvature resulting in concavity in the edge of the first bulkhead appears correct. The hull form at the bow will be sharp, not bluff (full and round). The edges of the frames still need to be faired out your model so the edges are parallel to the inside surfaces of the planks.

To help planks stay in proper place and have some more surface to for the glue to hold them to the frames, put some balsa blocks in the spaces between the stem and the first bulkhead, and the first and second bulkheads, then sand them to the desired hull shape. The edges of adjacent planks will then be easier to keep flush with one another, and the glue will grab and hold the planks and make planking easier.

Below you can see how the hull curvature should appear near the bow after planking. See the inverted curvature than forms near the stem? Sometimes the shape of the bulkhead edges can seem extreme, but it looks okay once the planks are on the frame. This hull shape is designed to cut through the water with less resistance.
View attachment 394676
Many thanks for your input here, particularly the piccie. It illustrates exactly what I was trying to say. I have a feeling my balsa stock is in the loft, and I won't be going up there anytime soon due to my annoying elbow problem, but I think your suggestion is the best. I'm guessing that the negative curvature isn't obvious on other finished models I've seen. Anyway, I'm glad now that I didn't rush into this and gave it due consideration.
F/S
 
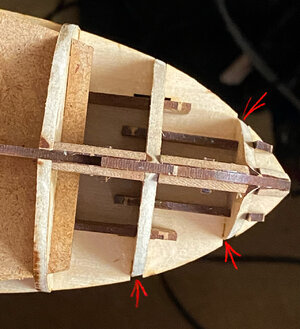
Can anybody tell me what to do here please? The only solution I see is to evenly pare down the sub-deck to allow the wide top plank to lie against the the bulkheads; am I right?

IMG_0243.jpeg
 
Last edited:
The question is which part is incorrect, the bulkhead or the deck? Obviously they should not have such a size difference at the edges. Now, if the bulkheads were sanded too much while fairing the edges, that would create this condition, and it's the bulkheads we need to fix.

No worries, though, because it's easy to repair. You need to get some wood the same thickness of the bulkheads, and glue strips (shims) on the areas where the parts were made too small, LET THE GLUE DRY, then re-sand the bulkhead edge until it matches the deck, being careful to make the shape the same on both sides of the hull. Make the strips only as long as they need to be to cover only the length of the bulkhead's edge that was sanded too far.

Choose a soft wood like basswood so you can bend the strips while gluing them down and use pins to hold the new piece in place until the glue dries. Now, when you cut the strips, you should cut one side at an angle along the length of the strip so it matches the angle you've already sanded into the edge of your bulkhead. A bandsaw would make this easy, but you can file and sand it and make an even better fit by hand. To make things easier, laminate several small strips onto the edge instead of trying to fit one piece. The thin strips bend over the curve of the edge more easily.

After the edges have been built up with strips and you've rough sanded them to shape, look at the hull end-on and make sure the port and starboard sides look symmetrical.

Once they bulkheads have been restored, resume planking the hull.
Hi again Kurt
Many thanks for your help here. However, I did not over-fair the bulkheads at all, I adhered strictly to, or outside of, marked lines. So, do I do as you suggest, or do I fair down the deck? I feel disappointed that a comparatively expensive kit like this one has these errors incorporated. I thought that as this was classified as a a beginner's kit there wouldn't be these problems. But that's not your concern, and I feel grateful for the encouragement you're giving me.
F/S
 
Hello again F/S,

Did the kit come with any drawings? Anything that you can use to compare the shape/dimensions of the false deck with line drawings of the ship?

Unfortunately, the lines marked on the bulkheads are not as 'gospel' as you may have wanted them to be - or the false deck is misleading you. In either case we need to figure out which is wrong because one of them is...
Hi Paul
You can download the manual here if you'd like to have a look:
 
Cool.

If you look on page 16 (steps 45 and 46) your construction issues are mirrored in the prototype build. Step 61 shows some additional fairing and it would seem that the deck is shaped to the bulkheads at that time - but then a subsequent photo shows there is still a difference in the fit between the false deck and the bulkheads. Confusing for sure...

BUT! There is a real deck included in your kit - use that to check the dimensions of the false deck and build your hull to match the real deck! Eventually the bulkheads that now extend above the deck will be cut off entirely so as long as the real deck can be lowered onto the false deck (within the bulwarks you will add as a later step) you will be fine.

Helps?
Hi Paul
Well I'm glad the confusion wasn't limited to just me . I'll do as you suggest and check the 'real' deck tomorrow. Thanks again - watch this space
F/S
 
Great advice on how to fix this condition, Paul. @FenStranger, ALL kits have problems, no matter how much they cost. Using the drawings to verify dimensions is part of kit building. And no, they never tell you in the instructions which parts are off tolerance, so you as the builder have to detect the problem and find a way to fix it. Corel kits are known to hand you a few blocks of wood, and expect you to shape the parts using drawings and fitting them to the hull, so what Corel expects you to do is pretty close to scratch building for their ship galleries.

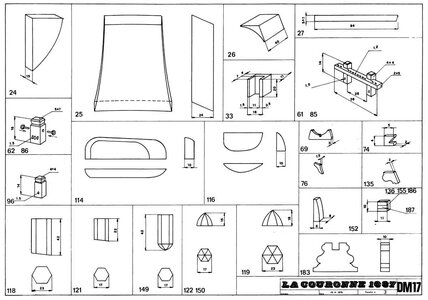
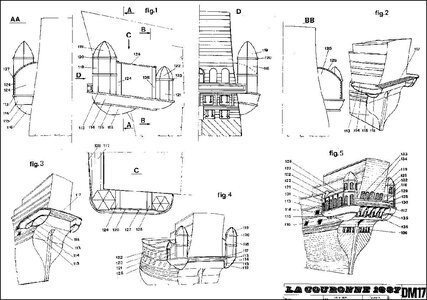
For example, Corel will give you instructions and semi-finished solid wood blocks for you to fabricate these parts...
crown03.jpg

in order for you to make these features on the model. Corel expects you to have the tools and know-how to shape wood precisely. The tower top bells were a pain to make the facets even and sharp edged.
couronne-08-detail-zd.jpg

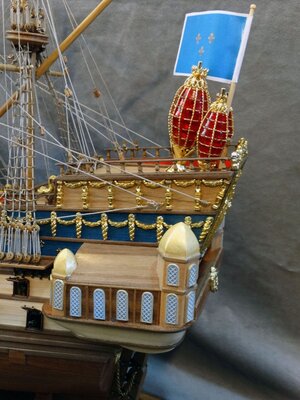
The final product as built using kit instructions:
gallery_12022_1531_298863.jpg
 
Last edited:
Hi again Kurt
Well, once again I'm indebted to you for such an intricately detailed reply. I think I'm beginning to realise that I was expecting too much from the manual/plans supplied. You've given me a good lesson in how to look at these things. I did of course look at your illustrative drawings and result, and picked up on the lack of detail given, and how that translated into your result, well done! That type of vessel holds no interest for me at all but I admire the amount of detail that goes into them.
Max
That wasn't my model in the last post, that was someone else's, a modeler who built his ship exactly to the instructions. The one I built was heavily modified and super-detailed. The idea was to show you what you can expect from a kit as far as construction is concerned. Thumbsup
 
Cool.

If you look on page 16 (steps 45 and 46) your construction issues are mirrored in the prototype build. Step 61 shows some additional fairing and it would seem that the deck is shaped to the bulkheads at that time - but then a subsequent photo shows there is still a difference in the fit between the false deck and the bulkheads. Confusing for sure...

BUT! There is a real deck included in your kit - use that to check the dimensions of the false deck and build your hull to match the real deck! Eventually the bulkheads that now extend above the deck will be cut off entirely so as long as the real deck can be lowered onto the false deck (within the bulwarks you will add as a later step) you will be fine.

Helps?
Hi Paul
Right, I've just a look at the 'real' deck, but of course I can't offer it up because the false frames on top of the bulkheads are preventing that. But doing a very careful eye check it appears that the sub-deck is actually broader. I will check this more precisely with dividers later. If it turns out to be correct then all's we'll. But either way I see a compromise coming. If anyone should be reading this ahead of making this model, then I clearly suggest laying the real deck on top of the sub-deck and check for inconsistencies before beginning assembly. As Kurt has said in a previous post, not everything is as you might like or expect it to be.
As I'm a bit hampered at the moment with my left arm, don't expect too much progress, but I am definitely back on board!
Thanks to all who've helped so far
Max
 
Last edited:
Back
Top