Soleil Royal by Heller - an Extensive Modification and Partial Scratch-Build by Hubac’s Historian

Joined
Feb 2, 2020
Messages
1,464
Points
443

Location
New York City
Hello, Ships of Scale!

My name is Marc LaGuardia, and for the past three years, I have been extensively bashing the Heller kit in an effort to transform it into what I believe is her re-fit appearance of 1689.

The project exists in its entirely, here at Model Ship World:


The log is quite lengthy, and includes protracted discussions of contemporary sketches and portraiture that are all interesting and relevant to my re-construction. That would all be incredibly tedious to re-create, here, though. Instead, I will open with a photo-montage that brings us up to the current stage of the project.

As I write new posts for MSW, I will also post that same content here.

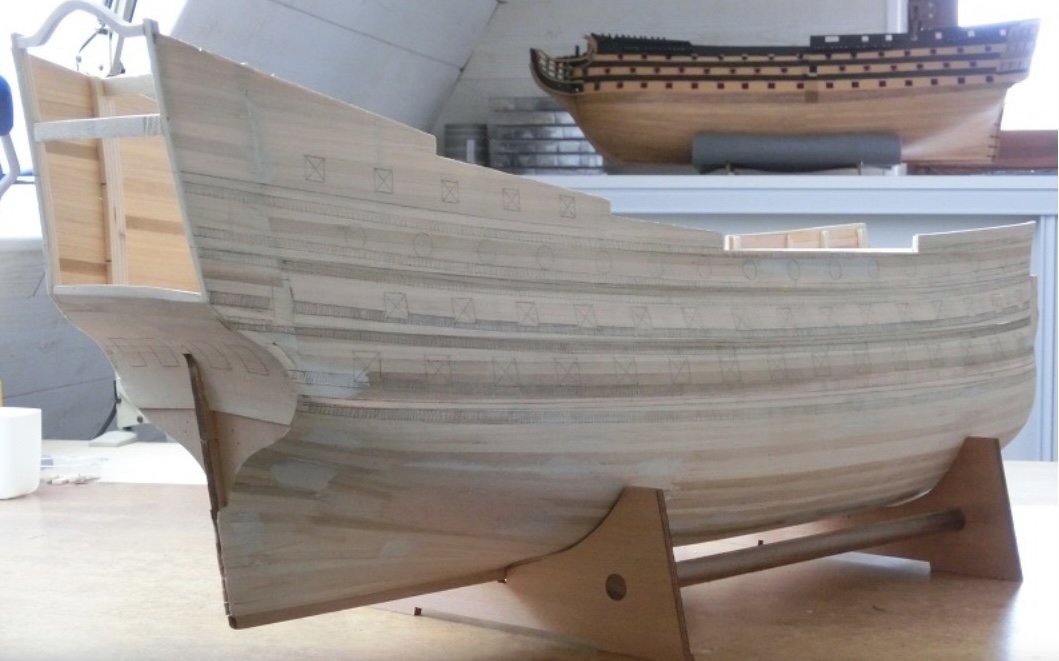
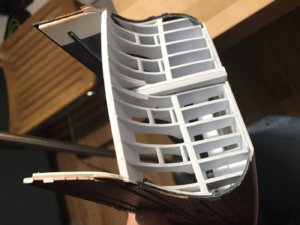
So, to begin - the project was born of the idea that I could make the Heller kit broader and longer, so that I could increase the number of stern lights from five to six, and create the new quarter galleries that are the focal point of my revised model.

To that end, I cut away the lower hull, and added 5/8” of extensions to either side of the stem (thanks to Henry in Boston for donating his defective hull), and 3/8” extensions to the aft edges of the lower hull and upper bulwarks. I also cut the sheer down, a bit, at the poop-royal because the Heller kit is just a bit too tall to be plausible, IMO; this is partly due to the fact that the height between all decks is exaggerated.

Along the way, I have discovered myriad ways to upgrade the kit and add missing detail. I have made a particular point of representing the iron that holds the dead-works together.

To be clear, my intent here is to produce a mostly impressionistic model that is historically accurate to the degree that it can be, but also accepting of certain flaws, inherent in the kit, which are too onerous to overcome.

The project seemed to languish in the planning/drawing phase for quite a long time, but has really started to come together in the past year.

I have received an incredible amount of help from people all over the world, and remain indebted to their research, their insight, and quite often - their spare parts!

And without further ado, I present Soleil Royal as she may have appeared after her refit in 1689. The montage will begin with the next post.

Thank you for looking in, and happy modeling!

- HH
 
I don’t seem to have any really early pictures on my phone, anymore. So, I will open with the frieze, which was remarkably complicated37FB4FF6-A33F-4DBC-AA6F-B1FCA7D82C46.jpeg
9A6C1B74-1B36-4E36-B034-AEA801ECF3C1.jpeg
8F9B7B3F-4952-49C9-93E5-05CC5424356D.jpeg
9CBA19F1-34EE-4542-BA07-C980D55B9224.jpeg
8E9FCB47-A772-4835-A464-850175B3235D.jpeg
E9A03592-B087-4E2E-94D6-D489A6F0A63B.jpeg
13A597B8-1EDF-49CE-90B7-0F26795124A4.jpeg
6B0F80B0-CF39-4208-8825-81324BFE5067.jpeg
47C00A78-1E67-4823-8406-EE4C88F4738C.jpeg
83420A5B-D971-41A0-B22B-EDAABE67221F.jpeg
DE3A1CB0-CB03-457F-9C1C-18CAB2F7F39E.jpeg
2F40BC97-9C20-4962-8FAA-2AB1B47DFCA4.jpeg
11895BC3-ED69-42BF-BFB2-88A09BA9915B.jpeg
There is much more that I can and will post, but I have some other things to take care of, right now. More to follow...
 

Attachments

  • E0F4D182-ABFA-4BB7-93D4-635D5B0444BB.jpeg
    E0F4D182-ABFA-4BB7-93D4-635D5B0444BB.jpeg
    186.8 KB · Views: 46
  • 9AE6C127-0088-4916-A9EE-EE80680EE953.jpeg
    9AE6C127-0088-4916-A9EE-EE80680EE953.jpeg
    113 KB · Views: 46
  • BF855B62-C56C-48D9-8244-A4A5B5329A8B.jpeg
    BF855B62-C56C-48D9-8244-A4A5B5329A8B.jpeg
    167 KB · Views: 47
Here are a few pics of the lower hull before painting:
ED4B2110-346A-4D24-816A-F41AF58B69BB.jpeg
Above, you can see the representational forward chase port that I engraved into the plastic. This port gives me 15 lower deck piercings, which actually corresponds with her re-build configuration on the lower deck.
CAC29E0C-B686-406E-AF23-ABA0B588F29D.jpeg
8A9E86DD-4F2B-4D10-BDCE-4C4C1C8C4A9E.jpeg
You can see, above, that I had to shift the aft-most port on the lower deck forward 1/4”, in order to make room for the lower finishing of the quarter gallery.
363A0B03-65B9-4C25-8253-C4A054DBD8AB.jpeg
3F6B038C-8FC0-4FF2-9DE5-FD8E9E8DACB1.jpeg
5202D360-6B4F-4954-9120-1B16D5BEC7CA.jpeg
And, after priming:
B8D13864-9C20-4148-825F-736193BCFC10.jpeg
This overview shot gives a sense for the eventual broadening of beam.
D193FB2D-BDFE-41A1-AF84-EB1D12ED9921.jpeg
You can still make out the stock, outboard hawse hole, which had to be filled after adding the stem extension pieces. The whole project hinged upon the success of these extensions, which did require some careful heat-bending and re-engraving. It was a relief when it all came together.
6D036BF9-53EB-4A3C-9316-482CF327594D.jpeg
A7F84246-D8DF-416C-96EC-BFECD16E58E6.jpeg
Now, a few images while working through Herbert Thomesan’s age and distress paint protocol:
AD534B56-A642-4A02-8788-FF3A693847E4.jpeg
645B4FEE-30F7-44C2-BA5A-D2593225DD8D.jpeg
D07CD6E5-1A83-42C2-AC62-9ABB8A00AD5B.jpeg
5F81CA63-00E6-40F5-8B2C-5A3713D0D640.jpeg
88439ED3-51E4-412F-8640-F8914BC1084F.jpeg
001E55DC-15B0-4B76-9D7E-2A6F9B534981.jpeg
8DD5D76F-37D2-4FCE-83CA-95E7A2A3FD9C.jpeg
Above, you can see the interior thickening of the gun ports that I added, from the outset, in an effort to give a sense of the frame depth of a real hull. I dislike the hollow appearance of plastic warship models because they do not convey any sense of hull thickness. Here the port depth thins as you rise from the lower to middle deck. My objective is always to reduce any impression of a plastic model; to that end, all flash is eliminated, injection mould craters are filled, and surfaces are appropriately textured.

People sometimes wonder about the surface sheen of my finish. It is actually not this shiny in person. I clear-coated everything with a matte spray, that mutes the sheen without robbing the surface of all of its depth.

More to follow; next, I will post assorted upgrades to the guns, their carriages and the port lids.

Thank you for looking in!
 
Last edited:
Do not under-estimate yourself. The weathering is really easy, and pretty much fail-safe.

Step 1: Apply your acrylic base coat in thin coats until you have achieved your desired color saturation. I own an airbrush, but not a compressor at the moment, so I brush everything. That’s why I like acrylics so much; they are easily brush-able and self-leveling.

Step 2: Brush on a heavy coating of Windsor & Newton’s Van Dyke Brown artists’ oil paint. You have a pretty generous open time with the oil paint; it Is pretty easily removed up to 15 minutes after initial application. Thomesan was very specific about this, so I just did exactly what he told me to do.

Step 3: Wipe off most of the surface oil: I use t-shirt scraps over q-tips.

Step 4: Use a coarse chip brush to blend the remaining oil paint and burnish the surface. You can then move on to the next section, or put it away to the next day.

Step 5: Allow the oil paint to cure for a few days

The important thing is to realize that you must work in manageable sections. Generally, I would work a span of 4-5 gun-ports on one deck level, and including the wale strake immediately above it.

The chip brushing eliminates any sense of transition from one section worked to the next. It doesn’t matter whether the previous section has already cured.

One thing to note: I sanded away the raised grain detailing (coarse - 50 grit) along the belts of gunports and between the wales - but not on the wales, themselves (only because I had started detailing them with bolt heads). The oil paint gets into scratch marks better than what is left around the raised grain, if you choose to leave it intact. The impression of the distressing is very different in each scenario.

I certainly appreciate the compliment, though.
 
Last edited:
In continuation:

I took great pains to increase the breadth of the lower and middle deck guns because I felt that Heller did not adequately convey the weight of these calibers
A7DBF9D9-EFC7-4342-AA34-7F5028B73201.jpeg
The lower battery (above), and middle deck battery will be glued into dummy carriage blocks, painted black. I see little purpose in building full carriages where they can’t be seen. Trunions and cascabels have been shaved off, accordingly.

A friend donated his spare middle deck battery, and those guns will become my main deck battery, and thus all of the remaining gun calibers will shift up a deck, thereby improving their impression of heft.
0A0D0D3A-C412-4818-80CF-BBE7ECF8F067.jpeg
7962F36F-FF3D-423D-8334-8F00EA386AC5.jpeg
So far, I’ve only painted the lower battery. I started using Citadel acrylics and really love the results - as opposed to the artists’ acrylics that I used on the lower hull. These are just dark bronze, lightly brushed over with thinned ver-de-gris. Super simple, and the ver-de-gris picks up quite a lot of the authentic moulded detail on the Heller barrels.

The carriages were another area where much improvement could be made simply by increasing the spread of the trucks. Only for the visible carriages, did I go all out with super detailing:
A64A8924-15C7-422D-B4FA-4170A82ED888.jpeg
6903F1B4-2918-49F5-A396-4E87A299BEA6.jpeg
25951A58-414E-4DDC-93A5-DE430EF1C9FE.jpeg
My friend, Dan Pariser, gave me some really nice photo-etch haul-in tackles that will greatly simplify “rigging” the guns.

The port lids offered many opportunities for improvement:
790C1A6B-1962-4323-B97F-579CA6C533DF.jpeg
D0D50BE1-F01D-4F9B-A5F3-1639F787BD63.jpeg

91984E9A-1422-4748-BCC6-BC33FBADA1FA.jpeg
7E9C5883-7539-4AEE-BDFC-C7C1BAC5455A.jpeg
F5446265-4DAC-4BBD-81F3-432874E1F809.jpeg
Rather than use fleur-de-lis for all of the port lids, I thought it would be a nice echo of the frieze to incorporate the shells, on the upper tier. In truth, French ships of the epoch used a number of different ornaments on the ships of the Premier Rang Extraordinaire.

For the port lids, port openings, and eventually the upper bulwarks, I use walnut ink as a distressing medium. It’s super easy to thin or dial back the effect with a wet brush. Once you are happy, you can clear-coat it and make it permanent.

Next, was a light re-design of Berain’s quarter galleries. The main modification, here, was a reduction from five to three lower gallery windows:
E3239FBF-9A93-471E-8ACA-CACE24F16AFE.jpeg
816AAACF-DEFF-4141-A6E7-298042CB0BF6.jpeg
AA91B34E-4F77-48FE-A57A-2739A987D5A2.jpeg
There are definitely issues that still need to be resolved before my drawing will actually work with the reality of the model I am making, but I am aware of the adjustments that I need to make.

Tomorrow, I will post the frame-up and re-construction of the lower transom, which will bring the project up to date.

Thank you for your likes, your comments, and for looking in.
 
Hallo Marc,
Many thanks for starting this highly interesting topic in our forum. Much appreciated.
It is really impressive what you are doing with this Heller model. A friend of mine is building the victory and also bashing it extremely (Dafi). So I know how much work it can be.
We have several specialist modelers here with big knowledge of this period and their ornamentation, f.e. @Ivan Trtanj or Willi meischl, alias @schifferlbauer so I guess you will have interesting talks here in your topic.
I will follow your work with big interest.
 
I guess you have this interesting book already?
 
Thank you, Uwek! I appreciate the kind words.

Yes, I am very familiar with Dafi’s Victory, as he keeps a blog on MSW. What he has managed with that kit, which is a much better foundation for a serious model than Heller’s SR, is nothing short of remarkable. I have that kit, as well, and dream of some day converting her to her 1765 appearance.

I will look for Ivan and Willi. Thanks for the references. And, Mr. Lemineur’s book was what first clued me in that, perhaps, the Tanneron model is not to be taken as the Biblical last word on the first SR’s likely appearance. My version is in French, and it was challenging to translate, before the advent of smart phone translators, but as a result, my French improved significantly.
 
Marc does the original French version of JC Lemineur's book have a full profile drawing of Berain's Soleil Royal inside the jacket?I bought the English version released much later and it does not come with a jacket.There is just the stern quarter and bow section of the Berain drawing on the front and back cover.

Superlative work in plastic,I would need many Stella's after altering those cannons as you have doneROTFROTF

Did you seal the Acrylic with anything prior to applying oils?

Kind Regards

Nigel
 
All of this was a rather slow process of modifying the primary components of the lower and upper hull. It was important to me to add my modifications before paint because I fully expect the model to take me 8-10 years before it is complete; I don’t want bits and pieces flaking off because they are poorly bonded to paint.

Anyway, once the big work was done, I began to layout the 1/16” styrene plinth that will serve as the foundation for the model, which will ultimately be a diorama.

My vision is to set the ship in the roadstead of Brest, with the parapet walls of the arsenal in the background, and the ship’s chaloupe transporting Tourville to the gangway, on the morning that she makes ready to sail for Barfleur. The crew will be loosing the topsails, just as you see in so many Puget portraits, and weighing anchor:
D3B70758-F586-4200-ADF6-73C93679E4FA.jpeg
She will have had a few years in the water, since the refit, so she won’t be dirty, exactly, but not pristine. In any case, the purpose of distress washing is as much for a sense of realism as it is also helpful in highlighting all the fine mouldings and reliefs that we labor for endless hours to create.

That is also why the ship will not be completely bathed in gold paint, but rather only the ornaments, themselves, will be picked out in gold. Sheer strakes, port frames, mouldings, the frieze lattice, etc, will be done in yellow ocher with the walnut wash.

Perhaps, if Hayett’s description of the Royal Louis is to be applied to SR, the very first incarnation of the ship would have been heavily - almost entirely - gilded. By 1688, however, and in the midst of a re-build that was already more expensive than if they had started from scratch, it seems more likely that the use of gold leaf would have been greatly reduced, in order to lower costs. The ship, after all, was no longer to serve simply as a talisman of Louis the XIV’s power and prestige; she was being made ready for war!
2071EBC7-ED04-4657-8E2E-A4AF9375EA10.jpeg
7EB13102-7227-4E99-A776-A5B4B9350A3C.jpeg
One of my objectives with this model - since I’d be constructing the stern from scratch, was to present the round-up. With that in mind, I mapped it onto the plinth, and the sternpost. The ship’s sides, below the stern counter, were actually trimmed back a tapering eighth, in order to accommodate this round-up without forcing the sternpost too far outboard, if that makes sense.
3B5F311A-6497-492D-9E8E-526BD1E26A77.jpeg
I doubled the plinth at the fore and main mast footings, and also at the stern. This re-enforced these areas, and also gave me a positive stop for the glue-up, which simplified that slippery process. The plinth is also drilled in two locations for mounts that tie it to it’s build board.
0EF6720C-7DD2-4432-AB93-AA24E9105D42.jpeg
The interior was then gusseted and glassed with epoxy for extra strength. These gussets also serve as mounts for the “beams” that will eventually support the camber-less lower gun deck.
884D5C31-AD1D-4AF7-AB9A-D0CB5F719DD3.jpeg
A4BC8780-5137-4F02-B320-BA8D96071889.jpeg
4806AE4F-861D-4D86-960C-CBC19AB75CD7.jpeg
A re-enforcement and thickening of the stem. I apologize because I do not understand why SOS sometimes changes my picture orientation.
026BF3F6-7AE2-4143-856A-B2881CBB5835.jpeg
37C04D2A-5F2D-42A3-99C3-D1B17949692C.jpeg
Up until this level, at the stern counter, my transom is square to the centerline, but there’s a bit of un-expected trouble ahead!!!!

A few perspective shots to remind myself where all if this is going and that it will all be worth the effort:
5A025AFD-0F1E-4394-8DA4-00A4CE9816FF.jpeg
3CABD3AC-F020-40DE-BDAE-0FF24D5348AF.jpeg
995AA3CF-52A6-4933-9D3D-726891C7C963.jpeg
BB8D3C65-1022-4E54-BE27-8B932AA4B1FD.jpeg
Cutting in for the rudder head. Yes, good friends and sharper researchers than I have noted that the tiller, and not the rudder, would have passed through a rectangular slot, just above the sternpost. At the time that I was doing this, I used Olivier Gatine’s model of La Belle, and Tusset’s St. Philippe as my guide.
B88C2429-58A0-4659-9A21-495CC425CC7E.jpeg
C8A2E98B-7010-46AD-A1D8-929A19F4276C.jpeg
It is important that I get a strong sense for the correctness of the big mouldings, like the transom moulding:
FB57B1E4-F1C7-411B-A478-794E91433B2C.jpeg
A8A0E4C1-1F59-415D-9807-C629361F9463.jpeg
0E6C13DA-6132-4873-8B61-7F035E397659.jpeg
C18E385E-6C39-4668-9C7B-F32B237EEA41.jpeg
1A404901-C862-4A62-ACA3-5AF8BF98F9E8.jpeg
This moulding was built up in three layers.

My original plan was to recycle the stock kit windows and heat-bend them to the round-up. David Antscherl persuaded me to make them from scratch.
A3D4B690-DB9A-42DE-9997-97EE18C0791E.jpeg
D770E6E7-E659-4B52-A0A9-6FD5F7995D68.jpeg
325708CE-8549-47A2-B42C-A34EBE58B176.jpeg

In the next post, I will discuss a few items of authorial license that I have taken with the lower transom and rudderhead.

More to follow. Thank you for your interest.
 

Attachments

  • 70C15B08-CA8F-4B3B-B702-059FCB48204F.jpeg
    70C15B08-CA8F-4B3B-B702-059FCB48204F.jpeg
    153.1 KB · Views: 11
Okay, Nigel, so yes - I’ve downed liberal quantities of scotch and ale throughout this build, and in the spirit of sailors’ rations, I fully intend to continue that tradition.

As for painting with oil over acrylic, it was not necessary to surface treat it. I did, however, find that it was necessary to really allow the acrylic to fully dry for three days, or so, before applying the oil. In the early going, I noticed a faint, hazy blush on the oiled/burnished surface, the next day. Fortunately, a vigorous re-brushing with the oil-residue’d chip brush was enough to release whatever moisture was trapped underneath.

In the French version of Vaisseaux du Roi Soleil, there is no complete broadside view of Soleil Royal - only the color gouache portrait by Pierre Vary, which is directly based on what I think are the quarter and bow sets, in Berain’s hand. There is also, of course, the well known and indisputable Berain stern drawing.

It was initially puzzling to me that Mr. Lemineur would use this color portrait for his cover and say so little about it, in the book. Over the years, I have struck up a correspondence with Mr. Lemineur, and he has been exceedingly gracious in helping me to better understand this transitional phase between the First and Second Marines.

In coming to understand his thinking a bit better, I now can see why he is very uncomfortable dwelling among the fragmentary and, often, contradictory scraps of Soleil Royal imagery.

I was astonished, for example, to realize very recently that the bow drawing in both Berain and Vary’s portraits makes no accommodation for the forecastle deck. It simply isn’t there, however SR1 and SR2 were certainly furnished with forecastle decks.

And, of course, there are numerous issues of perspective and structural coherence that plague the quarter drawing.

So, the difficulty of any attempt to model SR1 is that you must, somehow, fill in all the blanks between bow and stern, and reconcile all of the apparent ornamental anomalies in some sort of sensible way. At best - it is an educated guess.

The St. Philippe, on the other hand, offers a much firmer foundation for historic accuracy, and a more credible portrait of a French First Rate.

Personally, I have no reputation at stake, so I am happy to play with conjecture. My point of view Is that, if no one persists in asking the question(s), then we will never inch closer toward any sort of answer.

“Bartender! Make it a double!”
 
Last edited:
Thanks Marc for the detailed,informative and interesting reply Thumbsup
I do feel that knowing what Soleil Royal looked liked in 1669 before the refit is almost a complete lost cause.

As an example,the English Warship Prince 1670 was refitted and renamed Royal William,the two have very little in common.The term "refit" is often used to disguise expense to the taxpayer when infact they are almost building a new vessel utilising little of the first incarnation.The difference in design between the two incarnations of Soleil Royal could have been very dramatic.
The practice is still very much alive today,with vessels lengthened,widenened or completely changed topsides to suit a change in use.

Kind Regards

Nigel
 
‘Heading down the home stretch, and we will soon be up to date!

I have to say, it’s really weird which photos the photo editor turns sideways. A lot of sideways pics in this post - again, my apologies.

There are two areas where I have decided to take authorial license with the ornamental program. The last surviving gun from SR1 is emblazoned with the motto:
NEC PLURIBUS IMPAR
which means, roughly:
NOT UNEQUAL TO [the illumination of] MANY [suns]

I found this to be so emblematic of Louis XIV’s self-conception that I wanted to find a way to incorporate it into the model, so that it would be easily visible.

There has been quite some debate on MSW, concerning the plausibility and likelihood of placing a flowing banner ornament, like this, beneath the transom moulding. The prevailing argument against doing so is that a strong following sea would likely wash it right off the transom.

Well, I didn’t feel comfortable painting it on, and there was no other place above the transom moulding, where it wouldn’t interfere with the rest of Berain’s ornamental program. And so, despite sound arguments to the contrary, I decided to go ahead and place the ornament here. Ultimately, it adds something of historic relevance from the time period.

I modeled the banner on Le Foudroyant of 1723’s name banner:
A76A8EF4-0D07-4176-B0D2-279AF1234D0F.jpeg
48AAAF50-8EAA-4983-BFDE-2DA0957A0183.jpeg
1DEC3CAA-CFFD-486E-B018-5B06A6F2B74A.jpeg
D65BC6FF-2A2B-4B93-A6A0-A9BC6DE78D20.jpeg
54EAB9DB-5717-4C49-9384-1B8A1F22D29E.jpeg
My other fictional indulgence is the rudder head ornament. Berain draws a sort of Palladian ornament in the area of the rudder head, but it is difficult for me to interpret what that would really look like in three-dimensions.

Ultimately, what appealed to me more was this rudder head dolphin from Soleil Royal’s contemporary, the re-designed Dauphin Royal:

223131E5-B456-4004-8E01-947EF48B95DF.jpeg
74B4D285-9534-448A-9B3C-BDCD11CF04B0.jpeg

Many thanks to Marc Yeu, AKA Nek0, for supplying these ultra clear images of the DR, and allowing me to use them.

The new quarter galleries I am making have similar, low relief, dolphins flanking the false windows on the main deck level. I thought a rudder dolphin would be thematically consistent, and would look really cool.
AFE76DA0-4601-4821-86CD-787A280241BC.jpeg
616E8907-5A8F-4C07-94AF-3B8DA2213446.jpeg
588A73E8-F45B-42BB-9C94-7E0085DF928E.jpeg
D5D75AD1-73C1-4268-9789-896EC100C698.jpeg

All of that brings us to the present, where I am in the midst of a particularly challenging frame-up and planking for the stern counter and above.

I have lately come to realize that the rake of my stern, beginning at the counter level, is running askew of the ship centerline. At the main deck level, the starboard side projects, aft, 3/32” further than port. By the time you get to the tafferal, that difference has grown to 5/32”, or 15 scale inches.

This sounds like a lot, and it is significant. Fortunately, it does not jump out at you, and the gentle curve of the round-up will help conceal the problem. In truth, there isn’t much I can do about it because I need every last scale inch of the upper bulwarks to fit all of the QG figures, the quarter pieces, etc; I can’t afford to cut back the starboard side because the loss will be significant enough to make the upper bulwarks appear cluttered.

While I’m sure I have had some hand to play in this discrepancy, I don’t think I was so negligent, while truing the back edges of the upper bulwarks, to completely alter the rake of the stern. I know that my extension pieces run perfectly parallel because I can still make out the joint.

My suspicion is that this is at least partly an artifact of the kit prototyping process, which used to be done by hand. The model is designed, naturally, for the parts to all more or less fit together. As anyone who has built a Heller sailing ship kit can attest, though, that often means less. So questions about whether the transom is square are not readily apparent, when building the stock kit because our brain is not looking for that; we are just trying to massage the parts so that they go together, and if putty is part of that equation, then so be it.

However, once you begin to reverse-engineer things to fit the stock kit, all sorts of interesting problems emerge!

In order to frame between the counter and the upper transverse bulkhead, at the main deck level, it was necessary for me to first fir-out the transverse bulkhead to account for this increased stern rake on the starboard side:
93AE4690-D87C-4264-ABA8-B96920B88C3C.jpeg
62F23542-A30B-43A7-BD8A-ECDAEF528A7E.jpeg
After this transverse bulkhead was adjusted, I could then individually fit the vertical bulkheads between this lowest tier of six lights. It was all very fiddly business, but now that all is sanded fair, I could tackle another complicated bit of plastic surgery.

While I am re-creating the structure of the stern from scratch, I always seek to re-cycle whatever ornamental work that I can. I had this idea that I could take the rudder concealing ornament and incorporate it, up into the fabric of the stern counter/false balcony in the way that Berain drew it:
1F5AFD89-BF8C-434F-B2F0-B76A193A6274.jpeg
As I have two of these, I figured that I could separate the head from the acanthus brackets, and then set the head so that the first layer of counter planking abuts it. I could then seamlessly let the acanthus brackets into the transom planking, just behind the head, thus reducing (if not eliminating) the gap between them. It is not perfect, but I think it will work out pretty well:
344A125C-B28C-4B0D-B4A0-9ED5F2AA930E.jpeg
704BD0FA-5AC8-4409-AE81-694310DEB1B4.jpeg
E3487083-A697-4A4B-A324-1EE5E17BCF9C.jpeg
This is where the model stands right now. In order to create the paneling of the false balcony, several layers of styrene will be applied, at different depths, as required by the design. The central section, with the lambrequin tassels will project the furthest. Once I know what all of that amounts to, I will fabricate the top and bottom mouldings that frame it all in, and install the window plate and fit the pilasters between windows, and etc, and so forth.

Thanks to everyone who has taken an interest in this project. I will be posting regular updates from here, going forward.

All the best,
- HH

PS, this post is a pretty good example of why the main build log runs 37 pages, and counting.
 
Last edited:
Thanks Marc for the detailed,informative and interesting reply Thumbsup
I do feel that knowing what Soleil Royal looked liked in 1669 before the refit is almost a complete lost cause.

As an example,the English Warship Prince 1670 was refitted and renamed Royal William,the two have very little in common.The term "refit" is often used to disguise expense to the taxpayer when infact they are almost building a new vessel utilising little of the first incarnation.The difference in design between the two incarnations of Soleil Royal could have been very dramatic.
The practice is still very much alive today,with vessels lengthened,widenened or completely changed topsides to suit a change in use.

Kind Regards

Nigel
Call me a fool, but I am eventually going to try. Your point about the Prince/Royal William is well received.

What I find fascinating about Berain’s stern drawing is that he represents the pre-1672 transom, whereby the wing transom is located above the chase ports, thus defining the widest point of the stern.

This, combined with the fact that the council chamber coffered ceiling was salvaged, in the re-build, and re-incorporated suggest that Laurent’s son, Etienne, remained faithful to his father’s first framing of the ship - even if it was necessary to replace most of it.

Added to that is the legend that some of the stern ornament was also salvaged and re-incorporated. As I argue in my other log, I believe that Berain merely re-framed LeBrun/Puget’s existing allegory in his own compartmentalized style. I imagine that, in it’s first incarnation, SR’s stern was more exuberantly carved, but that it probably looked very similar to the re-build.

There is an established pattern, with the Royal Louis, in particular, of recycling the allegory and even the posture and arrangement of the major figures from one build to the next.

Structurally and architecturally, though, I suspect that early SR had a very similar appearance and bearing as the Royal Louis and Monarque - only, a bit broader and longer.

I can almost see it clearly enough in my minds’ eye to draw it. Unless a truly credible portrait emerges, though, I will never be able to say with any certainty that such and such is so. I will try, though.
 
Back
Top