
-

SUBSCRIBE TO SHIPS IN SCALE TODAY!
The beloved Ships in Scale Magazine is back and charting a new course for 2026!
Discover new skills, new techniques, and new inspirations in every issue.
NOTE THAT OUR NEXT ISSUE WILL BE MARCH/APRIL 2026 -

Win a Free Custom Engraved Brass Coin!!!
As a way to introduce our brass coins to the community, we will raffle off a free coin during the month of August. Follow link ABOVE for instructions for entering.
You are using an out of date browser. It may not display this or other websites correctly.
You should upgrade or use an alternative browser.
You should upgrade or use an alternative browser.
Sovereign of The Seas 1637 - Heavily modified Mantua kit
- Thread starter modelshipwright
- Start date
- Watchers 35


xenrunner said:Bill hi,
I'm speechless ...
Wonderful carving; something I can never dream of doing :greetings-clapyellow:
Cem.
Thank you for your kind remarks.
Bill
The Unicorn that sits on the stern rail at the starboard side was the next carving in the round to be done.
The next photo shows the beginning of the carving against the section of the stern from the Lely portrait.

I used several aids as guides to how the unicorn would look besides the Lely portrait. Here is an image obtained from Google pictures.

The Unicorn underway..........

A little more refined........

The finished Unicorn mounted on the stern of my model. The horn was made by inserting a piece of boxwood in my rotary tool and using a diamond file to create the shape. It was then cut off and mounted on the carving.

More to follow.......
The next photo shows the beginning of the carving against the section of the stern from the Lely portrait.
I used several aids as guides to how the unicorn would look besides the Lely portrait. Here is an image obtained from Google pictures.
The Unicorn underway..........
A little more refined........
The finished Unicorn mounted on the stern of my model. The horn was made by inserting a piece of boxwood in my rotary tool and using a diamond file to create the shape. It was then cut off and mounted on the carving.
More to follow.......
Last edited:
The next project was to start filling in some areas on the starboard gallery. There are small carvings with a face and swirls beside their heads above the gallery windows as shown on this section of the Pett Painting.

The start of the carvings in a strip of boxwood.

Some of the carvings separated from the strip.......

With a Canadian dime to show scale......

Three of the four carvings mounted on the gallery.

More to follow...........
The start of the carvings in a strip of boxwood.
Some of the carvings separated from the strip.......
With a Canadian dime to show scale......
Three of the four carvings mounted on the gallery.
More to follow...........
Last edited:
A friend of mine is a dentist and periodically he updates his equipment used in surgeries. I was fortunate enough to inherit one of his dental drill units. It is a brushless motor in the handset and has a quick change handpiece head for changing burs. I use both the belt driven drill and the new dental drill in my carving.
The Spectra Surge Dental Drill unit with handpiece.

The black stand with the grey cord on it is an LED light that turns on when the drill is operated and focuses a beam of light on the area it is aimed at.
More to follow......................
Bill
The Spectra Surge Dental Drill unit with handpiece.
The black stand with the grey cord on it is an LED light that turns on when the drill is operated and focuses a beam of light on the area it is aimed at.
More to follow......................
Bill
Last edited:
The next carving I approached was the Coat of Arms for the area below the gallery windows on the starboard side. It is much the same as the one shown below that I carved for the port side.

In the following series of photos I will show you the progress of the carving process. In this way you can see what was in my mind as I approached each area towards finishing it.


The Coat of arms is now complete and the additional small faces on each side have been added.

More to follow........
In the following series of photos I will show you the progress of the carving process. In this way you can see what was in my mind as I approached each area towards finishing it.
The Coat of arms is now complete and the additional small faces on each side have been added.
More to follow........
Last edited:
One very important reference that I obtained was a book by Hendrik Busmann called "Sovereign of the Seas" Die Skulpturen Des Britischen Konigsschiffes von 1637, published in 2002 by Convent, and Deutsches Schiffahrtsmuseum, Brenerhaven Germany. Busmann did his thesis on the sculptures on the Sovereign and produced this wonderful account in the process. It came complete with three inserts which include the view of the hull from port side from the Payne engraving, the Van de Velde sketch of the port side and the painting from the Museum of Fine Arts Boston of the starboard side which is attributed to Peter Pett.

The book is written in German but does provide a wealth of information in photos with closeups of specific areas on the hull. It has proved to be a very important guide for my carving work and needed to be mentioned in this log.
More to follow...........
The book is written in German but does provide a wealth of information in photos with closeups of specific areas on the hull. It has proved to be a very important guide for my carving work and needed to be mentioned in this log.
More to follow...........
Last edited:
The four spaces adjacent to the coat of arms should be two wide spaces so I removed the dividers in the middle of each space. I then carve another mythical creature with a rider on his back to fill the left hand space.

More to follow.........
More to follow.........
Last edited:
As a break from carving I started work on the fore deck railings. The following photos look at preparation of the fore deck and the bulkhead against that deck for the placement of rails. At the top of the bulkhead a capping trim was formed and glued in place.
The next few photos show of the progress of rails that will surround the fore deck. Also shown is the Temco Template former used to copy the profile of the shape of the front of the fore deck.


This photo shows the assembly of the stanchions to the front part of the fore deck rail.
More to follow.........
All comments and suggestions appreciated.
Bill
The next few photos show of the progress of rails that will surround the fore deck. Also shown is the Temco Template former used to copy the profile of the shape of the front of the fore deck.
This photo shows the assembly of the stanchions to the front part of the fore deck rail.
More to follow.........
All comments and suggestions appreciated.
Bill
Last edited:
The port and starboard fore deck rails are mounted and the next step is to fit and mount the front rail seen sitting loosely on the deck surface.

I had been meaning to cap the railing to the poop deck a long time ago and finally made the capping rail piece from boxwood and assembled it. it is about 1 mm wide and 0.5 mm thick. It was shaped using my soldering iron fitted with a brass tip I made specially for bending wood strips. The cap adds a nice finishing touch and blends nice with the stairway railings.

More to follow...........
I had been meaning to cap the railing to the poop deck a long time ago and finally made the capping rail piece from boxwood and assembled it. it is about 1 mm wide and 0.5 mm thick. It was shaped using my soldering iron fitted with a brass tip I made specially for bending wood strips. The cap adds a nice finishing touch and blends nice with the stairway railings.
More to follow...........
Last edited:
The following photo shows the assembly of the fore deck rails. They now have to be final fitted in place so that the joins are smooth and flowing from front to side rails.

The work now begins on fabricating the beak-head supports. I am using contemporary paintings and sketches as well as some beautiful models of the Sovereign that I have seen in my travels as guides to how I will represent the beak-head. One such model is located at the US Naval Academy in Preble Hall, Annapolis MD. Built in 1921 by Henry B Culver. Another was built by Ed Marples and is located in the Ventura County Maritime Museum in Oxnard CA. I have viewed both of these fine models and have many photos to refer to. The following picture shows the blanks cut out in Costello Boxwood. Now begins the process of forming the shapes that best support the sculptures they will be fitted with.

This photo shows the blanks test mounted on the beak.

More to follow.........
The work now begins on fabricating the beak-head supports. I am using contemporary paintings and sketches as well as some beautiful models of the Sovereign that I have seen in my travels as guides to how I will represent the beak-head. One such model is located at the US Naval Academy in Preble Hall, Annapolis MD. Built in 1921 by Henry B Culver. Another was built by Ed Marples and is located in the Ventura County Maritime Museum in Oxnard CA. I have viewed both of these fine models and have many photos to refer to. The following picture shows the blanks cut out in Costello Boxwood. Now begins the process of forming the shapes that best support the sculptures they will be fitted with.
This photo shows the blanks test mounted on the beak.
More to follow.........
Last edited:
The bulk head supports are now modified to include the height of the side decorative panel and are now gently curving towards the beak where joined.

The forward edges of the supports are now being beveled to reflect the line of future planking and structural woodwork that will support the sculptures.

Side view.

The beak construction begins.


This shot shows the progress to date of the beak construction. All timbers are Pau Marfin.
More to follow.........
The forward edges of the supports are now being beveled to reflect the line of future planking and structural woodwork that will support the sculptures.
Side view.
The beak construction begins.
This shot shows the progress to date of the beak construction. All timbers are Pau Marfin.
More to follow.........
Last edited:
The construction of the beak is progressing. Provision has been made for the gammoning that will secure the bowsprit.
As viewed from above.
The overall concept for the beak is to model the Vasa of 1628 as it was built in the same period.
More to follow........
As viewed from above.
The overall concept for the beak is to model the Vasa of 1628 as it was built in the same period.
More to follow........
Attachments
The next photo shows the beak in a more completed fashion. Next begins the work where the beak encounters the hull of the ship.

The small deck extension is now being planked in Holly with a new front trim glued in place

More to follow........
The small deck extension is now being planked in Holly with a new front trim glued in place
More to follow........
Last edited:

Stunning work. I just went through your log on the other site and am glad I found it again. Since this is a smaller site, your work is not lost as easily as on the msw site.

GaryM said:Stunning work. I just went through your log on the other site and am glad I found it again. Since this is a smaller site, your work is not lost as easily as on the msw site.
Thanks Gary. I appreciate your comments. I follow and enjoy your build of SOS on this site as well.
Regards,
Bill
Graham said:Fantastic work. I see you using woods such as Swiss Pear, Holly and Pau Marfim (had to look that one up). Do you season the wood yourself and then rip it or buy the strips in ready cut? Regards.
Thanks for dropping by Graham. I purchased all the wood I use from several exotic wood dealers in Canada and the US and millled the strips needed on my 9" band saw and Preac miniature table saw. Then the wood is processed through my home made thickness sander to final size. The wood is now 20 or more years old and stored in a closet in my workroom. The wood is seasoned and ready for use when I need it.
Regards,
Bill
 The small deck extension is planked and the next photo shows it loosely fitted to the model with a dowel in place to represent the bowsprit. The straight piece across this deck is the trim to finish off the deck agains the hull. The ends will be bent to conform to the shape.
A shot from the front showing the trim piece with the ends bent to shape and loosely fitted against the hull.

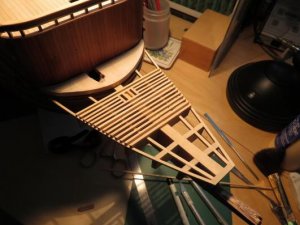
Construction of the sides of the beak head are underway. Swiss Pear planking is now being applied to the birch plywood forms.

More to follow...........
Last edited:
Hi Bill and thanks for your response regarding the woods you use. A neighbour was recently lopping his cherry tree so I acquired some logs for my wood burner - is cherry a good modelling wood and might be worth me hanging on to? They are pretty straight and branch (so hopefully knot) free. Sorry, but a second question - why is the bowsprit offset? The old ship builders certainly knew a thing or two, but you would think that in the long run that would impart unequal stresses on the ship. Cheers.