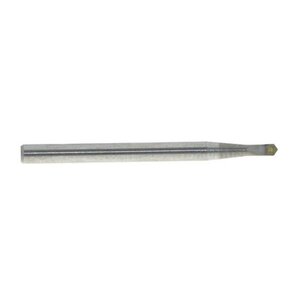
Flat ended bits sound more like a milling tool than for drilling. Maybe they could mill their way through given more time and if a cutting edge(s) are present on the bottom end. ???? RichLots of great info here. I think I’ve ordered 5 or 6 different drill bits trying to find good ones for brass. I’ve sent several sets back as they had flat ends not pointed. Also for size 67 and smaller my smallest collet is to big to hold the shaft without slipping. I finally found ones with the 1/8 inch shaft, similar to what Donnie was showing. So much trouble just to drill a damn hole!
-

Win a Free Custom Engraved Brass Coin!!!
As a way to introduce our brass coins to the community, we will raffle off a free coin during the month of August. Follow link ABOVE for instructions for entering.
-

PRE-ORDER SHIPS IN SCALE TODAY!
The beloved Ships in Scale Magazine is back and charting a new course for 2026!
Discover new skills, new techniques, and new inspirations in every issue.
NOTE THAT OUR FIRST ISSUE WILL BE JAN/FEB 2026
You are using an out of date browser. It may not display this or other websites correctly.
You should upgrade or use an alternative browser.
You should upgrade or use an alternative browser.
I think they’re supposed to be for mild steel. Useless for brass, travel all over, sent them back.Flat ended bits sound more like a milling tool than for drilling. Maybe they could mill their way through given more time and if a cutting edge(s) are present on the bottom end. ???? Rich
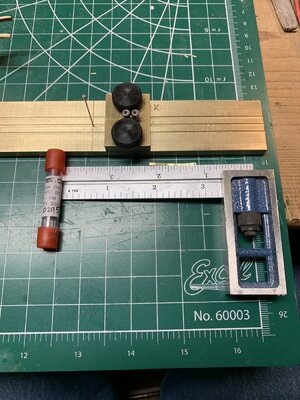
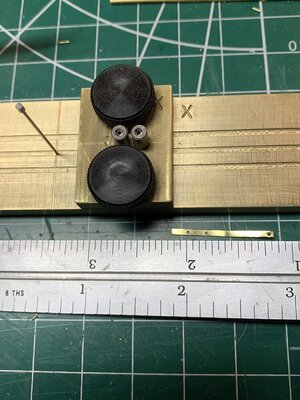
After receiving a lot of good recommendations and techniques I adapted one clamping jig with space stopper pin and put my own evolution of that which a local machine shop owner, apprenticed in Austria with a degree in mechanical engineer and metallurgy, produce for me from my drawing and the chunk of hard brass that I took in. He said he would have to anneal it to settle it down before proceeding further and then recommended acquisition of bushings to better guide the drill. COVID and Wx delays set the production schedule back almost a month but he called this morning saying he had the bushings and we discussed his commencement of the new "toy" for this boy. The photos make it pretty well self explanatory.I think they’re supposed to be for mild steel. Useless for brass, travel all over, sent them back.
The center guide groove is for my 1/64" x 1/16" brass strips for the shroud chain plates for my BN MS2130. Drilling with a #28 bit is through the first bushing and then a stopping pin feels out and drops into the hole in the second bushing with the spacing that I needed. With prior experimentation and frustrations I decided to bite the cost bullet and pro
 ceed.
ceed.There are less expensive ways that many SoS members use but with my eyesight and other challenges I was not able to consistently receive the results that I wanted . . . at least for these parts of the schooner . . thinking "it doesn't cost, it pays".

Beautiful jig Rich great to hear you are on track.After receiving a lot of good recommendations and techniques I adapted one clamping jig with space stopper pin and put my own evolution of that which a local machine shop owner, apprenticed in Austria with a degree in mechanical engineer and metallurgy, produce for me from my drawing and the chunk of hard brass that I took in. He said he would have to anneal it to settle it down before proceeding further and then recommended acquisition of bushings to better guide the drill. COVID and Wx delays set the production schedule back almost a month but he called this morning saying he had the bushings and we discussed his commencement of the new "toy" for this boy. The photos make it pretty well self explanatory.
The center guide groove is for my 1/64" x 1/16" brass strips for the shroud chain plates for my BN MS2130. Drilling with a #28 bit is through the first bushing and then a stopping pin feels out and drops into the hole in the second bushing with the spacing that I needed. With prior experimentation and frustrations I decided to bite the cost bullet and proView attachment 214010ceed.
There are less expensive ways that many SoS members use but with my eyesight and other challenges I was not able to consistently receive the results that I wanted . . . at least for these parts of the schooner . . thinking "it doesn't cost, it pays".View attachment 214011
Cheers,
Stephen.
that’s an impressive setup.
Nice idea. I like the precision you will be able to achieve and no wandering drill tip.
Your drawing and idea to move the stock and not the table gets the credit. I used it today to drill out all of the shroud plates and now need to do some filing and shaping to accept the deadeye strops on the rail top. I can now also drill and shape some items for the bowsprit area rigging. I will still need to deal with drilling holes for the various bands on the yards with single, double, triple, and quad rigging connections. I'll probably to do a much thinner sheet stock which I can cut, fold and drill than staying with the 1/64th for a lot of that. Thanks again for your idea. It is working very well with my small drill press and the jig on the table with the bushings using a regular #68 bitt.Beautiful jig Rich great to hear you are on track.
Cheers,
Stephen.
Rich
My pleasure Rich.Your drawing and idea to move the stock and not the table gets the credit. I used it today to drill out all of the shroud plates and now need to do some filing and shaping to accept the deadeye strops on the rail top. I can now also drill and shape some items for the bowsprit area rigging. I will still need to deal with drilling holes for the various bands on the yards with single, double, triple, and quad rigging connections. I'll probably to do a much thinner sheet stock which I can cut, fold and drill than staying with the 1/64th for a lot of that. Thanks again for your idea. It is working very well with my small drill press and the jig on the table with the bushings using a regular #68 bitt.
Rich
I am very happy to hear I have helped.
Cheers,
Stephen.
My pleasure Rich.
I am very happy to hear I have helped.
Cheers,
Stephen.O
I initially tried to drill freehand through the jig bit broke two bits not having sufficient feed control. When I put the jig onto my small drill press, moved from the cold garage into the warm den work area I have had no breakage of bits and as long as I secure the feed stock with the finger screws I get the perfect alignment that the bushings provide. It will work for some fittings and not others depending upon folding through drilling complexity in a case by case basis.My pleasure Rich.
I am very happy to hear I have helped.
Cheers,
Stephen.View attachment 214262
Take a look at this You Tube video by Click Spring. in this video he shows how to modify standard drills to cut brass.
he is building a copy of the Antikythera mechanism using only ancient tools. one of the videos shows how to make paddle drills that are ideal for use on brass and wood.
he is building a copy of the Antikythera mechanism using only ancient tools. one of the videos shows how to make paddle drills that are ideal for use on brass and wood.
Last edited by a moderator:
Some days ago I ordered from Fischer Goldschmiedebedarf so called "Spitzbohrer" "HM-SPEAR DRILL" of the company Meisinger
I guess these are following the same principles

 www.goldschmiedebedarf.de
I guess these are following the same principles

Goldsmith Tools, Workshop Equipment, Findings & Pearls, Gemstones - Karl Fischer GmbH
Goldsmith Tools Shop. Since 1895, the Karl Fischer GmbH offers everything to the jewelry manufacturing. Tools and accessories for watchmakers, jewelers, model makers, opticians and other professional groups. Repair equipment, tools, machinery, findings, jewelry parts, gemstones, beads and...
Great video, Jim. The problem, however, how to make such drill bits in 0.3, 0.4 diameters. This is the real challenge 
I previously tried to work down standard drill bit points but at the small sizes was total unsuccessful in the #68 size range up and down in experimentation. I am very pleased with the jig and bushings that I had made which does not require special points. RichGreat video, Jim. The problem, however, how to make such drill bits in 0.3, 0.4 diameters. This is the real challenge
I have reground 0.5mm drills using a extra fine diamond lapping stick, I admit that that I will break 1 out 3 that I grind. Uwek's paddle drill works well on plastics and wood. if you follow Click Spring's videos on making the Antikythera replica he uses nothing but paddle drills and the results are works of art.Great video, Jim. The problem, however, how to make such drill bits in 0.3, 0.4 diameters. This is the real challenge
Interesting video and concept but much larger than the sizes for No. 68 downwards to at least No. 72 bits. Also the need for the forge. Thanks, RichI have reground 0.5mm drills using a extra fine diamond lapping stick, I admit that that I will break 1 out 3 that I grind. Uwek's paddle drill works well on plastics and wood. if you follow Click Spring's videos on making the Antikythera replica he uses nothing but paddle drills and the results are works of art.


