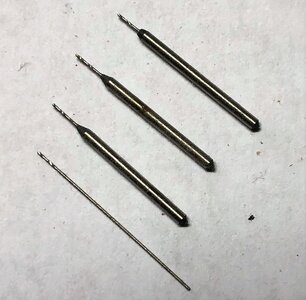
Stable mini-drill bits for narrow brass strips

The wood strips hold the brass strip from wandering laterally. I only drill through the brass and not through the aluminum. It give me a more solid under-surface than when I tried doing the drilling onto wood which caused the bottom of the brass to protrude downwards around the circumference. I thought that aluminum would reduce or prevent that distortion of the exit hole. I was not successful in only holding down the strip ends as the middle portion moved laterally.
The three holes are spaced 3/16 inch apart. I check the alignment of the jig by touching down on one end on the centerline and then traversing the table to the other end to check until I have those aligned on the centerline. Not a machinist approach but like walking in a long range shot to the target.

Your suggestion of a top plate with three drill guide holes would more accurately position the final holes in the brass but still require my correctly placing the bit through them. If I find the number of X revolutions between holes I could do it that way but it would be slower and possibly less accurate as long as I don't distort the guide holes. Let me know of your reaction to this. thanks, RIch
Hi Rich,

Do you intend to drill down through the aluminium using the aluminum as your drill guide?

It is important that your jig and therefore the workpiece is parallel to the table, that is to say that the groove used to locate your brass strip is parallel to the table.

I would trim off the wood on either side of the aluminium as from what I can see it is not necessary or straight this may aid setting up.

Are the centre distances between holes similar?

Cheers,
Stephen.
 
Hello, Rich. I think aluminum under surface may add to the mix of troubles. The drill bit must freely exit from the drilling hole, in your case, it will hit the aluminum. Also, the drill bit should be cut brass without excessive force, and most important has a very precise feed. Arguably, the milling machine is the optimal tool for such drilling. Parts are held well horizontally, and you have a precision feed from a horizontal column. Straight and perpendicular to a table\pars. Also, I want to mention that I use short drill bits. I brought them from Russia. I am sure it can be found here. * the long twisted drill will break at the first attempt.

IMG_1818.jpeg
 
Hello, Rich. I think aluminum under surface may add to the mix of troubles. The drill bit must freely exit from the drilling hole, in your case, it will hit the aluminum. Also, the drill bit should be cut brass without excessive force, and most important has a very precise feed. Arguably, the milling machine is the optimal tool for such drilling. Parts are held well horizontally, and you have a precision feed from a horizontal column. Straight and perpendicular to a table\pars. Also, I want to mention that I use short drill bits. I brought them from Russia. I am sure it can be found here. * the long twisted drill will break at the first attempt.

View attachment 203503
I will back up and rethink this over. I did begin to use only a very short portion of the long bit exposed from the chuck when I saw the "bending" problem. I will wait until I receive a better spring loaded punch for a more accurate starting point than I have been able to do with my left hand holding the punch and right hand delivering a tap, compounded by my lack of depth perception and right eye blind area and very poor peripheral vision. . . causing me to look back and forth from the end of the punch to the small hammer for a contact and not a miss. I think that I will also have to reduce the free area of the strip to be drilled for the holes and have the longer piece held underneath the clamp in a manner not to bend or distort that deadeye "chain plate" length. Getting the strip secure with adequate tension on the ends is a need to be solved. The manufacturer no longer makes the strip in the needed size but I have some 1" wide x 36" ones that possible can be sheared or scored and removed for edge filing to have some more strip stock. This is an entirely new area for me to go through my learning curve with both the metal and drill press/clamps. thanks, Rich
 
The heavy shank drill bits Jim Posted will do very well for the flex issue. These heavy shank bits will also dissipate heat much better. If your looking into getting a spring loaded center punch make sure its adjustable in tension otherwise the pressure required to set the punch off will distort thin metals leaving a crater area around the punch mark. Hope you get it figured out Rich
 
The heavy shank drill bits Jim Posted will do very well for the flex issue. These heavy shank bits will also dissipate heat much better. If your looking into getting a spring loaded center punch make sure its adjustable in tension otherwise the pressure required to set the punch off will distort thin metals leaving a crater area around the punch mark. Hope you get it figured out Rich
Yes the spring loaded punch has three settings which I will test. I don't have any thick brass as a backup so a trip to a local hardware store seems in order to have something wider and thicker than the 1/16 wide x 1/64 thick strips which are very flexible. Other Bluenose builders have solved this situation so I know it is out there. Mostly my just having to learn how. Thanks, Rich
 
You can back up the brass piece that's being punched with a piece of steel that will help as well as using a light load setting on the punch to keep a crater from forming. A thick chunk of brass will also work. I wouldn't use aluminum or wood though as these are both softer then the brass being punched, you want as hard or harder under the piece being punched.
 
My question about using a steel backer would be if a pointed bit would be stopped before making a full circular hole or just the small point of penetration resistance??? If that happened then I think that another, possibly hand drilling, step would be needed to complete a full hole. I think that the brass backer is what I need and just have to do a proper depth setting to not go too deep into the backer. If I place the next strip in the same place there should be that hole beneath the strip being drilled which may or not be a problem but I can always hand file off any crowning on the exiting side which will be concealed when placed against the hull. Only 20 strips of three holes each so I will get it down along the way and trying to minimize any wasted strips with the limited number that I have before having to "shear" the 1 inch wide piece into 1/16 inch strips and not certain about that approach. Thanks for your recommendations. I'm learning more as I go. RIch
You can back up the brass piece that's being punched with a piece of steel that will help as well as using a light load setting on the punch to keep a crater from forming. A thick chunk of brass will also work. I wouldn't use aluminum or wood though as these are both softer then the brass being punched, you want as hard or harder under the piece being punched
 
you want the steel as a backer for punching with the center punch to help avoid distorting the brass into a crater around the indent. For the drilling of the hole I always use a soft wood block like pine as a backer. you will usually always get that burr on the exit side of the hole when drilling brass so for that you are correct to just file it off, since it wont be seen on that side you could even leave it as it wont be large you may even have a hard time seeing it with the naked eye.
 
The wood strips hold the brass strip from wandering laterally. I only drill through the brass and not through the aluminum. It give me a more solid under-surface than when I tried doing the drilling onto wood which caused the bottom of the brass to protrude downwards around the circumference. I thought that aluminum would reduce or prevent that distortion of the exit hole. I was not successful in only holding down the strip ends as the middle portion moved laterally.
The three holes are spaced 3/16 inch apart. I check the alignment of the jig by touching down on one end on the centerline and then traversing the table to the other end to check until I have those aligned on the centerline. Not a machinist approach but like walking in a long range shot to the target.

Your suggestion of a top plate with three drill guide holes would more accurately position the final holes in the brass but still require my correctly placing the bit through them. If I find the number of X revolutions between holes I could do it that way but it would be slower and possibly less accurate as long as I don't distort the guide holes. Let me know of your reaction to this. thanks, RIch
The idea with my jig sketch is that the jig doesn't move once the second hole is drilled, the workpiece moves and the jig is finished off in the X Y table.

The sequence for finishing off the jig is to drill the hole that has "pin or blunt drill" above it first.

Then move table position by winding your tables wheel in this case 3/16"and drill the second hole.

Once the 2 holes are drilled you don't move the table anymore that is to say the jig doesn't move the workpiece does.

To make your chain plates, first position the workpiece where you want to start drill that hole then move the workpiece along to the "pin" hole push the pin through the first hole to locate it then drill the next hole you can continue doing this as many times as you need and all holes will have the same distance between each other.

I would suggest buying the smallest "centre" drill you can get and use that in your drill before drilling the small hole, this will be much more accurate than a centre punch.

Cheers,
Stephen.
 
In my opinion, these EUROTOOL DRL-250.02 mini drill bits have lasted a very long time and have taken a lot of drilling and have not broken. They are kind of hard to come by and I suggest getting one set. What makes these nice is that ALL the shanks are 1/8 inches and are interchangeable with one collet.

 
Just so you know: The drills Donnie suggest does not seem to come in size #78. The smallest one seems to be 0.5 mm ( aprox. #76 )
Personally I find 0.5 mm does not easily break. But from very recent experience I would not recommend to use 0.2 mm and less hand-held on the 1th of January (or any other day with tremors) ROTF
 
The drill bits Don R. mentioned in the above post are mostly suitable for wood. They are designed for PBC circuit boards. They are not made as true spiral bits. Their shanks have standard size 3mm, this makes them very convenient if you are using collet system. I have not have success drilling metal, including brass and copper.
Many manufactures claimed they are HSS, I am in doubt with the statements, but even if they are, drilling the hard wood a bit of challenge (based on my personal experience)
 
The idea with my jig sketch is that the jig doesn't move once the second hole is drilled, the workpiece moves and the jig is finished off in the X Y table.

The sequence for finishing off the jig is to drill the hole that has "pin or blunt drill" above it first.

Then move table position by winding your tables wheel in this case 3/16"and drill the second hole.

Once the 2 holes are drilled you don't move the table anymore that is to say the jig doesn't move the workpiece does.

To make your chain plates, first position the workpiece where you want to start drill that hole then move the workpiece along to the "pin" hole push the pin through the first hole to locate it then drill the next hole you can continue doing this as many times as you need and all holes will have the same distance between each other.

I would suggest buying the smallest "centre" drill you can get and use that in your drill before drilling the small hole, this will be much more accurate than a centre punch.

Cheers,
Stephen.
Given some time and late realization I understand your jig use now. It looks very sound and I will be taking this approach. Maybe the clamping will be different but the two hole and reference pin will reduce repeated spacing and irregularities. Thanks again Rich
 
Given some time and late realization I understand your jig use now. It looks very sound and I will be taking this approach. Maybe the clamping will be different but the two hole and reference pin will reduce repeated spacing and irregularities. Thanks again Rich

Hi Rich,

Excellent, I wouldn't worry too much about clamping of the workpiece, I would hold it in place using my fingers, you are only drilling a very small hole.
Just don't put your fingers right underneath the drill bit.

I would still buy a couple of centre drills from the smallest one you can get and maybe a couple of sizes larger, these will help a lot with drilling an accurately positioned hole.

You use the centre drill before drilling the hole.

Drilling very small holes is a challenge....

Cheers,
Stephen.
Life would become boring without challenges . . . at least every so often. rich
 
Life would become boring without challenges . . . at least every so often. rich
my thoughts exactly I like difficult. why? well because its not easy lol seriously though for me doing difficult things broadens my knowledge, secures a higher level of confidence, and the personnel satisfaction is greater when we achieve something we didn't previously know we could. I'm the try anything once, twice if I liked it type of person.
 
Lots of great info here. I think I’ve ordered 5 or 6 different drill bits trying to find good ones for brass. I’ve sent several sets back as they had flat ends not pointed. Also for size 67 and smaller my smallest collet is to big to hold the shaft without slipping. I finally found ones with the 1/8 inch shaft, similar to what Donnie was showing. So much trouble just to drill a damn hole! :eek:
 
Back
Top