I’m getting old but the spellchecker dumbs us all down. Remember when we were required to use the dikshunarySpeleen is overwrated.
Kids don't even learn to spell nowadays anyway. As long as the teacher can figure out what is being said all is right with the world. Wouldn't want to crush their tender souls by telling them they did something wrong. But I digress (son of an English teacher by the way).
-

Win a Free Custom Engraved Brass Coin!!!
As a way to introduce our brass coins to the community, we will raffle off a free coin during the month of August. Follow link ABOVE for instructions for entering.
-

PRE-ORDER SHIPS IN SCALE TODAY!
The beloved Ships in Scale Magazine is back and charting a new course for 2026!
Discover new skills, new techniques, and new inspirations in every issue.
NOTE THAT OUR FIRST ISSUE WILL BE JAN/FEB 2026
You are using an out of date browser. It may not display this or other websites correctly.
You should upgrade or use an alternative browser.
You should upgrade or use an alternative browser.
Statenjacht 1678-Kolderstok 1:50
- Thread starter rtibbs
- Start date
- Watchers 22
-
- Tags
- kolderstok statenjacht
Bringing you up to date, sort of 
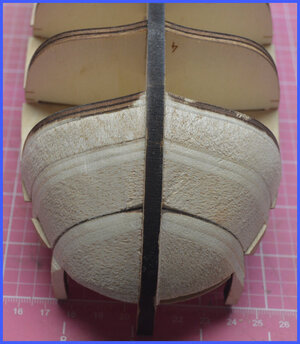
Balsa filler blocks in the bow
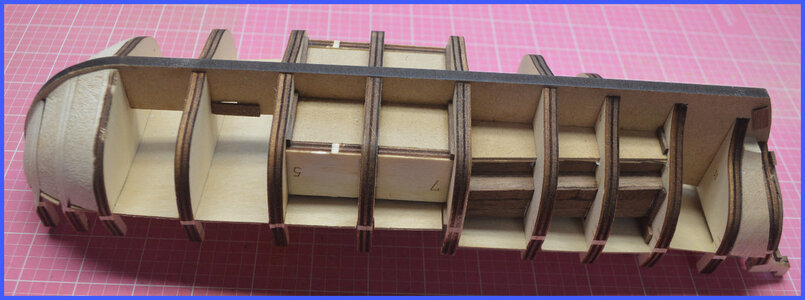
Bow & stern fillers prior to fairing the hull
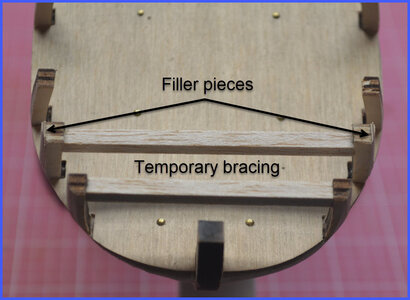
Added some temporary bracing for support during fairing. Also, a couple of filler pieces.
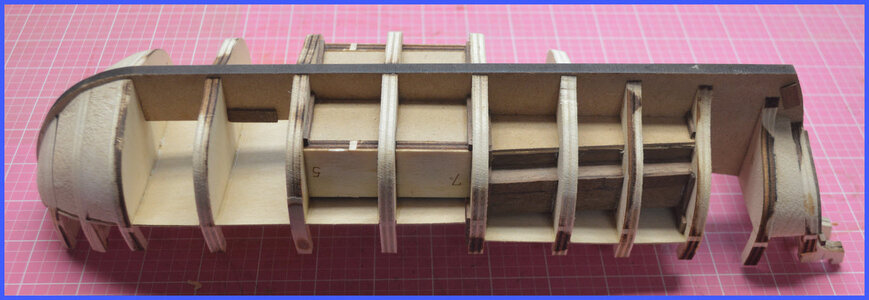
Most of the fairing complete however I'm sure there will be adjustments as I move forward with the planking. (Oh, the horrors of planking await)
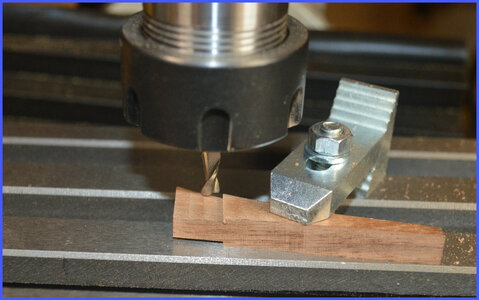
The stern post required some relieving for the hull planking. 3/16 end mill
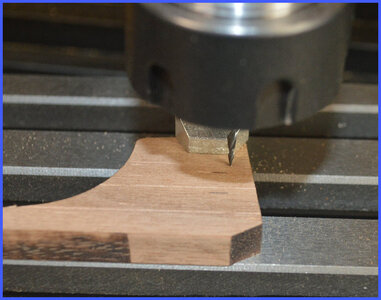
"Planking" the rudder with a .05mm Ball Nose endmill. Actual planking would result in the rudder being to thick.
(Thanks Piet for the tip. One of many I have gleaned from his build)
I've actually started the planking process. Installed the first three planks P & S however, I have since deconstructed them as I didn't like the way they were laying. (If the first one isn't right, none will be right) Add me to the do-over club.
I will probably follow the Grant method of jumping around as I continue the planking process. Most likely I won't adhere to the script within the instructions. We'll see how that works out.

Balsa filler blocks in the bow

Bow & stern fillers prior to fairing the hull

Added some temporary bracing for support during fairing. Also, a couple of filler pieces.

Most of the fairing complete however I'm sure there will be adjustments as I move forward with the planking. (Oh, the horrors of planking await)

The stern post required some relieving for the hull planking. 3/16 end mill

"Planking" the rudder with a .05mm Ball Nose endmill. Actual planking would result in the rudder being to thick.
(Thanks Piet for the tip. One of many I have gleaned from his build)
I've actually started the planking process. Installed the first three planks P & S however, I have since deconstructed them as I didn't like the way they were laying. (If the first one isn't right, none will be right) Add me to the do-over club.
I will probably follow the Grant method of jumping around as I continue the planking process. Most likely I won't adhere to the script within the instructions. We'll see how that works out.
Good evening Ron- You are taking care and I enjoy your techniques of fillers , good fairing and forward thinking with the rudder thickness- Going to be awesome. “The Grant” method.....Bringing you up to date, sort of
View attachment 312337
Balsa filler blocks in the bow
View attachment 312338
Bow & stern fillers prior to fairing the hull
View attachment 312339
Added some temporary bracing for support during fairing. Also, a couple of filler pieces.
View attachment 312340
Most of the fairing complete however I'm sure there will be adjustments as I move forward with the planking. (Oh, the horrors of planking await)
View attachment 312341
The stern post required some relieving for the hull planking. 3/16 end mill
View attachment 312342
"Planking" the rudder with a .05mm Ball Nose endmill. Actual planking would result in the rudder being to thick.
(Thanks Piet for the tip. One of many I have gleaned from his build)
I've actually started the planking process. Installed the first three planks P & S however, I have since deconstructed them as I didn't like the way they were laying. (If the first one isn't right, none will be right) Add me to the do-over club.
I will probably follow the Grant method of jumping around as I continue the planking process. Most likely I won't adhere to the script within the instructions. We'll see how that works out.
 makes you a tad
Thanks Grant,“The Grant” method.....makes you a tad
. Cheers Grant
See I do read others logs.
You never know what bits of wisdom one can glean.
While working on the planking of the hull I decided to express my current status
All members welcome to join
View attachment 312579
 The Bitcoin of SOS
Ron what’s the current price of your SOS bitcoin? Funny Jan.The Bitcoin of SOS

 . cheers Grant
Oh my, I guess I will have the mint issue a new coin. The backside will have something appropriate to the dumb*** award.
While cutting off the upper frames in preparation for lining the inside of the hull one of my miniature chisels went through the hull.
There are times when a slicing motion would be the preferred motion over pushing.
I thought I could just say this was the result of a cannon shot except it was from the inside out.
At least you have sharp chisels. 
My oldest daughter once drove through our garage door from INSIDE the garage - so the cannon shot explanation might still fly.Oh my, I guess I will have the mint issue a new coin. The backside will have something appropriate to the dumb*** award.
While cutting off the upper frames in preparation for lining the inside of the hull one of my miniature chisels went through the hull.
There are times when a slicing motion would be the preferred motion over pushing.
I thought I could just say this was the result of a cannon shot except it was from the inside out.
Great point! You don't need to specify WHOSE cannon made the holeMy oldest daughter once drove through our garage door from INSIDE the garage - so the cannon shot explanation might still fly.
Oh no, but it’s only a bad moment, lots of glue and sawdust later and all will be wellOh my, I guess I will have the mint issue a new coin. The backside will have something appropriate to the dumb*** award.
While cutting off the upper frames in preparation for lining the inside of the hull one of my miniature chisels went through the hull.
There are times when a slicing motion would be the preferred motion over pushing.
I thought I could just say this was the result of a cannon shot except it was from the inside out.
Someone spiked the barrel?the cannon shot explanation might still fly.
I REALLY need one of these...While working on the planking of the hull I decided to express my current status
All members welcome to join
View attachment 312579
- Joined
- Sep 3, 2021
- Messages
- 5,190
- Points
- 738

Franglais?not a lot of youse having a spillchucker when so much internet content is in the Americkun langwidge.
always amuses me when I have to set the langwidge as UK English ...... is there any other category of English?
Hallo @rtibbsTime to reopen the doors to the shipyard and get started with a build log.
I originally planned on the Willem Barentsz as my next build after the Speeljacht and I do have the kit on the shelf.
What changed my mind to go with the Statenjacht were a few things.
(1) I really like the lines of the ship
(2) Single main mast as opposed to the three masted Barrentsz means less rigging to deal with. Hats off to you first rate builders of First Rates.
(3) Probably the biggest reason is that I really like the “luxury” of the state vessel with all its ornamentation, lower deck layout and furnishings. How can you go wrong with a ship with a fireplace?
(4) I’m really not into multideck vessels with dozens of cannons. Again, hats off to those that do.
That’s the great thing about this hobby. There is something for everyone.
Dry fit of the framework. 6mm MDF False Keel with 6mm plywood Bulkheads. Everything was right & tight. Something I've come to expect with the Kolderstok kits. No sanding/filing required.
As every builder knows, you never have enough clamps. I use pieces of aluminum angle for squaring as opposed to Lego blocks.
3mm lite ply fixture to keep everything nice and square. (No not included in kit)
I doubt if I'll post a step by step build, rather try to hit the main parts of the construction.
Any questions, just ask.
we wish you all the BEST and belayed a HAPPY BIRTHDAY

- Joined
- Jan 9, 2020
- Messages
- 10,566
- Points
- 938

Happy Birthday Ron! May it be a year ahead which is filled with peace for you - and for Kay - my prayers are that she may be granted all strength and willpower to remain strong and steadfast in her battle. I know that is the best birthday gift I could wish for you.
Thanks for the best wishes guy’s. Unfortunately not much celebrating this year. Fortunately she is maintaining a strong mental attitude for the inevitable while physically deteriorating.


