Best wishes to you for a restful birthday Ron. Prayers of comfort for your bride.
-

Win a Free Custom Engraved Brass Coin!!!
As a way to introduce our brass coins to the community, we will raffle off a free coin during the month of August. Follow link ABOVE for instructions for entering.
-

PRE-ORDER SHIPS IN SCALE TODAY!
The beloved Ships in Scale Magazine is back and charting a new course for 2026!
Discover new skills, new techniques, and new inspirations in every issue.
NOTE THAT OUR FIRST ISSUE WILL BE JAN/FEB 2026
You are using an out of date browser. It may not display this or other websites correctly.
You should upgrade or use an alternative browser.
You should upgrade or use an alternative browser.
Statenjacht 1678-Kolderstok 1:50
- Thread starter rtibbs
- Start date
- Watchers 22
-
- Tags
- kolderstok statenjacht
- Joined
- Sep 3, 2021
- Messages
- 5,190
- Points
- 738

I wish you a good birthday and hope you're able to enjoy this day, despite all your struggles, fears and concerns.Thanks for the best wishes guy’s. Unfortunately not much celebrating this year. Fortunately she is maintaining a strong mental attitude for the inevitable while physically deteriorating.
Haven't posted any recent pictures for awhile however, I have been plodding along with my build albeit rather slowly.I
I've gone off script slightly per the instruction. I planked the upper third of the hull then decided to work on the bulwarks. Reason being the hull above the deck is rather fragile with only the 1.5 mm planking. I figured ol' dumb thumbs would probably crush something while continuing with the planking. The bulwarks are now lined with basswood and are now very rigid. I am also going to finish the bulwarks a little differently than historically correct. Call it artistic license if you will. More on that later.
As you can see, I have the deck's planked also.
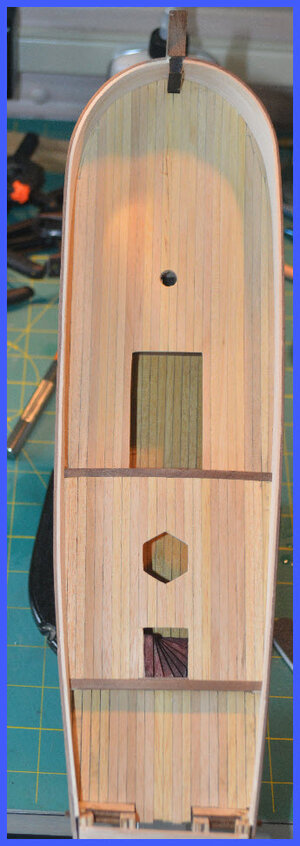
I've gone off script slightly per the instruction. I planked the upper third of the hull then decided to work on the bulwarks. Reason being the hull above the deck is rather fragile with only the 1.5 mm planking. I figured ol' dumb thumbs would probably crush something while continuing with the planking. The bulwarks are now lined with basswood and are now very rigid. I am also going to finish the bulwarks a little differently than historically correct. Call it artistic license if you will.
As you can see, I have the deck's planked also.

Last edited:
That's looking very tidy Ron. Well done!
Good morning Ron. Happy belated birthday. Looking really awesome. BTW artistic license is that wonderful freedom from the “have to do’s” and always adds that uniqueness to our models.....it is our license each one individually owned. Look forward to your bulwarks . Cheers GrantHaven't posted any recent pictures for awhile however, I have been plodding along with my build albeit rather slowly.I
I've gone off script slightly per the instruction. I planked the upper third of the hull then decided to work on the bulwarks. Reason being the hull above the deck is rather fragile with only the 1.5 mm planking. I figured ol' dumb thumbs would probably crush something while continuing with the planking. The bulwarks are now lined with basswood and are now very rigid. I am also going to finish the bulwarks a little differently than historically correct. Call it artistic license if you will.More on that later.
As you can see, I have the deck's planked also.
View attachment 316830
Thanks for the birthday wishes Grant. I always feel guilty deviating from historical accuracy especially on a forum titled Ships of Scale however the big picture is I’m building this for me.Good morning Ron. Happy belated birthday. Looking really awesome. BTW artistic license is that wonderful freedom from the “have to do’s” and always adds that uniqueness to our models.....it is our license each one individually owned. Look forward to your bulwarks . Cheers Grant
As usual I’m late to the party. HAPPY 
Your planking looks fantastic, nicely done.

Your planking looks fantastic, nicely done.
Thank you Jan. Unfortunately I finished the cakeAs usual I’m late to the party. HAPPY
Your planking looks fantastic, nicely done.
Question, how does one with fumble fingers assemble this deckhouse?
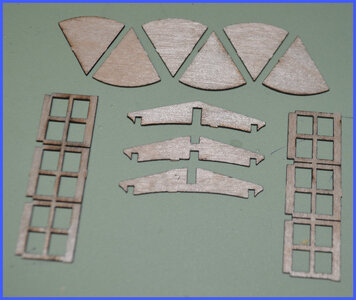
These are the components to form the deckhouse
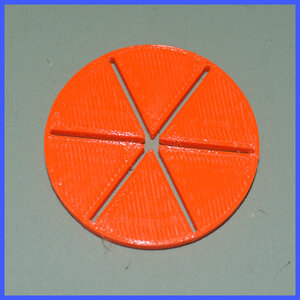
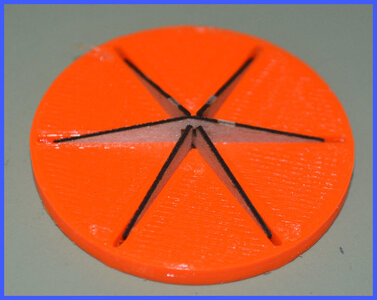
First you print a disk to retain the crossmembers for gluing
A little dab of adhesive in the center should do the trick
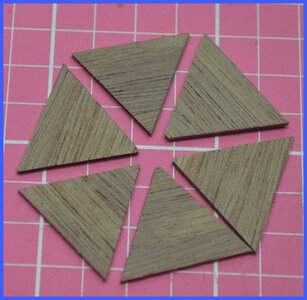
These are the walnut roof segments made up of edge gluing 3 1.5 x 4mm strips together then cutting to shape.
Used my Ultimation cutter to cut into diamond shapes. I left some a little oversize in case "adjustments" were necessary 
So, my friends, that's how ol' fumble fingers did it.
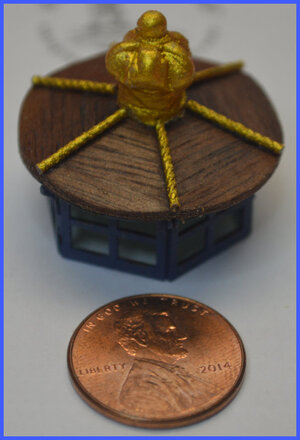
The gold enhancements are made from 1mm rope CA'd for stiffness then painted gold.
I still have to add vertical ones to the window frames.

These are the components to form the deckhouse

First you print a disk to retain the crossmembers for gluing

A little dab of adhesive in the center should do the trick

These are the walnut roof segments made up of edge gluing 3 1.5 x 4mm strips together then cutting to shape.
Used my Ultimation cutter to cut into diamond shapes. I left some a little oversize in case "adjustments" were necessary 

So, my friends, that's how ol' fumble fingers did it.
The gold enhancements are made from 1mm rope CA'd for stiffness then painted gold.
I still have to add vertical ones to the window frames.
Excellent execution "fumble fingers.et all"
Thanks Heinrich, the cutter went through the 1.5 x 12mm like a hot knife through butter. (Well, maybe not that easily) I was concerned that some of the glue joints might part. However, they didn’t.There is nothing fumbling about those "ole" fingers, Ron - that looks great! I am very impressed by the cuts that you were able to obtain on those diamond shapes!
- Joined
- Sep 3, 2021
- Messages
- 5,190
- Points
- 738

Very inventive...Question, how does one with fumble fingers assemble this deckhouse?
View attachment 317548
These are the components to form the deckhouse
View attachment 317549
First you print a disk to retain the crossmembers for gluing
View attachment 317550
A little dab of adhesive in the center should do the trick
View attachment 317551
These are the walnut roof segments made up of edge gluing 3 1.5 x 4mm strips together then cutting to shape.
Used my Ultimation cutter to cut into diamond shapes. I left some a little oversize in case "adjustments" were necessary 
View attachment 317552
So, my friends, that's how ol' fumble fingers did it.
The gold enhancements are made from 1mm rope CA'd for stiffness then painted gold.
I still have to add vertical ones to the window frames.
Good morning Ron- inventiveness , patience, and skill made an awesome deckhouse. No redo coins here for sure. Cheers GrantQuestion, how does one with fumble fingers assemble this deckhouse?
View attachment 317548
These are the components to form the deckhouse
View attachment 317549
First you print a disk to retain the crossmembers for gluing
View attachment 317550
A little dab of adhesive in the center should do the trick
View attachment 317551
These are the walnut roof segments made up of edge gluing 3 1.5 x 4mm strips together then cutting to shape.
Used my Ultimation cutter to cut into diamond shapes. I left some a little oversize in case "adjustments" were necessary 
View attachment 317552
So, my friends, that's how ol' fumble fingers did it.
The gold enhancements are made from 1mm rope CA'd for stiffness then painted gold.
I still have to add vertical ones to the window frames.
Still working on some of the deck structures. This is the deckhouse complete with window glazing.
Please remind me why I love this ship so much when it has all these embellishments which require painting, and I don't like to paint.
A few more deck fiddly bits and then I can continue planking the bottom 2/3 of the hull.
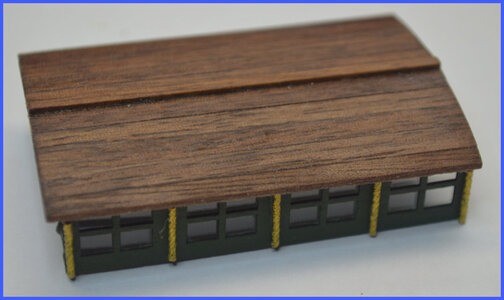
Please remind me why I love this ship so much when it has all these embellishments which require painting, and I don't like to paint.
A few more deck fiddly bits and then I can continue planking the bottom 2/3 of the hull.

Last edited:
- Joined
- Jan 9, 2020
- Messages
- 10,566
- Points
- 938

Dear Ron. You love this ship, because it allows you to become fully immersed in its build. It involves you to the point where you become the shipwright or are a State official luxuriating onboard. That is what a @Kolderstok kit does. I have said on numerous occasions how much I love the WB, and now you have done the same. These kits involve in you in the build like no other - I am sure that this makes Hans a happy man!
- Joined
- Sep 3, 2021
- Messages
- 5,190
- Points
- 738

Dear Ron. You love this ship, because it allows you to become fully immersed in its build. It involves you to the point where you become the shipwright or are a State official luxuriating onboard. That is what a @Kolderstok kit does. I have said on numerous occasions how much I love the WB, and now you have done the same. These kits involve in you in the build like no other - I am sure that this makes Hans a happy man!
 , that does it; addictive, that's what those kits are; addictive.
I am ever so glad I decided upon first finishing my YQ BN, then build an unspecified aircraft and once that's completed, I'll allow myself to start thinking about another ship. Luckily for me, Kolderstok doesn’t have any POF-kits (yet?)....
- Joined
- Jan 9, 2020
- Messages
- 10,566
- Points
- 938

@RDN1954 Interesting point about the POF, Johan., Personally, I don't have a preference, but I will not allow the construction method to influence the ship I want to build. If I had made a predetermined decision to build only POF, my selection of models would be limited to either French or British ships. Conversely, if a manufacturer brings a POF Brederode to market, I will buy it immediately - hence to me, it's all about the subject, not the construction type.


