To Stain, or not to Stain? Is that the question?

Jimsky

Administrator
Staff member
Administrator
Forum Moderator
Joined
Nov 3, 2018
Messages
12,177
Points
938

Location
Brooklyn, New York USA
Greetings all! My previous post about Oils and their variations would be incomplete without a discussion about other finishes and their techniques. while I am in no way claiming to be an export in wood finishes, I will simply relay what I have researched from the real experts, and what they are saying. They are Christophe Pourny and Bob Flexner. You can get all of the details in their books.

Staining the wood
Staining colors the wood’s surface in order to highlight its natural tone, enhance it with a decorative cast, or give it a different character completely Staining can also serve as a strategic purpose, helping to even the tone between different cuts of the wood used on a piece of furniture or to help patches and repairs blend in. Of all the steps in finishing, staining, causes the most problems. Because of such difficulties as splotching, streaking, color unevenness, and incompatibility between stain and finish, many peoples avoid the use of stains altogether.

You probably think of staining as simply applying a colored liquid to bare wood. Staining is this, but it is also much more. It includes glazing, toning, and shading, all ways of applying a colorant so that you can still see the wood through the color. In all cases, the key to staining is translucency; the goal is not to obscure the wood like paint, but to add a wash of color that lets the grain show through. Most likely, you choose a stain for its color. You're probably not thinking about other important considerations, such as what the stain is made of, how fast it dries, or how it will behave on the wood.
Some stains, such as Watco and Minwax, penetrate deep into the wood; others, such as Woodcote and Bartley, very little. Some stains, such as Behlen 15 Minute, dry fast; others, such as Red Devil, slowly. Some stains, such as Carver Tripp Safe and Simple, raise the grain of the wood; others, such as Carver Tripp Wood Stain, don't. If you've done much staining, you've surely noticed some of these differences.

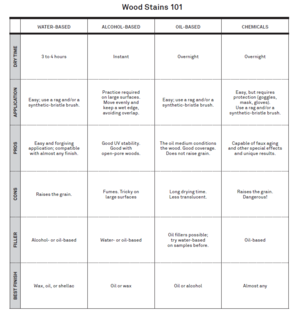
In the following posts, we will get deep dive into each of the available types of stains available on the market. For now please check the table below, it describes each of the stains its properties and use.

1636412011343.png
To be continued in the next post...
 
Great information!
Looking forward to the following posts.
If I have CA glue stains on my model, is there a wood stain that would hide it or only paint can do that?
 

Understanding Stains​

There are a number of ways to classify stains. Understanding the ingredients, their properties, and how they interact helps in predicting how a stain will perform. Here are the things that make a difference:
  • The colorant is a pigment or a dye?
  • Binder, is it oil, varnish, lacquer, or water-based finish?
  • Thickness, is it a liquid or a gel?
Let's start with Pigment. The pigment is finely ground solid, colored particles that resemble colored earth. Until recently, all pigment actually was colored earth, mined in various parts of Europe and America. Now, most pigments are synthetic. Since the pigment is opaque, it is used as the colorant in paint. Most manufactured stains are made with pigment. Pigment colors wood by lodging in depressions, such as pores, scratches, and gouges. The larger the cavity, the greater the amount of pigment that will lodge there, and the darker and more opaque the cavity becomes. This is why pigment stains highlight large pores, gouges, and cross-grain sanding scratches. The pigment can also color wood by building to a thickness on the surface. Building occurs when you don't wipe off all the excess stain, and it is equivalent to painting the wood with thinned paint.

Dye. The coloring in coffee, tea, berries, and walnut husks is the dye. These and other natural materials such as logwood, alkanet root, cochineal, and dragon's blood were once used to dye wood. BTW, chemicals are also used as dyes, for example: Bleaching the Wood'. Today, far superior, synthetic aniline dyes are available. Aniline dyes are made from aniline and related chemicals. Aniline is derived from petroleum. Dye is molecular. Each individual unit of dye is a molecule. In contrast to pigment, which colors wood by lodging in crevices, dye colors wood by saturating the wood fibers with color. Dye molecules, much tinier than pigment particles, penetrate into the very composition of the wood.
There are literally thousands of dyes synthesized from aniline and related chemicals. Each of these dyes dissolves naturally in a solvent. Some dyes dissolve in water, some in alcohol, some in mineral spirits or lacquer thinner. Make your own stains by mixing the powder with the appropriate solvent or with a finish that is compatible with the dye solvent-water dye with the water-based finish; alcohol dye with shellac; oil dye with oil, varnish, or lacquer.
Generally speaking, water-soluble dyes are the most lightfast of the three types. Lightfastness is an important quality because it means the colors will remain true longer. As a result, alcohol and oil-soluble dyes are not as popular. Also, water-soluble dyes are the slowest drying, so you have more time to remove the excess stain (but longer to wait before going on to your next step). The slow drying allows the dye to penetrate deeper, bringing out more richness and depth in the wood. The use of water as the solvent in water-soluble dyes makes these dyes cheap, devoid of toxic fumes, non- flammable, and nonpolluting to the atmosphere. But water raises the grain of the wood

To sum all of the above, let check Dyes versus Pigments. There are three significant differences between dye and pigment:

  • Dye is transparent; pigment is opaque.
  • Dye penetrates everywhere more or less equally. Pigment lodges only in places that are large enough to hold it
  • Dye, dissolved in a solvent, is much easier than pigment stain to lighten, darken, or change to another color after it has been applied to the wood
Binder. Binder is the glue that holds pigment particles to the wood. Without a binder, the particles could be brushed or blown off the wood like dust once the solvent evaporated. All binders are one of the four common finishes: oil, varnish, lacquer, or water base.
You can make your own stain by mixing some pigment with the appropriate binder and thinning if necessary: Use ground-in oil pigment with oil or varnish. Use artists' acrylic colors with water-based finishes. Use universal- tinting pigment with oil, varnish, lacquer, or water-based finishes.
The choice of the binder doesn't affect the way the stain looks on the wood. The binder determines how much time you have to wipe off excess stains. The oil binder cures slowly. Varnish and water-based binders cure moderately quickly. Lacquer binder cures rapidly. It doesn't matter whether the water-based binder is acrylic or emulsified oil. But what is important is whether the binder is oil or varnish. Oil cures much more slowly than varnish.

Solvent and Thinners. Solvents and thinners make it possible to apply dyes and pigment stains. Solvents are used in dye stains to put the powder dye into solution. Thinners are used in pigment stains to thin the binder so the stain is easy to apply to the wood. Each dye and each binder has a specific solvent or thinner that is appropriate for it. Other solvents or thinners won't work. You need to learn which goes with which. Dyes that use water as a solvent, and water-based binders that use water as a thinner, present a problem in that the water raises the grain of the wood. To get a smooth finish with either of these types of stains, you usually have to sponge and sand the wood before applying the stain. If you apply the stain and then try to smooth the raised grain with sandpaper, you may cut through the stain and create light spots.

to be continued...
 
If I have CA glue stains on my model, is there a wood stain that would hide it or only paint can do that?
Jack, I am afraid, there is no such stain (as much as I am aware of). Stains are penetrating the wood. CA also penetrated the wood and when dried blocked the grain so the stain has no way to penetrate. This is why it is important to use CA carefully.
 
Jack, I am afraid, there is no such stain (as much as I am aware of). Stains are penetrating the wood. CA also penetrated the wood and when dried blocked the grain so the stain has no way to penetrate. This is why it is important to use CA carefully.
I tried, I figured it was a shot in the dark. Thanks for the prompt feedback
 
Types of Stains

Alcohol-based (or Aniline)
The great advantage of alcohol-based, or aniline stain is that it penetrates the wood deeply, creating beautiful, transparent color and that it dries extremely fast, almost instantly. This means that immediately afterward you can finish the piece, or apply additional coats to arrive at the desired coloration. You can achieve a perfectly black ebonized stain in a matter of minutes! Best for small surfaces.
PROS: Translucency is unsurpassed. Drying time is instant, so finishing can proceed right away. Doesn’t raise the wood grain.
CONS: A little trickier to apply because the medium dries instantly. You have to apply coats very evenly without overlapping, so you have to start a little lighter than the tone you ultimately want to achieve. Use in a ventilated area
.

Water-based
The least expensive variety, the easiest to use, and the most forgiving. Water-based stains should be avoided on species with very open pores, as you’d need to flood the wood surface to get adequate coverage—which would then raise the grain that you’ve just sanded nice and smooth. Water-based stains,
even more so than other types, have to be perfectly dry before continuing the finishing process; otherwise, moisture will be trapped under the finish and ghostly
white marks will appear. The upside of the slow drying process is a large open time, meaning greater control of application—thus, it’s ideal for bigger pieces. The other advantage is that water-based stains are very flexible. You can dilute them easily and on the spot or keep adding washes until you get the desired look. And if you don’t like the color, you can wash it right off.
PROS: Easy to use, easy to mix and intermix, easy to lighten or darken—if you don’t like the tone, just mix another batch and correct it.
CONS: The water raises the grain, so you have to sand in between coats. Not recommended on wood that has been previously waxed or finished, unless you are thoroughly clean or strip first.

Oil-based Pigment is typically diluted in turpentine or another oil-based solvent, creating a heavier stain that obscures the wood. It has to dry thoroughly before any subsequent finishing can occur, and the waiting time is long—at least overnight. The petroleum-based solvents emanate fumes that linger, so apply in a well-ventilated area. Because oil-based stains mix well with several finishes, they come in handy to revive the tone of a previously finished piece. But do not use them with a heavy hand—think of a veil—to reveal rather than obscure the wood.
PROS: Easiest to apply. (Modern versions now come mixed with sealer—but I do not recommend these for antiques or heirlooms.) Longer open time facilitates
the evenness of the application. Repeated coats can obscure the wood’s grain and color to artfully mimic another precious species. Doesn't raise the grain.
CONS: The pigment sits on top of the wood, creating a film. So heavy with product and pigment, these stains must dry overnight. Toxic fumes require ventilation.

In addition to the above well known and widely used there are Chemical Stains. Some very common household products—and foodstuffs—are capable of creating wonderful colors or effects without transforming your living room into a chemistry lab (or arousing the suspicion of the FBI!). Wear a mask, goggles, gloves, and appropriate protective clothing when working with these materials. USE CAUTION while using those!!!!!!
  • Ammonia Brush liberally on wood with a high tannin content—e.g., oak—to darken it to a lovely color. Apply a coat, let dry overnight, and then neutralize with water spiked with 10 percent white vinegar. The process also ages the wood, lending a nice patina. The secret behind Mission furniture’s smokybrown
    coloration and two-toned grain are ammonia fuming: Pieces were exposed to an ammonia concentrate in a closed room overnight.
  • Bleach Will lighten the wood, or in some cases give it a greenish or yellow cast. Pick up a bleaching set from the hardware store, or try household bleach. Apply liberally and repeat as needed—allowing the piece to sit overnight between coats—until you achieve the desired hue (see page 149). You can neutralize the bleach afterward, although it’s generally not necessary. Always use a synthetic-bristle brush, since bleach disintegrates natural bristles.
  • Iron Acetate This chemical gives a wonderful gray, weathered color to woods rich in tannic acids, such as oak. Soak a steel-wool pad in paint thinner for an hour, let dry, and rinse well with water. (This removes the oil applied by the manufacturer to prevent rusting.) Then soak the pad overnight in white vinegar. Rub the wet pad on the wood, working with the grain; the reaction appears as the piece dries.
  • Sodium dichromate Readily available at pharmacies, this chemical gives the wood a rich, old, dark aspect
  • Lye An effective way to darken cherrywood, which doesn’t take standard stains very well. Mix 1 tablespoon of lye in 3 cups of cold water, and then brush on. Wait overnight for it to cure.
  • Lime This acid is used to create pickled or whitewashed finishes—and to render wood impervious to bugs, rot, and fungus. It’s pigmented but not a solid
    coat, so it lets the grain show through. It works especially well on pine, which burns and ages nicely.
  • Sunlight Exposure UV rays are another great way to darken woods like cherry. Apply a coat of linseed oil and leave your piece outside in full sunshine for a day or two. The process gives cherry a silky, dark color; walnut, a tan cast; teak, a silvery hue; and pine, and orange coloration. Other woods like mahogany will, on the other hand, bleach over time when left in the sunlight.
As you can see there is a broad range of types of stains at our disposal. You have to know their individual properties before applying to your current project.

Applying stain will be next...
 

Applying Stain​

There are two ways to stain wood. You can apply the colorant to bare wood so that it soaks in. Or you can apply the colorant to sealed or partially sealed wood so that the colorant remains on top of the wood or penetrates only very little. Letting the colorant soak into the wood emphasizes the wood's grain. It also highlights any problems in the wood, such as uneven density, scratches, gouges, and mill marks. Put colorant into the wood when the wood has a natural beauty you want to amplify.
Applying a colorant on top of sealed or partially sealed wood adds color without highlighting the wood's figure or problems. You apply colorant this way when the wood has characteristics you don't want to call attention to. You can also apply colorant on top of sealed wood to highlight pores or recesses without changing the color of the wood itself, or to change its overall tone.

Applying Stain to Bare Wood​

There is not much involved in applying stain to bare wood. You wipe, brush, or spray the stain onto the wood, or you dip the wood into the stain. Then you either wipe off all the excess stain before it dries or leave it to dry as is. That simple.
You can't darken the color by applying a second coat of stain and wiping off all the excess. Since the pores or wood fibers are already filled with the first coat, you will just remove all the second coat when you wipe. But you can darken the color if you don't remove the excess. If you're using a dye stain, not removing the excess is equivalent to increasing the strength of the dye that is already in the wood from the first coat. After all the solvent evaporates, it is as if you had used a stronger solution of dye in the first place. If you're using a pigment stain, not removing the excess is equivalent to applying a thinned coat of paint on top of the wood. The stain will obscure the wood slightly.

Applying Stain to Sealed or Partially Sealed Wood​

In coloring wood, there are many reasons you may want to control the stain's penetration. These include the following:
  • reduce or eliminate contrast between side grain and end grain
  • reduce or eliminate splotching caused by irregularities in the wood's density
  • mute the visual impact of the wood's color, figure, and grain
  • highlight the wood's pores without changing the color of the wood itself
  • make two or more different woods resemble each other
  • fine-tune a color match
  • mask splotching caused by uneven stain penetration
You can control stain penetration by partially sealing the wood before applying the stain, or you can eliminate stain penetration by completely sealing the wood before staining. Partially sealing the wood is called washcoating. If you completely seal the wood and then apply a colorant, the procedure is called glazing (applying colorant between coats of finish, or shading and toning (putting colorant into the coats of finish). These are forms of staining, though they are not generally referred to as staining.

Washcoating partially fills the pores of the wood. You washcoat wood when you want to reduce, but not eliminate, stain penetration. The most common reason for washcoat is to reduce splotching. The results you get by staining over a washcoat are very similar to what you get when using gel stains. In both cases, the stain doesn't soak deeply into the wood. There are two methods for washcoating wood:
  1. You can use a slow-evaporating solvent that remains in the pores while you are staining. Any slow-evaporating solvent, such as mineral spirits, will do. You can also use a commercial washcoat that operates on the same principle. Flood the wood with the solvent. Allow the solvent to soak in. Wipe off the excess. Then apply the stain before the solvent evaporates out of the wood.
  2. You can use a highly thinned finish that only partially seals the wood. Any finish will work, and you can thin it to whatever degree you want. The traditional choice is 1/2- to 1-pound-cut shellac. A shellac washcoat can be mixed from liquid shellac, as it's sold in cans at hardware stores (typically a 3-pound-cut), by diluting I part with 2 to 5 parts of alcohol. You can also use a commercial washcoat that operates on the same principle. Whatever you use for a washcoat, the more thinner you add, the less the finish will stop up (seal) the pores, and the more the stain you apply afterward will penetrate. This type of washcoat is permanent in the wood. Once the washcoat has cured, you can apply the stain over it at any time.
Both methods reduce the amount of colorant you can get into the wood. Both methods, therefore, prevent you from getting the wood as dark as you could if you applied the stain to bare wood. But neither method eliminates splotching, because neither method eliminates stain penetration

Glazing is applying a thin coat of colorant between coats of finish, and either brushing the colorant out evenly or wiping it off high spots. The glaze can be applied by spray gun, brush, or cloth. The colorant is almost always pigment. Glazes contain a binder to glue the pigment to the previous finish coat. Most high-quality, factory furniture has one or more layers of glaze in the finish. Glaze offers many decorative possibilities:
  • As a corrective colorant, it can be used to darken the wood, refine a color match, blend heartwood and sapwood, or blend differently colored woods.
  • It can add the appearance of richness and depth to the wood.
  • It can subdue the brightness of a stain to produce a mellowed or softened look.
  • It can add decoration on top of a painted surface, such as making a solid-colored surface look like marble or wood grain. It can highlight pores. It can be used to imitate a worn, antique appearance.
Most glazes are a pigment suspended in an oil-, varnish-, or water-based binder. Essentially, they are thinned paint or thick stain.

Staining should be executed only after the proper preparatory steps have been taken to restore the wood to its naked stage. Stripping may be necessary or, at the very least, a good cleaning with alcohol. You must also sand the piece first, but never above 220 grit (I even recommend 180) because over sanding will close the grain too much and inhibit stain absorption.

Staining Order Although certain rules usually apply, every piece is different. So always start by mapping out your game plan via a dry run with your pad/brush. Start with the large, flat, prominent surfaces, which will determine the look of the piece, and then move to lesser areas. Apply an even amount of stain and, without rushing, make long, straight, and slightly overlapping passes from one end to the other, trying to keep a wet edge. For consistency, rewet your pad as it dries. On panels and details, stain any carvings, moldings, and corners first, evening them out, followed by the flat inside part of the panel. Stain the frame next, beginning with horizontal parts and progressing to verticals. Don’t forget the insides of the lateral frames of the drawers, lest unstained wood is exposed when you operate them. As you stain, move around the piece repeatedly to correct, even the tone, and lighten and darken as needed. Everything is still possible at this stage, so take advantage!

At the end of our discussion, take a look at a quick reference table: Which stain to Use. Hey, you have been warned! ;)

1636419843695.png

Good luck with you staining.
 
Great information!
Looking forward to the following posts.
If I have CA glue stains on my model, is there a wood stain that would hide it or only paint can do that?
It's like making a deal with the devil. The stuff promises great things when planking, but it fails to deliver. Instead you get a mess.:confused:
 
It's like making a deal with the devil. The stuff promises great things when planking, but it fails to deliver. Instead you get a mess.:confused:
I hear you, Jack. I primarily use PVA-based glue when it comes to wood, specifically if it comes to a hull or deck planking. However, if a hull plank is 1.5mm thick, I would use drops of CA glue (and the rest is PVA). CA acted as the clamp, at the bow and stern area while PVA curred. Also, the blend of CA I use doesn't leave white spots when dries.
 
Thanks Jim. This is a valuable resource. I have been building only since Covid and have shied away from stains. This helps a lot.
On the subject of CA for planking, I agree, none or sparingly. I have some success using a drop at the very end of plank, just to secure the toughest part of the bend. My favorite tool is a small scraper, if there is any resulting stains from the CA bleeding around the edges the scrapper allows for a very controlled removal.
I love these tools: https://www.micromark.com/Mini-Scrapers-Set-Of-4
 
I hear you, Jack. I primarily use PVA-based glue when it comes to wood, specifically if it comes to a hull or deck planking. However, if a hull plank is 1.5mm thick, I would use drops of CA glue (and the rest is PVA). CA acted as the clamp, at the bow and stern area while PVA curred. Also, the blend of CA I use doesn't leave white spots when dries.
Water accelerates the speed of CA curing. Commercial “accelerators” bring water to the bond to hasten drying. Plain tap water or spit will do the same thing, but leave the white discoloration. Commercial accelerators use acetone and magic to avoid the white! LOL!

if you want a quick bond in an area that won’t be seen, just use tap water or saliva before the CA.
 
Jack, I am afraid, there is no such stain (as much as I am aware of). Stains are penetrating the wood. CA also penetrated the wood and when dried blocked the grain so the stain has no way to penetrate. This is why it is important to use CA carefully.
Shellac will hide CA glue stains! 100%
 
Thanks Jim. This is a valuable resource. I have been building only since Covid and have shied away from stains. This helps a lot.
On the subject of CA for planking, I agree, none or sparingly. I have some success using a drop at the very end of plank, just to secure the toughest part of the bend. My favorite tool is a small scraper, if there is any resulting stains from the CA bleeding around the edges the scrapper allows for a very controlled removal.
I love these tools: https://www.micromark.com/Mini-Scrapers-Set-Of-4
After building my Sea of Galilea boat, I have a new found respect for CA glue and found that it really does help with planking... if used sparingly!
I, too, like to use a dot on each end of the plank with an occasional dot in the middle to help hold it in place... especially when clamps are not an option. I use wood glue between the dots!
 
HI CAN SOMEONE TELL ME THE SHELF LIFE OF SHELLAC. GOD BLESS ALL STAY SAFE DON
Hello Don.

The shellac shelf life is 6-9 months. Once dissolved in alcohol, shellac does not last more than 6-9 months at the most. Store mixture in a cool dark and dry area of your workshop. The ideal temperature is between 65-70 degrees F. Always dissolve shellac as and when needed.
 
THANKS JIM AND LYLE, WHAT DO I DISOLVE THE SHELLAC WITH AND THE PROPORTION. GOD BLESS STAY BSAFE ALL DON
Use Denatured Alcohol... the proportion will depend on you.
I highly recommend you Google Shellac mixing. It can explain the differences in proportions better than I can!
 
Back
Top